When you are managing your own Minecraft Server instance, you have the ability to customize the game how you want it to run. There are many configuration options that you can access from the Minecraft Game panel. For example, you can select settings such as the difficulty of the game, maximum world size, or log settings.
In this guide, we’ll show you how to access the configuration options for your Minecraft instance and go over the available settings.
Access Configuration Options
The first step when changing the configuration options is accessing them in your Game Management Panel.
- Login the Game Management Panel.
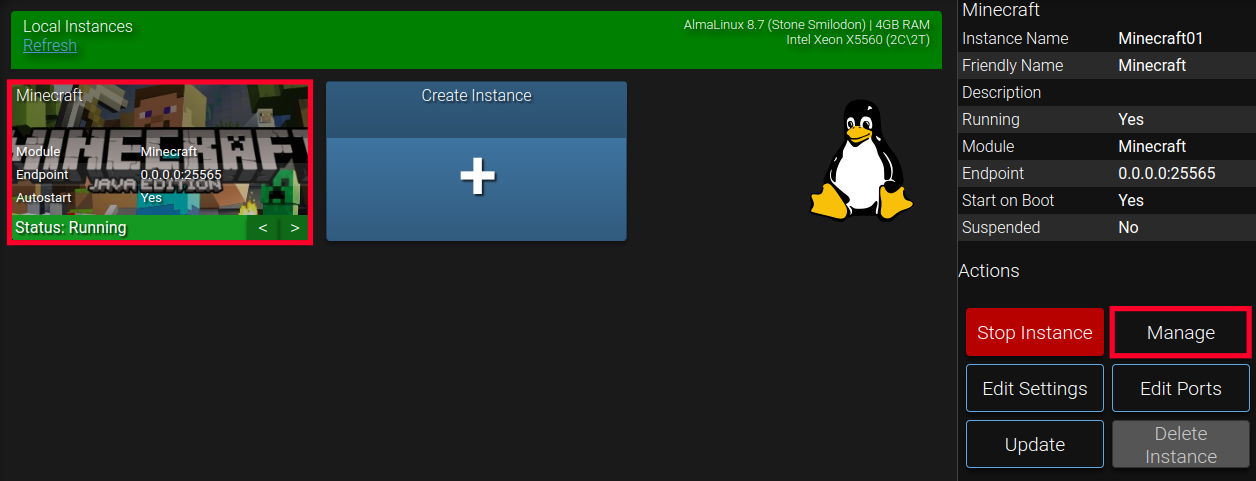
- Select your Minecraft instance then click the Manage button to the right.

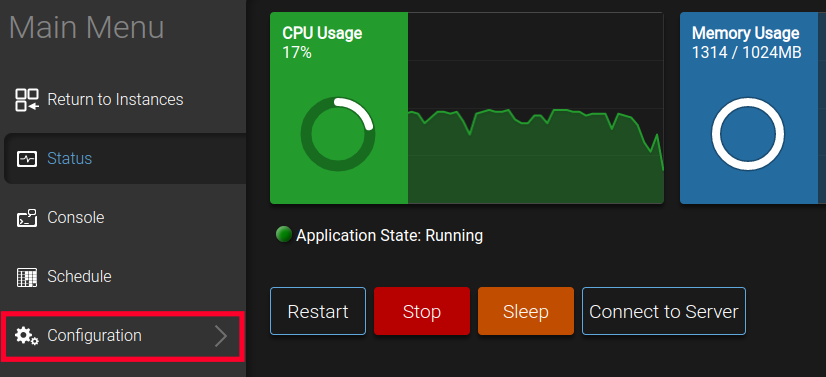
- In the main menu, click the Configuration link. You will then see the available Instance Configuration options listed on the left menu.

Available Configuration Options
Now that you know how to access the instance configuration options, we’ll go over the available settings.
Active Sessions
This section will list all recent users that have logged into the Game Management Panel and managed this instance. The following information will be included:
- Username
- Logged in at
- Last activity
- IP Address
- Device
Audit Log
The Audit Log section provides a running list of any modifications that were made to the Minecraft instance. For example, if I successfully login to the Game Management Panel and schedule a new weekly trigger, this will be logged with a Message showing “Authentication success” and “Adding interval trigger ‘Every Monday at 00:00’”.
The following information will be included in the log:
- User
- Timestamp
- Source
- Category
- Message

AMP Core
The AMP Core section is where many of the higher-level server settings can be modified. But, be sure that you know what you are editing before making changes
API Rate Limit
The API rate limit is where you set how many requests the Minecraft server can respond to in a single second. If any changes are made here, you will be prompted to restart your Game Management Panel.
Allow GET Method for API
Toggle this switch on if you want to allow API requests to be made using GET. This should only be used for testing purposes.
CORS Origin
Cross-origin resource sharing, also known as CORS, can allow a specific domain to make requests to your Minecraft Server. Enter the URL of the “controller” that the requests will be originating from.
Disable Compression
Toggle this switch on if you do not want your server to compress its responses. When you modify this setting, you will be prompted to restart your server.
Schedule Offset
If you have scheduled any triggers for your server (excluding event triggers) this will add or subtract time to when they will run. Enter a number in seconds in the available field, you can use a positive number to delay the trigger or a negative number for it to happen sooner. Changes will be saved immediately.
Startup Mode
Here you can select what you want your Game Management Panel to do when it starts. Choose from the following options:
- Do Nothing
- Update the application
- Start the application
- Update and then start the application
AMP Theme
AMP powers your Minecraft Game panel, and this is where you can choose how it will look by selecting the theme that is used. Default theme options are:
- Aura
- Black
- default

Branding
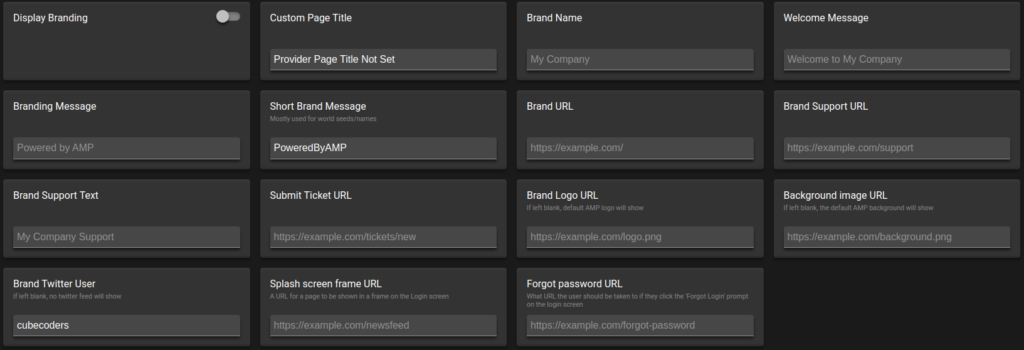
This area is where you can enable or disable branding on your Game Management Panel. If the Display Branding switch is enabled you can then enter the following information:
- Custom Page Title
- Brand Name
- Welcome Message
- Branding Message
- Short Brand Message
- Brand URL
- Brand Support URL
- Brand Support Text
- Submit Ticket URL
- Brand Logo URL
- Background image URL
- Brand Twitter User
- Splash screen frame URL
- Forgot password URL
Cloud Backups
If you are utilizing the 3rd party S3 storage from Amazon, it can be enabled and configured in this section. Once the option to “Use S3 Storage for Backups” has been enabled you can enter the following settings:
- S3 Service URL
- S3 Authentication Region
- S3 Bucket Name
- S3 Access Key
- S3 Secret Key
- S3 Upload mode (Upload all backups or Manual only)

External Services
This section is where you can configure SMTP and Pushbullet settings which can be used to send outgoing email messages or phone notifications from your Game Management Panel. Then you can enter the following setting:
- Use SSL for SMTP
- SMTP Server Address
- SMTP Server Port
- SMTP Username
- SMTP Password
- Email ‘From’ address
- Pushbullet Access Token
Note: You can use InMotion’s Email Configuration Tool to view your SMTP settings, you can use.

File Manager
Here you can set up Virtual Directories and Enable direct file transfers. See our full guide for more information on Using the File Manager in your Game Management Panel.
Gameplay and Difficulty
Use this section to adjust the in-game settings such as the difficulty and game mode, or whether you allow PvP, flight, monsters, animals, etc.
Force Game Mode
Enabling this will cause users that join using the “Game Mode” that is set in the next section instead of the one they were set to when they last logged in.
Game Mode
This is where you can set the default mode users who log into your Minecraft game server will automatically be set to. Keep in mind that this setting can be adjusted in-game. If you enable the “Force Game Mode” option, all players who changed their mode will switch back to this one when they log in. There are the settings you can select from:
- Survival
- Creative
- Adventure
- Spectator
Difficulty
Select how hard you want to Minecraft game on your server to be here. Choose from the following options:
- Peaceful
- Easy
- Normal
- Hard
Op Permission Level
An Op or Operator is like an Administrator within the game. They can have elevated privileges to change settings or grant permissions to other users. The higher the number the more power and permission an Op will have. You can choose from the following privileges:
- 1: Bypass spawn protection
- 2: Change game settings
- 3: Kick/ban/op players
- 4: Stop the server
Function permission level
Functions are commands that can be run on the Minecraft Game server and this is where you can set their permission level. Higher numbers have more privileges, and you can choose from the following options:
- 1: Bypass spawn protection
- 2: Change game settings
- 3: Kick/ban/op players
- 4: Stop the server
We recommend bookmarking our guide on Using the Minecraft Console.
Spawn Protection Radius
When using the Spigot plugin, this setting is how much “safe” space a user gets around the spawn point. The number is how many blocks of space a user gets.
Hardcore Mode
If you enable the Hardcore Mode option, any user that dies will be banned permanently from the server.
Allow Monsters
If this is enabled, monsters such as creepers and spiders will be allowed to spawn within the game world.
Allow Animals
Enable this option to allow animals such as sheep and chickens to spawn within the game world.
Allow NPCs
NPC stands for non-player characters and enabling this option allows other people to be spawned within a game.
Allow v.s. Player Combat (PvP)
Enabling this will allow player-vs-player fighting within the game world.
Allow Flight
Enable this setting if you want players to be able to fly while playing in the “survival” game mode.
Allow Command Blocks
A command block works along with Redstone and can be used to automatically trigger console commands. Enable this to allow them within the game world.
Player Idle Timeout Minutes
Here you can enter how many minutes a user can be inactive before being removed from the game.
Use Whitelist
If you enable this setting, only users that are “whitelisted” will be able to connect to your Minecraft game server.
Max Tick Time
According to the official Minecraft Wiki, “Minecraft’s game loop normally runs at a fixed rate of 20 ticks per second, so one tick happens every 0.05 seconds. An in-game day lasts exactly 24000 ticks, or 20 minutes. However, if the computer is unable to keep up with this speed, there will be fewer game ticks per unit time.”
If a tick takes too long to complete it may indicate an issue such as an unresponsive server. Here you can set how many milliseconds a tick can take before the server is stopped. For example, if this is set to 60,000 milliseconds, it would allow 60 seconds for a tick to complete. This is well over the typical 0.05 seconds that should be required and may indicate a problem.
Max Build Height
The number here sets how many blocks high a user is allowed to build.

Java and Memory
Here you can set a maximum memory limit for Java in Megabytes, create additional java arguments, and select a java version.

Monitoring and Metrics
Use this area to set the type of metrics that will be logged for your Minecraft server instance. This information can help you when monitoring usage or reviewing your research usage.
Multicore CPU Usage Calculation
If this option is disabled, the amount of CPU usage will be determined based on using a single core. Enable this if you are utilizing more than one core on your Minecraft server.
Ignore SMT Cores
Simultaneous multithreading or SMT is a method for managing multiple tasks on a single core. If this is enabled, the SMT is not taken into account and the usage will be based on the number of actual cores.
Console Scrollback Period
Here you can set in minutes how far back data will be included in the logs. Any changes to this setting will be saved immediately.
Full Process Metrics
Enabling this setting will result in your server collecting more detailed data on the tasks performed on your Game Management Panel.
User Friendly Process Metrics
Enabling this will cause the server to only log the actual memory that is used and will not include data that is stored/staged in the swap. This setting only works when “Full process metrics” are disabled.
Metrics Polling Interval
The number here is how often in milliseconds your Game Management Panel will update the metrics.

Performance and Limits
Here you can select the settings for things such as the maximum number of players allowed, server sleep options, and backup settings/limits.
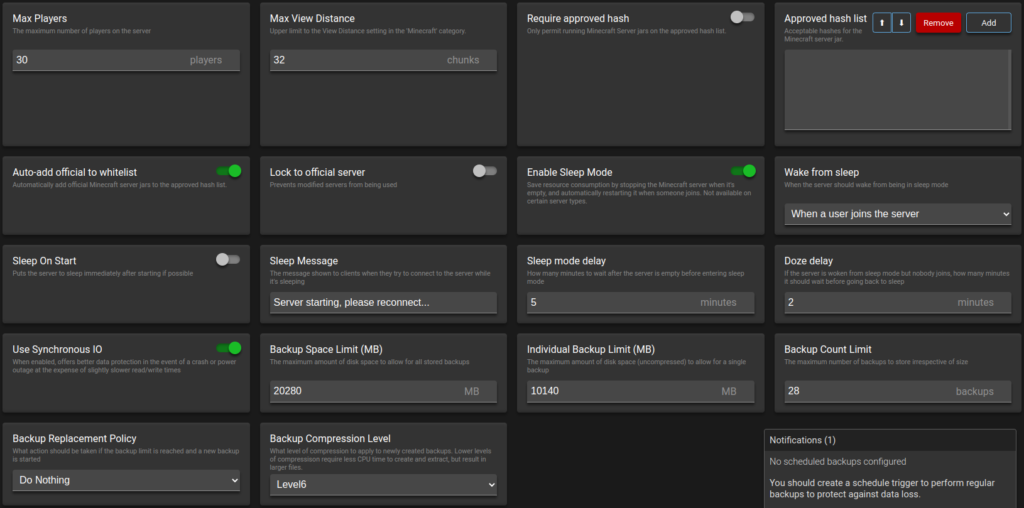
Max Players
Here you can set the total amount of users that are able to connect to your server at a single time. Reducing this number may result in better performance.
Max View Distance
This option sets how far a user can see when playing on the server. The number is set in chunks, which is a 16 x 16 area.
Require Approved Hash
If this option is enabled, users can only use Minecraft jars that are specifically listed in the “Approved hash list”.
Approved Hash List
Here you can add or delete specific hashes that are allowed to run. This list will only be valid if the “Require approved hash” setting is enabled.
Auto-Add Official to Whitelist
When enabled, official Minecraft server jars will be added to the approved hash list automatically.
Lock to Official Server
You can enable this option if you do not want to allow modified servers.
Enable Sleep Mode
When sleep mode is enabled, your Minecraft server will automatically stop when there is no one connected. When someone logs in, it will start back up. You can set how many minutes to wait before going to sleep in the “Sleep mode delay” section.
Wake From Sleep
If your Minecraft server goes to sleep, here you can choose when it will wake up. Select from the following options:
- Don’t wake automatically
- When the server is pinged
- When a user joins the server
Sleep On Start
Enable this if you want the server to automatically go to sleep when it is started.
Sleep Message
If a user tries to connect to your server while it is asleep, this is where you can enter a message that they will see.
Sleep Mode Delay
If the “Sleep Mode” option is enabled, this is where you can set how many minutes to wait before the server goes to sleep.
Doze Delay
Here you can set how long to wait in minutes when the server wakes up if no users connect.
Use Synchronous IO
If there is an issue with the server such as a crash, enabling this option can help recover the data. But, this can slow down the amount of time it takes to write or read data on the drive.
Additional Backup Settings
For more information, these settings are covered in our guide on Managing Backups on Your Minecraft Server.
Security and Privacy
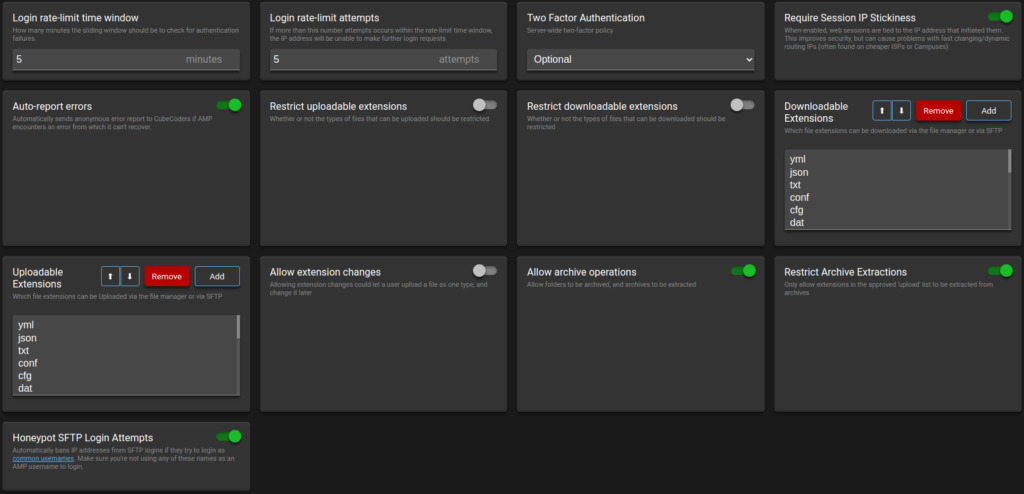
For more information, these settings are covered in our guide on Game Management Panel Security and Privacy Options.
Server Settings
This section is where you can select from a wide array of options for your Minecraft server instance.
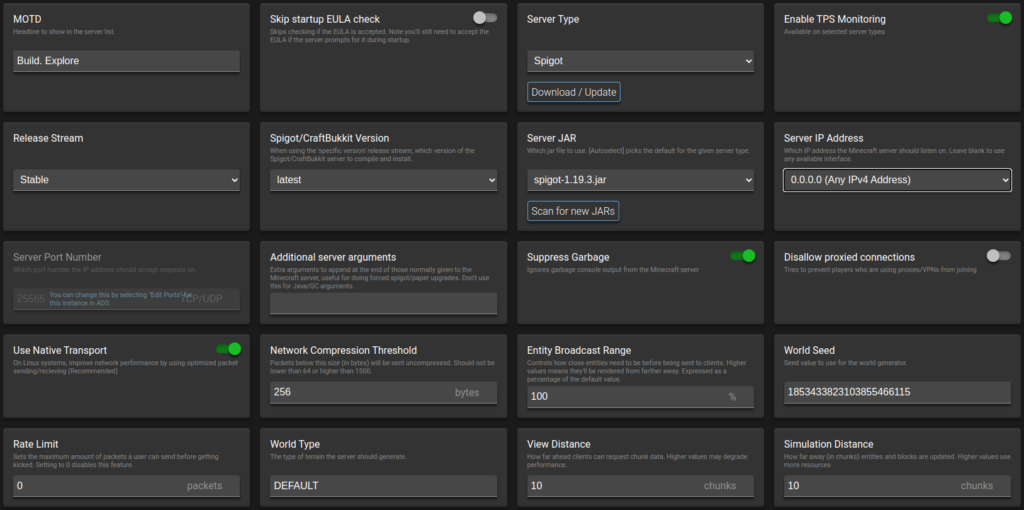
MOTD
The “message of the day” or MOTD will display when users connect to your Minecraft server. You can enter the text for the MOTD in the available field here.
Skip Startup EULA Check
EULA stands for “End-user license agreement” and if you check this box the server will not check if it has been accepted.
Server Type
Here you can select the type of Minecraft server that you will be running. You can also click the Download/Update button to get the latest version of the server. Here are some examples of the many server types that are available:
- Official
- CraftBukkit
- Spigot
- Cuberite
- SpongeVanilla
- Cauldron
- Tekkit
Enable TPS Monitoring
Checking this box enables the monitoring of ticks per second also known as TPS. This is only possible in some server types. If enabled you can run the following command for information:
/tps
Release Stream
Here you can specify which server releases you want to download and update. Choose from the following options:
- Stable
- Beta
- Development
- Specific Version
Spigot/CraftBukkit Version
Click the dropdown box to choose which version of Spigot/ CraftBukkit you want to install. Select the latest option or a specific version.
Server JAR
In this section you can click the drop down menu and select the specific JAR file that you want to utilize. You can also click the Scan for new JARs button to refresh the list.
Server IP Address
Here you can choose which server IP address the server should monitor or listen on. Choose from the following options:
- 127.0.0.1 (Loopback (IPv4))
- ::1 (Loopback (IPv6))
- 123.456.78.910 (venet0:0)
- :: (Any IPv6 Address)
- 0.0.0.0 (Any IPv4 Address)
Server Port Number
For more information, see the section on Editing Instance Ports on our instance management guide.
Additional Server Arguments
According to AMP, “Extra arguments to append at the end of those normally given to the Minecraft server, useful for doing forced spigot/paper upgrades. Don’t use this for Java/GC arguments.”
Suppress Garbage
Enabling this option will cause the server to disregard any useless output from your Minecraft console.
Disallow Proxied Connections
If this option is enabled, your server will attempt to stop users from connecting if they are using a VPN or proxy.
Use Native Transport
It is recommended that you enable this in order to take advantage of “optimized packet sending/recieving”.
Network Compression Threshold
Here you can set in bytes what size a packet needs to be in order to compress them.
Entity Broadcast Range
All items that move within the game are considered entities. You can increase this percentage value for them to be rendered at a greater distance, or decrease it for them to be rendered once they are closer to the player.
World Seed
You can enter a number here that can be used when a new world is randomly created.
Rate Limit
This option will set a packet limit that will remove game users when they reach that limit. Set it to 0 if you want this setting disabled.
World Type
Select the terrain of the world that is created here. You can choose from the following options:
- DEFAULT
- FLAT
- LARGEBIOMES
- AMPLIFIED
- CUSTOMIZED
- biomesoplenty
View Distance
Here you can set how far a user can see based on chunks. A chunk is a 16×16 area but keep in mind that it can affect your server performance the higher the value goes.
Simulation Distance
Enter the distance from a play that chunks will be formed. Once again a chunk is a 16×16 area.
Hide Online Players
Enable this setting if you do not want users to see a list of players that are currently connected to the Minecraft server.
Enable Status
When enabled, users will see whether the server is online or offline. If you disable this setting, the “Sleep Mode” setting will also be disabled and the server will be listed as offline until any users login.
Allow Analytics
Enable this setting if you want to share server information with Mojang Studios, the developers of Minecraft.
Level Name
Here you can click the drop-down menu and select the name of the world that should be loaded when the server starts. You can also click the “Scan for new worlds” button to refresh the list.
Maximum World Size
Here you can enter the block value for how large the Minecraft world can be.
World Generator Settings
If the “Flat” option is selected for the “World Type” settings, you can enter presets here for the world. There are flat world generators available online that can help you build this code value.
Generate Structures
If this is disabled, structures such as temples, villages, pyramids, etc. will not be created.
Enable ‘The Nether’
Enabling this setting will allow users to access the Nether dimension by using a portal.
Require Resource Pack
If you enable this, it will force users to download a specific resource pack in order to connect to your Minecraft server. You can enter additional “resource pack” options in the next three settings.
Resource Pack Prompt
When the “Require Resource Pack” option is enabled, this is where you can enter a message that will display when people try to connect and do not have the resource pack. You can use JSON syntax in this field.
Resource Pack URL
Here you can enter the address of a zipped resource pack that can be downloaded and used.
Resource Pack Hash
Enter SHA1 hashing here for your resource pack if you want to use it to confirm it’s valid.
Restart on Errors
When enabled, a “severe” message will automatically trigger the server to restart.
Use Synchronous Chunk Writes
Enable this option if you want chunks to be saved using a different thread from what the game server is utilizing.
Congratulations, you should now be familiar with the configuration options for your Minecraft instance. Check out our Minecraft section for more helpful tutorials.
