When you first purchase your Minecraft Server hosting account it will be set up and ready to work, but there may be times when you want to use custom networking options. For example, if you have multiple instances and are accessing them using the hostname, you can change the port for each instance to allow users to access them. Such as:
vps91249.inmotionhosting.com:25565
vps91249.inmotionhosting.com:25564
In this guide, we’ll show you how to access and change the networking options for your Game Management Panel.
- Accessing Your Networking Options
- Changing Networking Options
- Port Assignment Mode
- Application Port Ranges
- Application Port Exclusions
- Remote Instance Access Mode
Accessing Your Networking Options
Navigating to your networking configuration page is the first step in changing the setup of your server. After showing you how to access the networking options, we’ll go over the settings that can be changed.
- Login to your Game Management Panel.
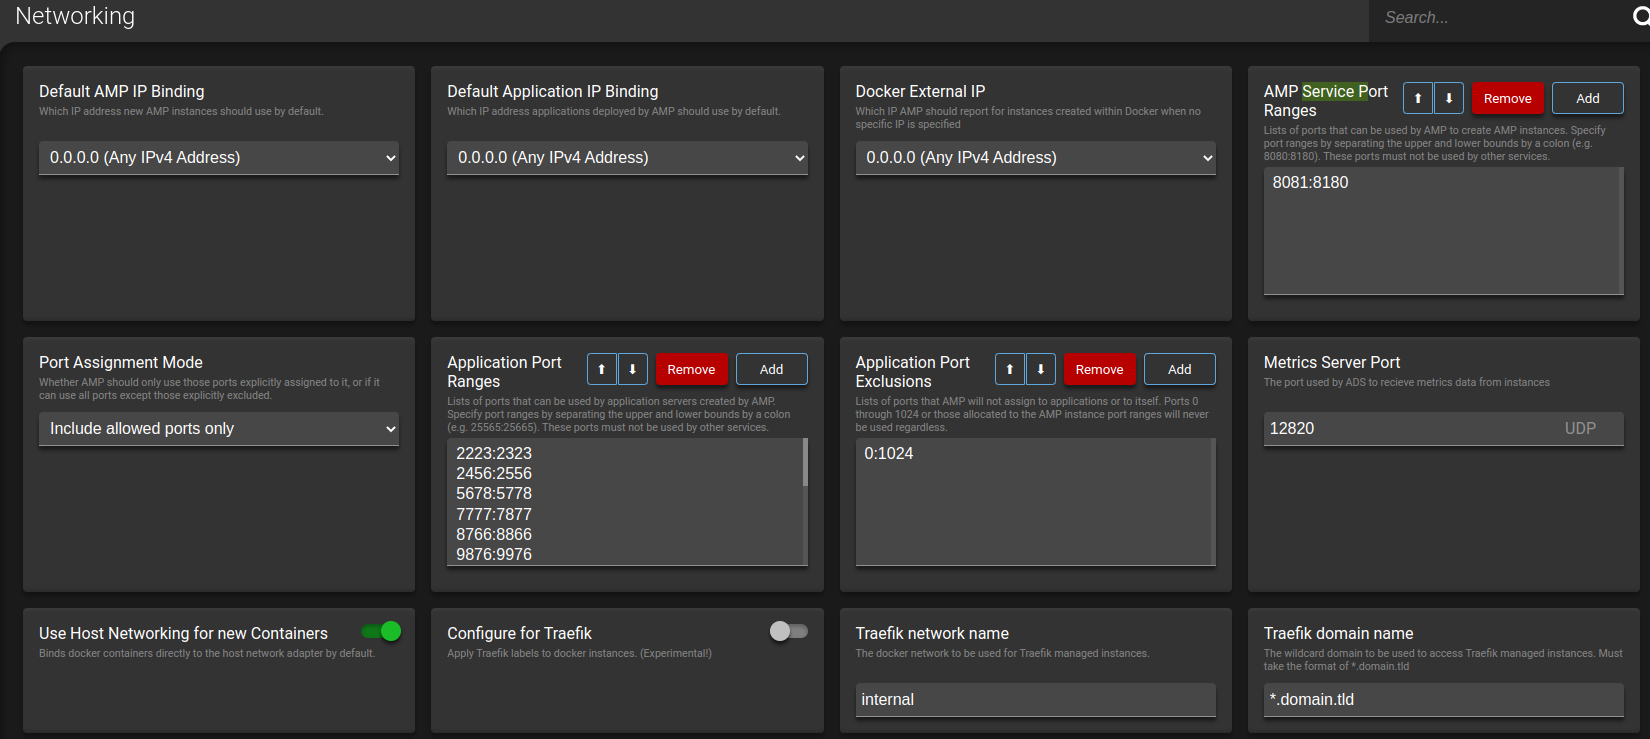
- Click Configuration in the main menu, then Networking. You will then see the available Networking options.

Changing Networking Options
Now that you know how to access the networking options, we’ll explain what options are available and how to change them.
Note: Changes will be saved immediately when you modify them.
Default AMP IP Binding
This section is where you set the IP address new instances will use by default. The available options should look similar to this:
- 0.0.0.0 (Any IPv4 Address)
- :: (Any IPv6 Address)
- ::1 (Loopback (IPv6))
- 127.0.0.1 (Loopback (IPv4))
- 123.456.78.910 (venet0:0)
Default Application IP Binding
Here you can select which IP address any applications that are deployed will automatically use.
- 127.0.0.1 (IPv4 Loopback)
- 123.456.78.910 (venet0:0)
- 0.0.0.0 (Any IPv4 Address)
AMP Service Port Ranges
In this section, you have the ability to add, remove or reorder the service port ranges used by your Game Management Panel when new instances are created.
Change Service Port Range Priorities
You can click the arrows to move the priority up and down.
Removing a Service Port Range
Click the Remove button to delete a port range immediately.
Add a Port Range
Depending on your setup, you have the ability to add additional port ranges.
- Click the Add button.
- Enter the beginning port range followed by a colon (:)
- Enter the ending port range.
- Click the OK button to save your changes
Port Assignment Mode
Here you can choose to use only ports that are allowed or any port unless it is specifically excluded. The allow/excluded ports are set in the Application Port Ranges and Application Port Exclusions sections that follow.
Click the dropdown box and choose from the following options:
- Include allowed ports only
- Allow all except excluded
Application Port Ranges
Here you can reorder, remove or add port ranges for any application servers generated by your Game panel.
Application Port Exclusions
In this section, you can Add IP ranges that you do not want to allow to be used for applications. Ports 0 to 1024 are automatically added here since they are used by your Game Management Panel. For more information, see the section on how to reorder, remove or add port ranges.
Remote Instance Access Mode
Your Game Panel can communicate with your Minecraft server instances using several different methods. You can choose from the following options, check out the official documentation for more information.
- Via Target
- Direct from Controller
- Bypass Controller
Congratulations, now you know how to access and change the network settings for your Game Management Panel.