
The Managed WordPress UltraStack VPS is the production environment for your WordPress website. It’s been fine-tuned for performance and lean speed. We’ve removed all the bloatware that traditional managed VPS environments may have – there’s no control panel software or no email server – only the services you need for a screaming fast website.
In their place, you manage your server from Platform InMotion, which uses API-driven Ansible Playbooks to talk to your server, make updates, and ensure steady operation. In this guide, you’ll learn what UltraStack is, and how to perform basic tasks on your UltraStack VPS, troubleshoot common issues, and get the most out of your new server.
What is UltraStack?
In short – UltraStack is the result of years of research and development by InMotion’s WordPress and Linux experts to give you the highest-performing Managed WordPress VPS on the market today.
Here’s a high-level overview of the server’s stack.
Container
Your VPS has dedicated resources, meaning neighboring servers should never impact your server’s memory or CPU limits. We’ve also removed all of the unnecessary services and software, such as email, control panels and other services not related to delivering your website.
The container uses the best features of LXC (Linux Containers) and Virtuozzo hypervisor management to ensure that you always get the power your VPS has available. We also employ advanced service monitoring to ensure that any time an issue does occur, recovery is fully automated.
Operating System
UltraStack VPS is currently based on CentOS 7, the latest enterprise-stable version of CentOS. We’re actively researching alternatives to CentOS, including RHEL-based distros like AlmaLinux, and Debian-based distros like Ubuntu.
The good news is that you’ll almost never have to worry about the Operating System’s quirks, since we manage software and security updates via Ansible.
Storage
Your VPS uses state-of-the-art NVMe Solid-State (SSD) hard drive devices, which offer significant read/write speed improvements over older SATA and PCIe protocols.
Apache
At the most basic level, your website runs on the venerable Apache web server, the most well-documented and stable web server on the market today. We’re actively researching alternatives like the LiteSpeed web server, but for now we’re sticking with Apache because of its familiarity of configuration (such as the use of .htaccess directives) and FOSS (free, open-source software) philosophy.
NGINX Proxy Cache
While Apache handles the actual execution of your website’s code, it actually serves that content to your NGINX proxy, which in turn serves your visitors with a dynamic page cache that prevents Apache from using too many resources during high traffic.
You’ll be able to fine-tune your proxy cache, or use our experts’ predefined caching profiles that have been designed to meet different use-cases, from dynamic WooCommerce shops and Forums to mostly static sites like blogs and brick-and-mortar businesses, and even disabling the NGINX proxy to pass all requests to your Apache server.
PHP-FPM
PHP-FastCGI Process Manager is the fastest and most secure PHP handler on the market today. Using isolated pools and workers for Opcache and bytecode caching, our engineers have tuned the PHP configuration for the most performant settings out-of-the box.
Redis Persistent Object Cache
UltraStack Virtual Private Servers with sufficient memory resources come pre-loaded with Redis, an in-memory cache of your most common PHP objects and pages. By storing this cache in RAM rather than on disk, the latency is reduced even further.
Brotli Compression
After all of the performance optimizations further down the stack, all responses are compressed using the Brotli lossless compression algorithm originally developed by Google engineers for the WOFF web font file format. Brotli is around 15-20% more efficient than gzip for JavaScript, HTML, and CSS files, and is supported by over 96% of browsers.
Cutting your files down in size means faster loading times for your visitors and for Google’s Core Web Vitals assessments.
Working with your Managed UltraStack VPS
Your server is set up out-of-the-box to work well with the majority of WordPress site configurations. If you need to customize anything, here’s how to do it.
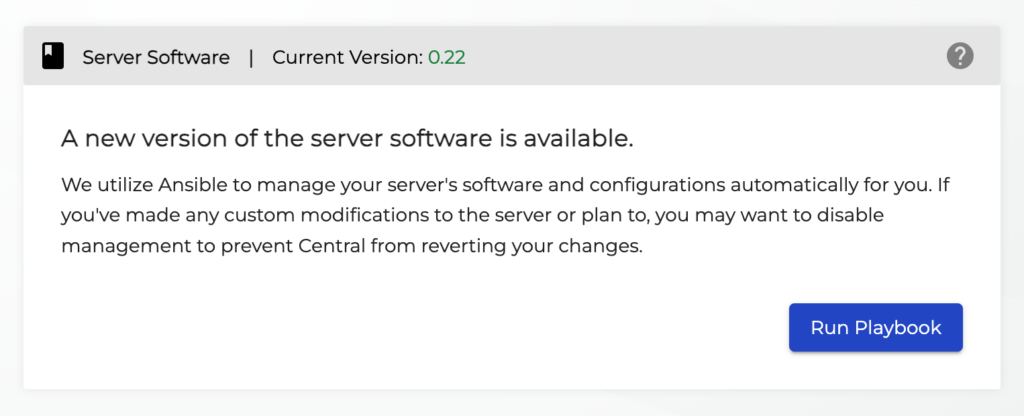
Run/Upgrade Playbook
Most unforeseen issues with your VPS can be resolved by re-running the Ansible Playbook. This process ensures that your site is running, all services are up, SSLs are configured, and your Central Connection is intact.
Before you upgrade your playbook, it’s a good idea to take a Server Snapshot so you can easily revert in case of unforeseen problems. Navigate to UltraStack VPS > Tools > Manage Server and click on Server Snapshots to make a “save point” you can revert to in case of problems.
Navigate to UltraStack VPS > Tools > Manage Server and scroll down to Server Software to see the current and latest versions of the server playbook, and click Run Playbook to begin the process. Allow the process to run for a few minutes, and check if the issue has been resolved.
Change PHP Settings
Navigate to UltraStack VPS > Tools > Optimize > PHP Settings where you’ll be able to change your PHP version, and change common configuration (php.ini) settings.
Stop, Start, and Restart Server
Navigate to UltraStack VPS > Tools > Manage Server to find controls to stop, start, or reboot your container.
Add SSH Key
Navigate to UltraStack VPS > Tools > Manage Server and click on Add SSH Key to enable shell and sFTP access to your server. Follow this guide to generate an SSH key from a Mac, Windows, or Linux computer.
Updating Your Site URL
Set the Site URL to any domain you’ve added to your project’s domains area.
- Navigate to the project you are working on.
- Click on Manage next to your UltraStack VPS.
- Click on Site URL from the sidebar menu.
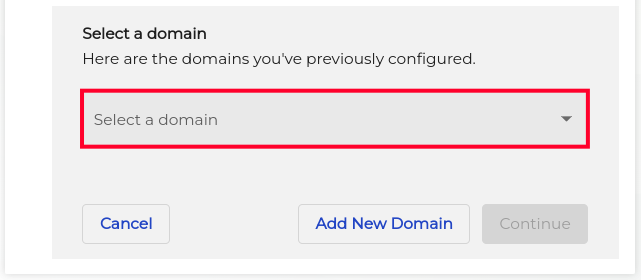
- Click the Add Domain button.
- You can then select a domain from the drop down menu.
 If your domain has not been added yet, click the Add New Domain button. For more information see our full guide on Adding a Domain to Platform i. Once your domain has been added you can proceed to the next step.
 - Click the Continue button.
- You will then have the option to create a Subdomain or click Continue Without Subdomain.
- Finally, click the Apply Site URL button.
You are finished when you see a message stating “Your site is live!”
Troubleshooting Common Issues
SSL Certificate
In some cases, your SSL certificate may not have been issued when the server was set up. Most often, this is caused by our playbook trying to set up the certificate before DNS propagation has taken effect. Normally, your server will fix this automatically when it detects DNS propagation and will re-run the SSL playbook when your domain is resolving, but occasionally you may want to run it manually.
Common issues resulting from a problem with your SSL are:
- Browser warnings when navigating to your website
- Platform i reports a “Connection Issue” when previewing your site, or accessing your WordPress Dashboard
To run the SSL playbook manually, navigate to UltraStack VPS > Site URL and go through the steps to set your URL. Optionally add a subdomain like www, and click Apply Site URL to start the playbook for your domain. This will assign an SSL certificate to your domain, as long as the DNS is resolving to your UltraStack VPS.