When you’re getting started with your new UltraStack WordPress VPS on Platform InMotion, you have two options to begin with:
- Migrate Manually
- Start from Scratch
Migrating Manually is the most reliable way to get your website transferred to Platform InMotion. Use this option, and Platform InMotion will install a fresh copy of WordPress on your VPS, and you’ll be able to transfer your site’s files and data using a number of tools, including plugins, sFTP, or other command line options.
In this guide, you’ll learn how to determine if you need to perform a manual migration, and the steps to migrate your site manually.
How to Migrate Your Site Manually to Platform InMotion
- After your new VPS has finished provisioning, you’ll see the Get Started button in your project.
- Click on Get Started, and choose Migrate Manually.
- Click on Continue, and you’ll find a blank WordPress installation with the current default theme and posts, also known as a “Hello World!” WordPress site.
- Proceed with your Manual Migration using one of the options below, or your own preferred method of transferring sites.
What Options Can I Use to Migrate My WordPress Site Manually?
There are many ways to transfer your site manually. Here we’ll cover a few, and if you’d like to learn more, check out our Ultimate Guide to WordPress Migration.
There are three major components to a WordPress website— the Files, the Database, and the domain name. First, we’ll cover Files and Database, and later, we’ll cover moving your domain name and Site URL.
Migrating WordPress Files and Database with a Plugin
We have detailed instructions for migrating your site using various plugins. Check the following links to learn more about each one.
Migrating WordPress Files and Database via Command Line
There are several command-line utilities that you can use to migrate your site between two servers. First, you’ll need to set up SSH access to your WordPress VPS. Check the following links to learn more about each one.
Note: Your UltraStack VPS does not include an FTP service. Plain FTP is an insecure method of transferring files to and from your server. Only sFTP, which runs over the Secure Shell protocol, is included.
Exporting and Importing Databases with WP-CLI
While you can use PHPMyAdmin or MySQL command line utilities to import and export your database, one of the easiest ways is to use WP-CLI, the WordPress Command Line tool. On your origin server, use the following command:
wp db export <filename.sql>Then, transfer that file using one of the methods above, and use the following command on the destination server to import the database:
wp db import <filename.sql>Exporting and Importing Databases with MySQL Command Line
If your hosting provider doesn’t have WP-CLI installed on your server, you can alternatively use MySQL, this just means you’ll need to do a little research to find your database name, username, and password. Luckily these can all be found in your site’s wp-config.php file.
To find them, SSH into your server, and navigate to the document root with the cd command, in this example in /home/username/doc_root. Then, use the following command to print and search the file for the phrase “DB_” which will provide all of the necessary credentials.
cat wp-config.php | grep DB_
username@server:/$ cd /home/username/doc_root
username@server:/home/username/doc_root$ cat wp-config.php | grep DB_
define( 'DB_NAME', 'username_exampledb' );
define( 'DB_USER', 'username_dbuser' );
define( 'DB_PASSWORD', 'password' );
define( 'DB_HOST', 'localhost' );
define( 'DB_CHARSET', 'utf8' );
define( 'DB_COLLATE', '' );
In this example, you can see the Database Name, User, and Password at the top of the results. Now, you can run the following command to export your database, substituting your credentials and preferred filename:
mysqldump -p -u username_dbuser username_exampledb > filename.sqlYou’ll be prompted to enter the password, and the export will run.
Likewise, you’ll need to search your wp-config.php file on your Platform InMotion UltraStack VPS. On your new VPS, your wp-config.php file will always reside in /home/wordpress/doc_root, and the database name and username will always both be “wordpress.”
Once you have the credentials, import the database with the following command:
mysql -p -u wordpress wordpress < filename.sqlEnter the password when prompted, and then reconnect your site to Platform i.
Previewing your Site After Migrating Files and Database
After you’ve imported your database, you’ll likely need to manually set the Site URL and Home options to use your temporary domain name. If you’d prefer to move your Domain Name DNS to your new site without previewing, skip this step and proceed to the next section.
Using WP-CLI is the easiest method to preview your site on your Temporary URL. Connect to your server via SSH, and use the following commands, making sure to substitute your VPS’s unique address for the placeholder below:
`wp option set siteurl <https://vps###.inmotionhosting.com>
wp option set home <https://vps###.inmotionhosting.com>`
Migrating your Domain Name Using Platform InMotion
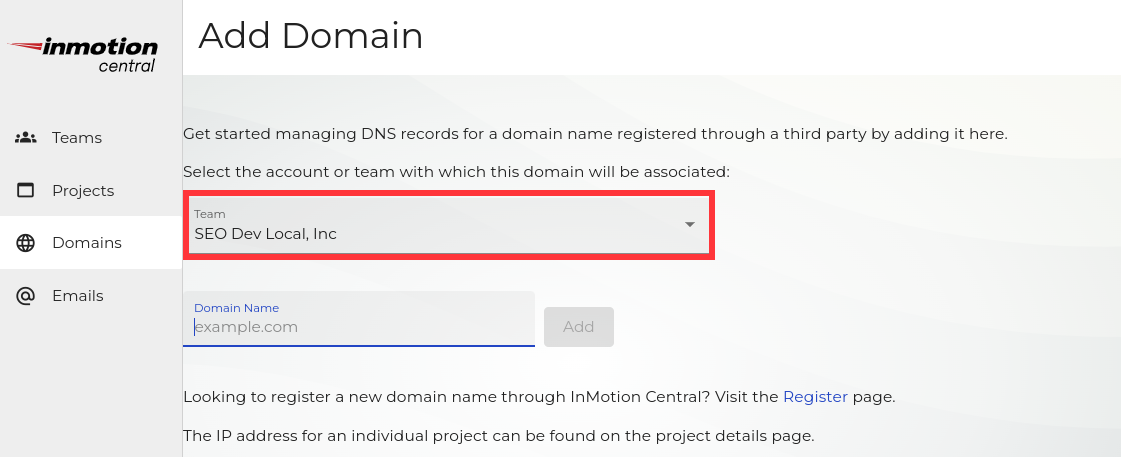
You can manage your domain name directly from your InMotion Central Dashboard by setting the Nameservers of your domain to ns1.inmotionhosting.com and ns2.inmotionhosting.com. Then, use the Domains tool to add your domain to your Platform i account. Be sure to select the correct team for your project.
Migrating your Domain Name Using Third-Party DNS
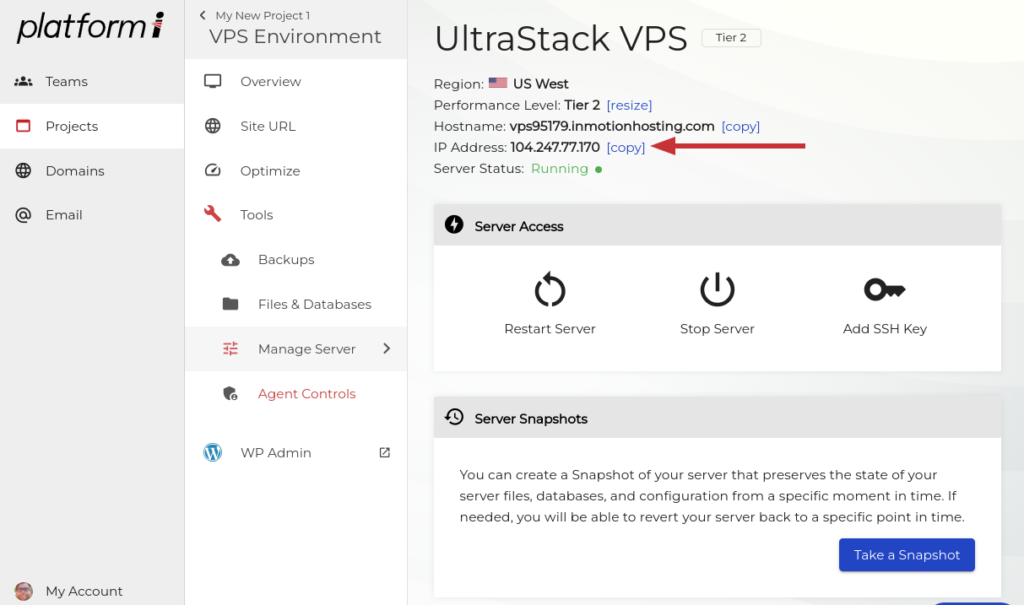
If you’d prefer to continue using the DNS Provider you currently have, simply set the main A Record to the IP address found in the Manage Server section of your VPS.

Setting the Site URL on Platform InMotion
The final step of your migration is to set the Site URL of your website to correspond with the actual domain name you use.
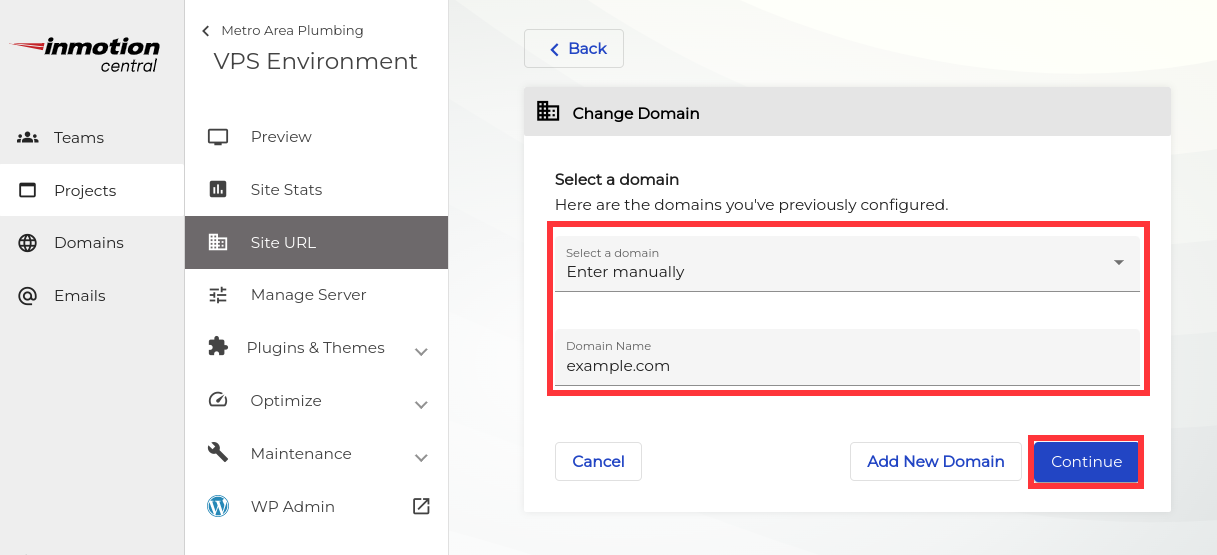
- Click Site URL in your project, and click Change Domain.
- Select your domain from the drop-down list of domains owned by your project’s team, or enter your domain name manually, and click Continue.

- Wait a few minutes while your server is updated, and your Manual WordPress Migration is Complete!