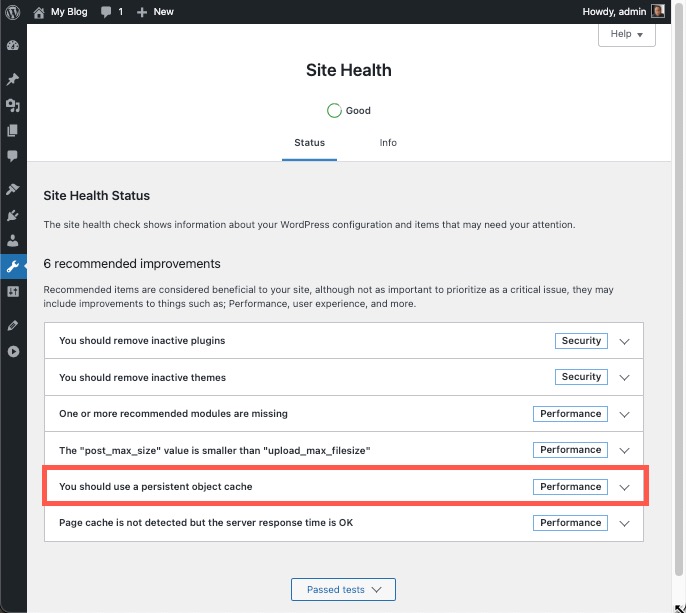
A common site health message WordPress displays for users is the recommendation to use a persistent object cache. There are generally two common solutions to this issue: Redis or Memcached.
This article will guide you in using Memcached to provide the caching solution that WordPress is recommending. We will walk you through its installation and configuration.
What is a Persistent Object Cache?
A persistent object cache is a server-side caching service that saves query results to a database. This type of caching improves database performance by reducing the number of queries the WordPress database processes.
This reduces CPU and memory resource usage on the server. You can tell your WordPress site is not using persistent object caching when you look at Site Health in your Tools menu:

If your site is static and you do not have a lot of interaction with your viewers, then a caching solution like W3 Total Cache without Memcached will be sufficient.
How to Install Memcached
The installation of Memcached requires that you have root access on a VPS or dedicated server. Using Memcached will require a server-side install and then a plugin in WordPress. The server installation will need to be done through SSH. The plugin will be used to configure how WordPress will use Memcached caching.
Server Side Installation
The installation command for CentOS 7 is as follows:
# yum update
# yum install memcached
CentOS 7 will eventually be replaced with another Linux-based solution like Alma Linux. If you have opted to upgrade the server Linux system, then use this command:
apt -get install memcachedIf you’re using a different flavor of Linux, then check your documentation for any installation differences.
Secure the Memcached Installation
The options setting must be changed to secure the Memcached installation so that only your local machine requests (your server) are listening to requests. You can use vi or nano to edit the file.
- After you have finished this installation, you will need to install tools to properly secure the Memcached installation.
#yum install libmemcached - Edit the configuration file for Memcached.
#vi /etc/sysconfig/memcached.conf - Change the OPTIONS line so that it is set as follows:
OPTIONS = "-l 127.0.0.1 -U 0" - Restart the Memcached service to apply the configuration changes.
#systemctl restart memcached#systemctl enable memcached
Plugin Installation – Using W3 Total Cache

You can use a WordPress plugin to use Memcached. We recommend using W3 Total Cache. See our guide for instructions on using W3 Total Cache.
- Log in to your WordPress Administrator Dashboard.
- Click on Plugins.
- Click on Add New.
- In the search field, type in “W3 Total Cache“
- Click on the Install button.
- Click on the Activate button.
Configure W3 Total Cache to Use Memcached
Once you have installed and activated W3 Total Cache, you must configure it to use Memcached.
- Click on Performance in your WordPress Administrator Dashboard menu.
- If you have just installed W3 Total cache, click on Skip.

- Click on General Settings.
- Under Page Cache, check that it is set to Enhanced. It should be set by default.
- Find the Database Cache section and click Enable.
- After that, click on the drop-down box for Database Cache Method and select Memcached.

- Click on Save Settings & Purge Cache.
- Next, go to Object Cache and select Memcached from the drop-down for Object Cache Method.
- Click on Save Settings & Purge Cache.
Once you have configured W3 Total Cache (or another plugin), your WordPress site is set to use Memcached. You can find more information by going to the Memcached wiki.
Using a persistent object cache improves your WordPress page load times by using previously saved queries. This is especially helpful when experiencing heavy traffic spikes on your site.
A good example of where using Memcached is an excellent solution for your caching needs is a large eCommerce site with many products and registered users. The caching aids the site performance by saving common queries for products and menus that help to reduce your resource consumption.
Check out our WordPress Educational channel for many other useful tips and tutorials!

there a typo in step two of memcache install above. it reads “#vi /etc/sysconfig/membached” <–with a "b"
i am trying that step with the correct spelling but i am not getting any responses in terminal.
Hello Oscar – thanks for pointing out that typo. I took a look at the command again and realized that it had more than 1 typo. It has been corrected – my apologies for the frustration with it. Here’s the correct command: #vi /etc/sysconfig/memcached.conf