IMAP folders may need to be manually assigned to a Mac Mail account in order to synchronize properly. The assigning of these folders is also known as Subscribing to IMAP folders. The following article explains how to find and configure this setting within the Mac Mail client.
NOTE: This article applies to Apple Mail used in OSX Mavericks (2013).
How to Add Folders to the Subscription List in Mac Mail
- Open your Mac Mail client.
- In the top left corner, click on MAIL in the menu bar, then select Preferences.
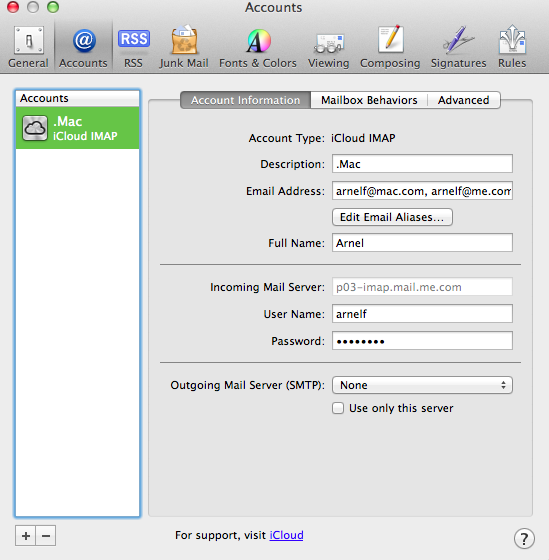
- Click on the Account Information

- Make sure that the first item is checked off. It should read: Enable this account.
- Next, click on the Advanced tab and click on the checkbox that reads Include when automatically checking for new messages.
- Close the Accounts window, then under the MAILBOXES column on the left-hand side control-click (or right-click) on the INBOX icon.

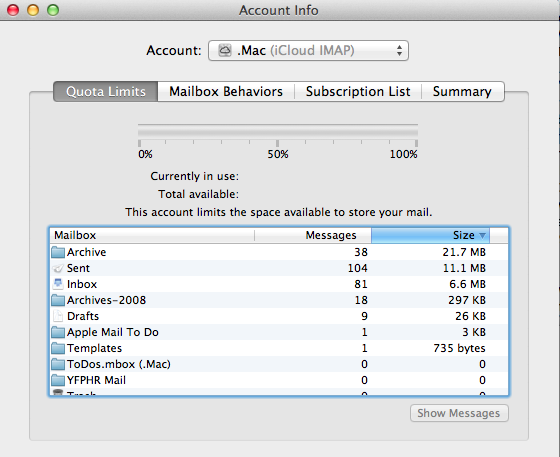
- Click on GET ACCOUNT INFO. You will see an ACCOUNT INFO window pop up like the one in the screenshot on right. Click on SUBSCRIPTION LIST. You will see the list of folders that are subscribed or not subscribed for synchronization with your IMAP account. You can select the folder and SUBSCRIBE or UNSUBSCRIBE with the buttons at the bottom left of the screen.
- Close the ACCOUNT INFO window, then click on MAILBOX in the menu bar at the top of the screen.
- Click on Take All Accounts Offline. Wait for it to go offline, then click on Take All Accounts Online to complete the changes.
If you are looking for information on setting up the Apple Mail Client, please go to How to Set up Mac Mail. Also, for further information on email in general, check out our Email Category page in the Support center.
Subscribing to IMAP Folders using Mac Mail
In order to use IMAP folders for the Mac email client, you will need to set the IMAP Path Prefix and select the IMAP folders that Apple Mail will use. The instructions for these steps are found below.
How to Enter the IMAP Path Prefix
- Choose Preferences in the Mail menu.
- Click on Accounts.
- Click on the Advanced tab.
- Type in INBOX in the “IMAP Path Prefix” field.
Selecting the IMAP folders for Sent, Drafts, Junk, and Trash
- Select and then click on the IMAP folder you would like to use: Sent, Drafts, Junk, or Trash.
- Click on the Mailbox menu.
- Choose the corresponding mailbox that you would “Use This Mailbox For”.
Repeat these steps for any other folders you wish to store on the server.


I am having this same problem and I don’t have the “mailbox behaviors” option?
That is definitely unlike the expected behavior we usually see in the Mac Mail client. However, it looks like some other Apple users have reported a similar error. I found some information in this forum that may be helpful to you.
i have a similar issue, the quotas tab shows all the folders, but if I change the prefix to INBOX all the folders disappear, if I set it blank or to / the mail folders all are there, the quota tab has all the folders, but the subscriptions tab is always empty. Is there a selection that I am missing?
Hello TJ,
I had missed that step. I’ve ran through the instructions again with the INBOX mapping step. It resulted in my Quota tab only having Inbox listed and the subscription tab was still blank. After removing the INBOX IMAP Path Prefix… all my folders showed up. Not sure what’s up with that, but yay folders!
Best,
Danielle
Hello Danielle,
That is weird but the important thing is that it is working for you now. Please let us know if you have any further issues.
Best Regards,
TJ Edens
Hello! For step 7, when on the Quota Limits tab, I do see all my folders… but when I switch to the subscription list tab, there is no option to un/subscribe from any folders. The subscription tab has nothing listed. What am I missing?
Hello Danielle,
Have you already set your IMAP Path Prefix as that is required before Mac Mail will show folders you can subscribe to.
Best Regards,
TJ Edens
I don’t mean to go backwards through the hedge here but I have a question:
I just migrated from my macbook pro to a new imac. I use apple mail and have 4+ imap enabled gmail accounts in apple mail. I have lots of folders that I have created in apple mail to save client emails. etc.
Is there a way to sync these folders across both my macbook pro, desktop and ipad so that if I am traveling, all my mail folders will be in sync? I would like to have the same mail interface, same folders with the same emails across all devices.
Is that even possible?
Thank you for your time,
VT
Hello Valerie,
Thanks for your question about the email folders. If you have created folders in your IMAP, then you should be able to subscribe to them on your iMac and your MacBook Pro. This will allow you to the same set of emails on either the laptop or your desktop. The server retains the copies of the folders and the mail that exists within them. So, when you subscribe to the folders, your mail clients on both the iMac and Macbook Pro should be synchronizing with those emails.
I hope this helps to answer your question, please let us know if you require any further assistance.
Regards,
Arnel C.
Hi Scott
I had to reformat my MacBook Pro. I configured my Mail with the help of my web server, all went well. But I don’t have my folders, about 20, synchronized. I followed you instructions in you article, very well writtent btw, but I don’t see any of my folders in the Subscription list, it is empty! I know they are on my web server, as I can see them when I access my mail accoutn via a webmail address.
And I have the same problem with the Sent box!
Could you help me with this?
Thanks
Georges
Hello Georges,
Thank you for contacting us. The instructions above are specific to our hosting, such as when we use “INBOX” in the “IMAP Path Prefix” field.
If you are not hosted with us, I recommend checking with your email host, to see if they have a different “IMAP Path Prefix.”
If you are hosted on our servers i recommend contacting Live Support so they can assist you in troubleshooting further.
Thank you,
John-Paul
Thanks Mr Amel,
I have change the settings as instructed but still it has not reported the recents sent items email. It stops on the sent items for Wednesday. Where could it has stored the sent items since wednesday 30/09/2015 till date.
Any advise will be very much appreciated.
Lawrence
Hello Lawrence,
Do you have any other devices connecting to the email account? If you log into your webmail can you see the items send since Wednesday?
Kindest Regards,
Scott M
I have the same issue as Jackie. The Sent email on my MacBook does not show up on my iPad email. Nothing shows up on the Subscription tab for me to Subscribe/Unsubscribe.
Hello Scott,
Sorry you’re having problems with the email on your iPad. Each device that you use needs to have the subscribe option selected in order to get SENT emails. It’s not done in one place. I just added an email account to my iPad so that I could see my test emails, then I had to go to EDIT the account in order to add SENT folder to to it. This is the way you do it:
And that should do it! I’m thinking of making this a separate tutorial since others have had issues with it. If you have any further questions or comments, please let us know.
Regards,
Arnel C.
Thank you Arnel C. for updating the article. That was helpful. I am now able to receive emails again. It’s strange though – when I tried to get the subscription list, nothing showed up. I saw a spinning circle in the lower left hand of that screen saying it was retreiving, but nothing populated the subscription list area.
So my initial issue is still not resolved…. I do not have access to emails I sent using my old laptop…. is this a result of not being able to see the subscription list or something completely different?
Hello Jackie,
The old laptop will also need to be subscribed to the sent folder as this is not done by default. Subscribing Sent folders typically can cause issues, which is why it is not automatically included like the Inbox is. As for your current computer, the list will need to be seen so you can subscribe to the Sent folder. Give it another try or two and see if the spinning icon eventually gives way to the list so you can subscribe. If it persists, you may need some a live walk through by our Live Support team, then they will determine if it is something on our side or if you need to contact Apple Support for further assistance.
Kindest Regards,
Scott M
I’m using Mavericks 10.9.4 and in the Mac Mail advanced area as described in steps 3, 4 and 5 above, there is no “enable this account” option to decheck. There is “enable this account” in the ‘account information’ area of preferences, but when I deselect that, the entire mailbox disappears completely, which prevents me from going through steps 6 and later.
I have left the “include when automatically…” unchecked and can send emails in Mac Mail, but not receive them. I can see the incoming messages in the WebMail client and other devices, just not on my laptop.
My ultimate goal is to have access to emails I sent prior to this new laptop I purchased this weekend.
What should I do?
Hello Jackie,
Sorry for the problems with email. I tested on my newer Macbook pro and determined that article needed to be updated. I’ve seen updated and you should see the steps to be more correct. I was able to see the subscription list myself. If you created an account, you should be able to select and then subscribe to folders you may have added on your IMAP account. If you’re still having problems with this, please let us know.
Regards,
Arnel C.
Solution may work for iCloud and some other accounts, but not for standard IMAP servers, such as our CommuniGate Pro, which is quite standards-compliant. A gear spins for a moment, and then stops, with no subscription list shown. Pretty sure this is an Apple bug. Sigh. Still in search of a solution in 2014.
This article is focused toward subscribing to individual folders on our servers and may not necessarily apply to some other email services. While it may still be useful information for many other email service providers, the purpose of this article is to assist our customers, as well as customers of various other hosts whom are connecting to servers running cPanel.