Recently, Jetpack has updated their interface for both better organization and focus on the use of the multi-faceted plugin. The plugin includes multiple blocks that are very useful for businesses. If you have a WordPress site for your business and you have a need to display your hours, then the Business Hours block is perfect for you. It simplifies the process of setting your hours and makes it a quick task to make changes if needed. Follow the tutorial below to learn how to use the block in the WordPress editor.
Note that this tutorial requires that you have the Jetpack plugin loaded to see the Business Hours block.
Learning how to use WordPress? If you want a great home for your new site, check out InMotion’s WordPress Hosting solutions for secure, managed, and optimized servers.
How to Add the Business Hours Block in the WordPress Editor
Adding the block requires that you are editing a post or page within the WordPress Administrator Dashboard. This block only allows you set hours per each day of the week. It does not give you a calendar function to set hours based on a day of the month.

- Open or create a new page or post within your WordPress site.
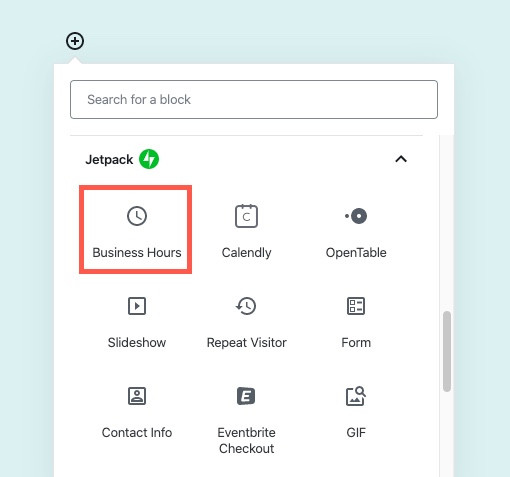
- Click on the circled + sign to add a new block.
- Find the Jetpack section and click on the Business Hours block.
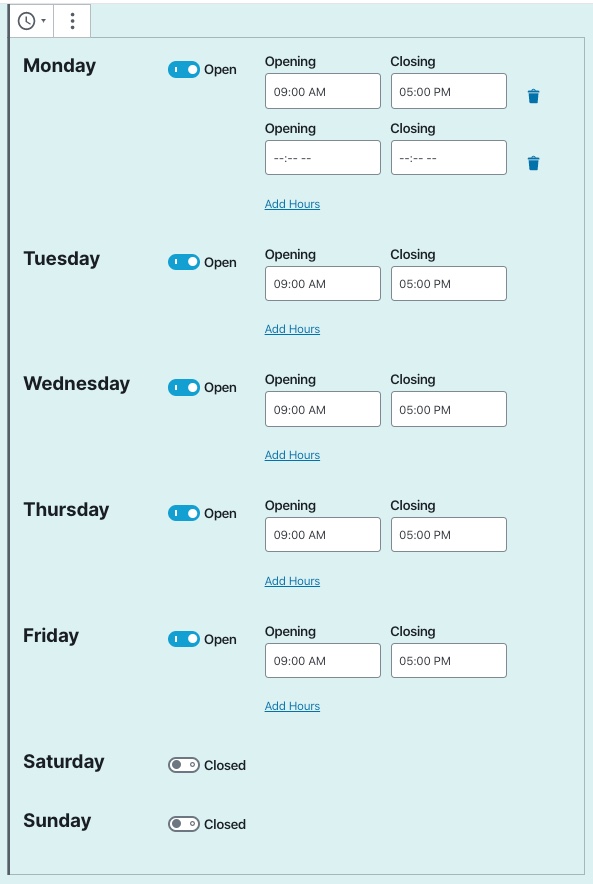
- You will see a list of hours for the days of the week. By default, all of the weekdays are set to open with hours of 9:00 AM to 5:00 PM.
- Click on Publish or Update for your post or page to save your changes.
Editing Your Business Hours
Making changes to the hours of the block is really easy. As noted above, when you first open the block it defaults to the five weekdays set to open with the hours of 9:00 AM to 5:00 PM. The weekends are set to closed. Follow the steps below to make changes to the block:

- Click on the Business Hours block.
- Click on the Opening and Closing hours for the day that you want to edit. You can also choose to close a day by clicking the slider labeled Closed.
- Remember to click on Save Draft, Publish, or Update button in the top right corner to save your changes.
Split Hours
If your business has split hours during the day, it’s easy to add them in the Business Hours block. You simply need to choose the day where you wan to add the split hours. Click on the Add Hours button and then specify the hours that you’re open.

An example of using this might be for a restaurant. You may be open from 9:00 AM to 11:30 AM for breakfast, then re-open at 4:00 PM to 11:00 PM for dinner. If you do make changes to the hours, then remember to click on the Save Draft, Publish or Update buttons in the top right corner of the screen in order to save your changes.
Congratulations! You now know how to use the Business Hours block from Jetpack in your WordPress site. Please go to our WordPress Educational Channel for more tips and tutorials!
For an additional method of adding business hours to your WordPress website, check out the Opening Hours plugin.
