So far in this tutorial you have migrated your WordPress database and copied the files associated with your website. The next step you will need to configure your WordPress settings so the files you just migrated can communicate correctly with the database. Until you perform this, your site will not display any content and you will receive a database connection error.
A few steps ago in this tutorial we asked you to write down the database name, username, and password. Now, we will need this information to continue the migration process.
Opening the wp-config.php file
- Log into your cPanel account.
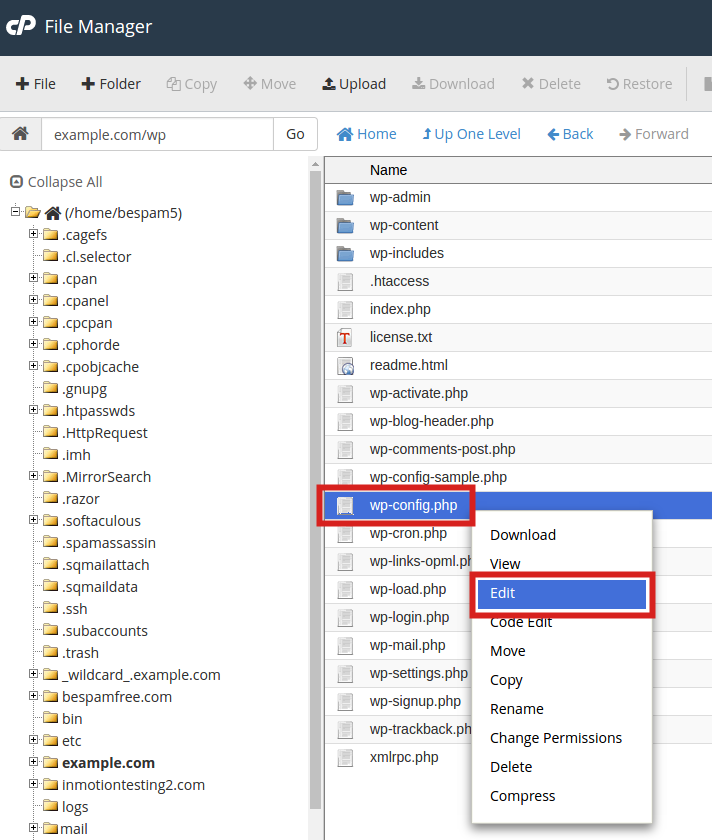
 Click on File Manager located in the Files section of cPanel.
- Make sure you are able to view hidden files.
- Navigate to the the folder to where you uploaded WordPress.
 Click the wp-config.php file, then click the Edit link on the top menu.
Configuring the wp-config.php file
For the purposes of this tutorial we will say we created the database with the following database credentials:
- Database name: inmoti5_wpress
- Database username: inmoti5_wpuser
- Database password: secretpassword123
Our current cpanel username is inmoti5 and as you will notice it automatically adds the prefix to database names and usernames.
| The database credentials that WordPress uses to connect to your database are contained within the wp-config file. What we will need to do is find the files and simply change them. Start off by finding this section within the wp-config.php file: // ** MySQL settings – You can get this info from your web host ** // /** MySQL database username */ /** MySQL database password */ /** MySQL hostname */ Take a look carefully at the above code, and you should see that this file is define what the database name, username, and password are. The value ‘localhost‘ is very commonly defined as the host, and the average user does not need to change this. After you find this section, update the values accordingly. In our example, the new changes will look like this: // ** MySQL settings – You can get this info from your web host ** // /** MySQL database username */ /** MySQL database password */ /** MySQL hostname */ After you’ve made the above changes, click the Save Changes button in the upper right. There are only a couple of steps left to migrating your WordPress site. In the next tutorial we will discuss how to correct image links from your posts and pages. |
Please check the next article on Correcting image links after a WordPress migration. If you missed our previous article, please see the Migrating WordPress Files tutorial. For more information on this course please visit Migrating your Existing WordPress site to InMotion Hosting.


Is it important to add uni word to all username database name or password necessary?
I’m sorry Zeeshan, I’m not quite sure what you mean. The username, database, and password should all be set to what your MySQL credentials are. The ones in the article are just examples. If you need additional help, feel free to reply back with some more details about what you are trying to accomplish. Thanks!
Do I need to use an ip address instead of localhost if I have a mysql database on another server?
Yes. If your MySQL database is not local to the web server, then it will need to be referenced with both an ip or URL and have the appropriate access credentials so that it can connect to the database.
Hello, should I change the MySQLHostname as well from ‘localhost’); to the hostname assigned to me or should I just leave it as localhost??
Thank you!
You should leave “localhost” untouched. That is the correct setting.
Hi team,
currently, I’m planing to change my host. so i have back up all website files from old host. After uploading into new host and change the database settings. Do i need to install agian wordpress in my cpanel (since i have construted website using wordpress dashboard only) or i can directly login https://lucreit.com/login
please answer for this..
thanks in advance.
No you do not need to reinstall WordPress in cPanel, if you have already moved the website files and database. You will need to update your domain to point to our name servers to be able to login to the website that you moved.
That worked! Thanks so much for the quick reply. My sites aren’t currently hosted at InMotion but I may reconsider come renewal time this year…
I followed all of the steps for copying a site to a subdomain (so I can work on it while the main site remains live). I can get to the site from the url so that seems to be working fine. What I am having an issue with is accessing the WP dashboard. When I go to https://staging.blipblox.com/wp-admin the username and password comes up as it should. But I am not clear on what user name to use here? The same as with my other site? Do I need to register the subdomain with WordPress.com first? Thanks for your help, this tutorial was GREAT.
Yes, you should use the same username and password as your original site, since it is just copying the “users” in the database. You can also reset the password via your same email address as in your original site. You should not have to register the subdomain with WordPress.com
Thank you,
John-Paul
Is it safe to edit the original wp-config.php file or should you create a copy first?
It’s best practice to make a copy before changing a file. So I would recommend that first. However, you can edit the file without the backup if that’s what you want to do. The backup is insurance in case something goes wrong with your change.
I recently changed my WordPress site to a completely new domain and database. I copied the database over. Everything seems fine. But all the users do not show within WordPress, but they seem to show within the database. Why is this and how can I fix this?
Even though the information appears to be in the database, it is possible that the database is corrupted. This can derive from a variety of causes but often happens if there was no “database repair” performed before export. I advise running a database repair and exporting the database again.
For migrations in which the domain name is changed, another setting needs to take place:
In table wp_options in the DB, first two columns needs to be updated with the new domain name.