WooCommerce is one of the most popular e-commerce tools, because it’s easy to install in WordPress, and easy to use. In the following guide, you will get a complete rundown of the settings you can customize for your store. These resources will provide you with the best guiding steps on how to set up a new WooCommerce store.
- What are the Differences Between WordPress Themes and WooCommerce Themes?
- How to Audition Different Themes with WooCommerce
- WooCommerce General Settings and Status Options
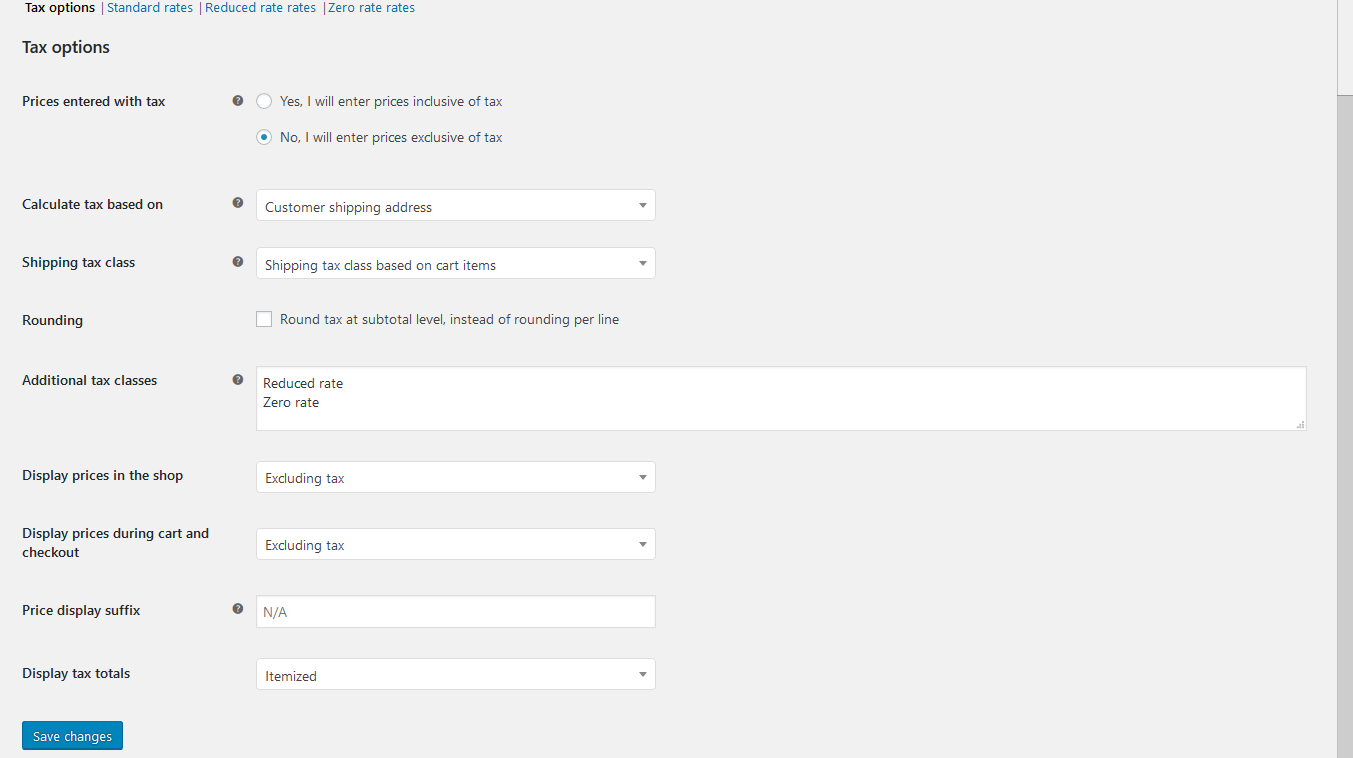
- How to Set Up Taxes
- System Status Report
- How to Setup Email Notifications
- Using WooCommerce Reports
- Changing Your Currency in WooCommerce
- Setting How Many Products Display per Row in the Storefront Theme
- How to Use Coupons
- How To Create Coupon Codes
- How to Make Product-specific Coupon Codes
- How to Exclude Products From Coupons
- How to Add a Handling Fee to Checkout
- How to Update your WooCommerce Database
What are the Differences Between WordPress Themes and WooCommerce Themes?
WooCommerce is designed to work well within whichever WordPress theme you are already using, but dedicated WooCommerce themes offer options and styles created specifically for WooCommerce stores.
The recommended default theme for WooCommerce is called Storefront, but you may want to try out different themes to see which you like best for your WordPress website.
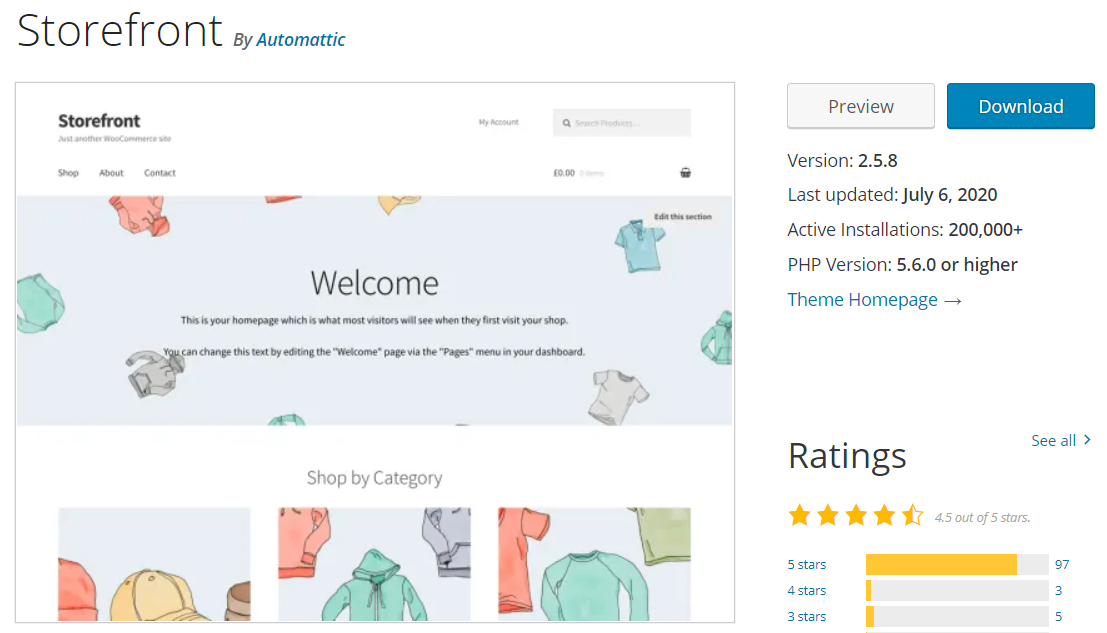
A great way to do this is to “audition” different themes.
Auditioning themes is an easy solution for those who would like to test multiple themes and options without making any changes to your eCommerce site.
Improve the performance and security of your WooCommerce site with our new WooCommerce Hosting plans. Get 40x faster speeds for your online store with dedicated resources, server caching, and optimization tools.
High-Performance VPS
99.99% Uptime
Free SSL & Dedicated IP
Advanced Server Caching
What to Look For in the Themes Marketplace
When searching for themes you can be as specific as you want as far as styles and options. You can also choose among Free themes and Premium themes with the product filter.
There are 20 WooCommerce themes available, three of which are free.
If you are in the market for premium WooCommerce themes you can expect to spend between $39 and $129, with most of the paid versions coming in at the $39 mark.
Before you spend money on an eCommerce website theme, do some research. You should make sure you trust the developer, that the theme is highly rated, and that it will be supported through later versions of WooCommerce and WordPress.
If you are having trouble with a theme you purchased, you can always troubleshoot it. And all the WooCommerce premium themes offer a 30-day money-back guarantee so you can try a theme out without the risk of being stuck with it if it doesn’t work for you.
Working With Mobile Themes
Some themes offer both a desktop layout and a mobile layout in the same package. This is a great perk to offer as it saves development time and eliminates guesswork.
On most themes, the desktop layout will typically be optimized for wider desktop monitors while the mobile layouts will fit more information into smaller screens for increased readability on tablets and phones.
It is important to ensure a consistent look, feel, and experience for your site on both desktop and mobile devices.
The default “Storefront” theme has desktop and mobile layouts, but not all themes offer both options. Check your Theme Options under the Appearance tab for more information on your theme’s customization options.
How to Audition Different Themes with WooCommerce
Before you decide on a theme for your WooCommerce store, you may wish to “audition” a series of different themes. Every WooCommerce or WordPress theme offers a different look and feel with generally similar functionality.
Keep in mind most the majority of WordPress themes will work well with WooCommerce. You are free to choose a style that works best for you.
If you like to try out multiple themes you have a few options. In this section we will show you how to use the Theme Preview function and Customize options.
How to Use the WordPress Theme Preview
Once you have installed the themes you are interested in trying, you can follow these steps to try them out.
- Log into WordPress Dashboard
- Choose Appearance > Themes
- Hover a theme and choose Live Preview
Yet Another Method to Preview Multiple Themes
You can also cherry-pick among your installed themes through the Appearance > Customize menu.
- Log into WordPress Dashboard
- Choose Appearance > Customize
- Under Active Theme you can choose Change
- Hover each image for the Live Preview option
- When you like what you see click Save & Activate at the top of the Customize menu.
WooCommerce General Settings and Status Options
After you set up WooCommerce products, you’ll want to ensure your e-commerce store settings are configured before it can affect customers.
Note: Log into WordPress to follow the steps below.
Widgets
Click on a widget to add it to an available section or drag it to the right. WooCommerce widgets are highlighted below. WooCommerce widgets include:
- Active Product Filters – shows products matching current filters
- Filter Products by Attribute – shows products matching specified attributes
- Cart – shows products currently in the cart
- Filter Products by Price – shows a slider to filter products by price
- Products by Rating – filter products by rating
- Product Categories – show product categories
- Products – list store products
- Products by Rating – show top-rated products
- Product Search – search field for your products
- Product Tag Cloud – show tags for your products
- Recent Product Reviews – list new reviews
- Recent Viewed Products – show products the customer viewed
Shortcodes
Using the WooCommerce Product Search paid extension, shortcodes allow you to use many features available via widgets but within a particular page or post. The following live filter shortcodes would be available:
Localization
If you change your WordPress site language in Settings, then General, WooCommerce will translate products according to Translate.WordPress.org. You can use custom translations with plugins such as GTranslate or Loco Translate.
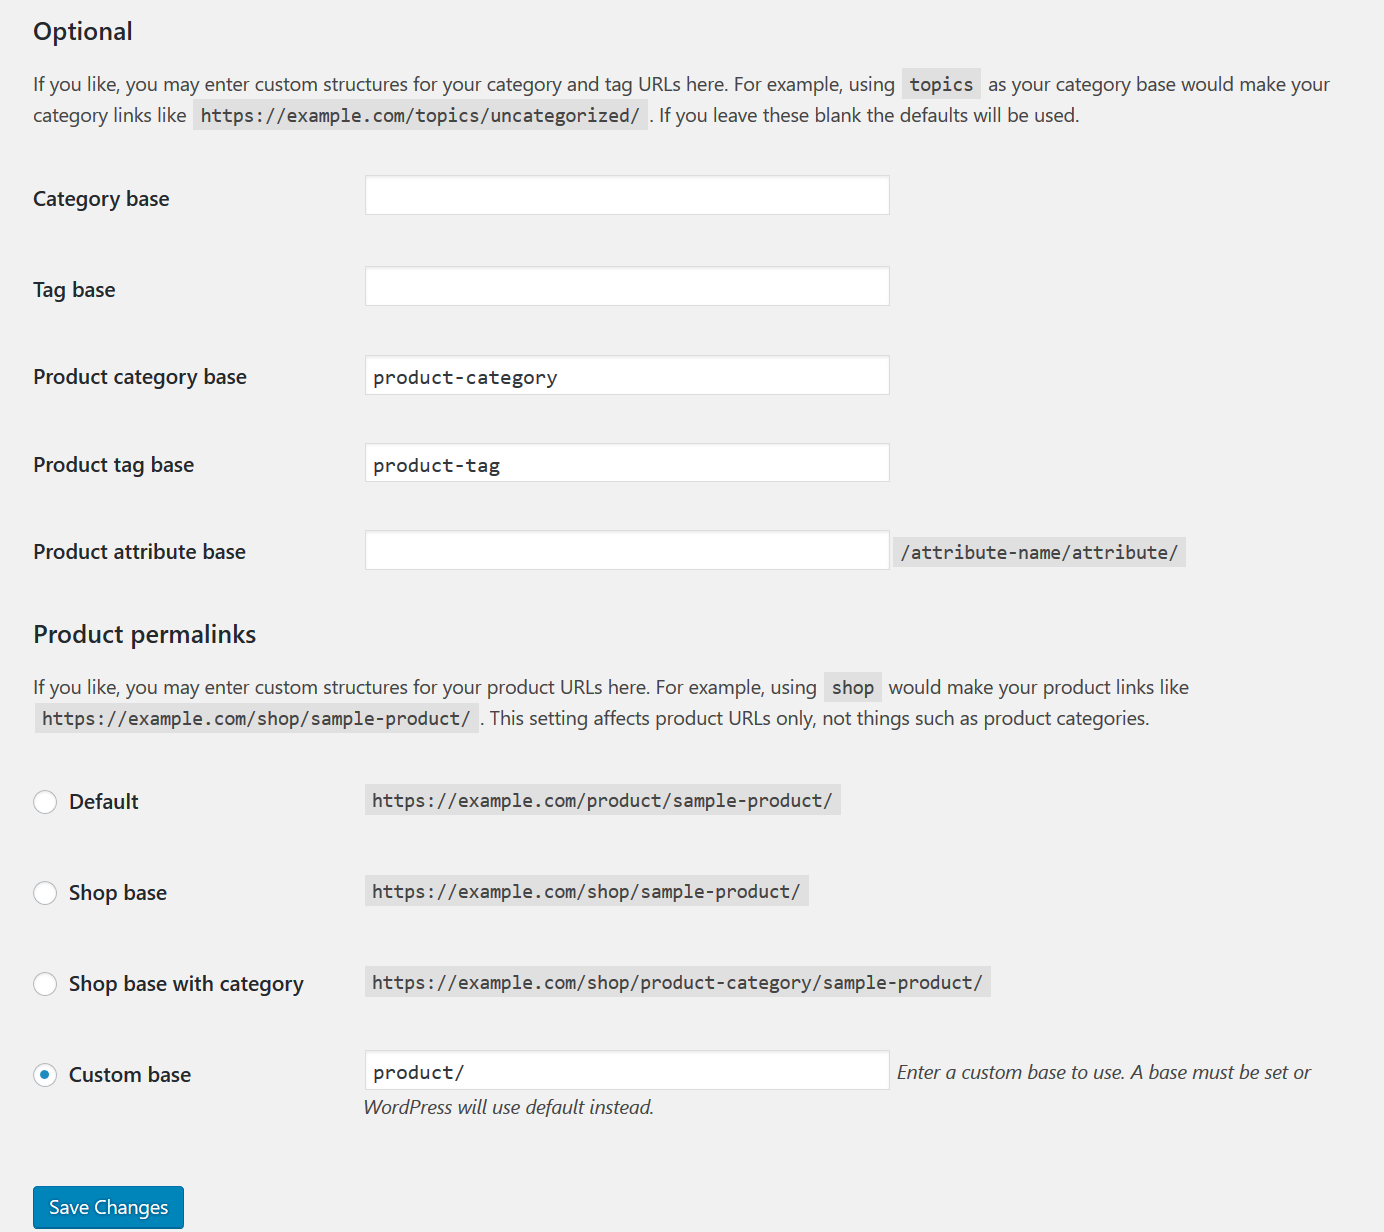
Permalinks
Roles
WooCommerce creates the Shop Manager and Customer roles by default.
Customers can edit their information and view their orders.
Shop Manager can manage WooCommerce settings and products.
You can further modify groups with plugins such as Groups, Members, or Compatibility Manager Enhanced.
How to Set Up Taxes
System Status Report
Click WooCommerce, Status, then Get system report for an easy-to-copy format of your WordPress website information to Copy for support.
Tools list options help you manage your WooCommerce products database and customer data. Options include:
- WooCommerce transients
- Expired transients
- Orphaned variations
- Used-up download permissions
- Order address indexes
- Term counts
- Capabilities
- Clear customer sessions
- Create default WooCommerce pages
- Delete WooCommerce tax rates
- Reset usage tracking
- Regenerate shop thumbnails
- Update database
Logs track events and errors with timestamps within your store.
Scheduled Actions lists web hooks in lieu of needing to use WP cron for scheduled tasks.
Webhooks
Webhooks integrate websites and services by sending an event notification to a specified URL to trigger other events. Event notifications can relate to changing orders, products, coupons, or customers.
- Under WooCommerce, click Settings.
- Click Advanced on the top.
- Click Webhooks.
- Click Add webhook.
How to Setup Email Notifications
As we continue our series on the WooCommerce plugin for WordPress, we will now show you how to set email notifications in WooCommerce. Everything from new order to password reset notifications can be sent from your online store via email. This is the first step when troubleshooting missing emails from your WooCommerce site.
- Log into your WordPress Dashboard.
- Click WooCommerce then Settings in the navigation menu.
- On the WooCommmerce settings page click the Emails tab.
- You will then see the available email notifications and the recipients listed. Roll your mouse over the question mark to see more information about the notification.
- Click the notification you want to set. In this example, I am choosing Processing order.
- You will then be on the notification management page. Ensure the box to Enable this email notification is checked.
- Click the Save changes button.
- Click the Emails tab to return to the notifications list.
- Repeat Step 5 through Step 8 for each notification you want to set.
Congratulations, now you know how to set email notifications in WooCommerce!
Using WooCommerce Reports
Once your WooCommerce site is live to the world, you should activelymonitor the progress of your online store to make informed decisionsto grow your business. Out of the box, WooCommerce has greatreporting features that will help you learn your top sellers, topdownloads, customer purchases vs. guest purchases and more. Thissection will walk you through the settings of the reporting section inWooCommerce Reports, giving you the information you need to runreports that benefit your growth.
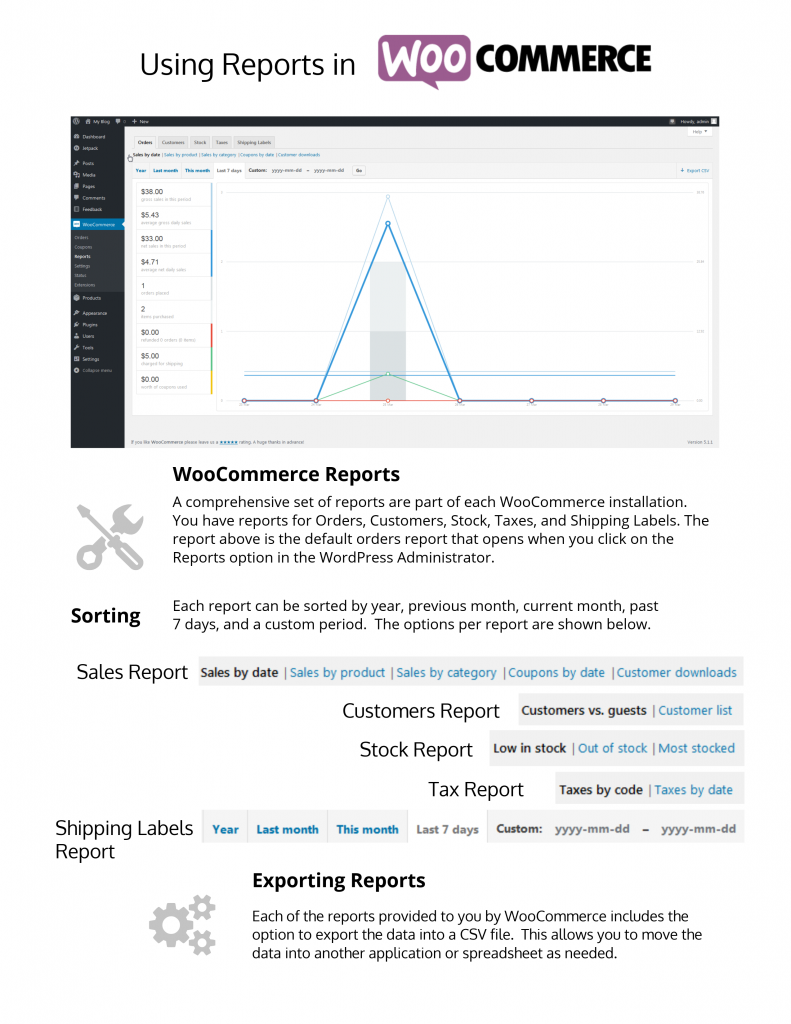
WooCommerce Reporting
Orders
When you navigate to WooCommerce > Reports in your WordPress dashboard, the default view is the Orders tab. Orders give you the ability to view gross and net sales volume and totals. You can also pull top sellers, top freebies, top earners, and product downloads.By default, orders that are processing, on hold, or completed are counted as sales. Here is a quick outline of the configuration options under the Orders tab:
- Sales by date – is the default view when you navigate to the Reports tab. It gives you an overview of the current performance of your online store in the view of a graph. You can also drill down into the data by year, last month, this month, last 7 days, or set a custom date range.
- Sales by products – allows you to view the sales per day in a given range for particular products. Similar to Sales by date, you can drill down into the data by year, last month, this month, last 7 days, or set a custom date range.
- Sales by category – will show you the sales numbers by category. A date range can be set for this report as well.
- Coupons by date – shows you the total number of discounts, as well as the number of coupons used. You can also filter by coupon, view the most popular coupons, and the coupons giving the most discounts.
- Customer downloads – are tracked and logged per unique IDs. This feature gives you the ability to view when a product was downloaded, the product name, file name, the order it was purchased, and where the customer is located via an IP address.
Customers
The Customers tab shows you reports for Customers vs. Guest concerning orders placed, as well as your full Customer List. Similar to the Orders tab, the Customer tab also allows you to drill down into the data by year, last month, this month, last 7 days, or set a custom date range.
- The Customer vs. Guest view shows you which percentage of orders are being placed by registered users vs. guests.
- The Customer List gives you a full list of your registered users.
Stock
The Stock tab gives you data on products that are out of stock and low in stock, as well as the quantity left in stock. This feature will help you stay on top of the products that need to be restocked so you can plan accordingly.
Taxes
The Taxes tab allows you to view Taxes by code (or state) and Taxes by date. You can also drill down into the data by year, last month, this month, last 7 days, or set a custom date range.
Changing Your Currency in WooCommerce
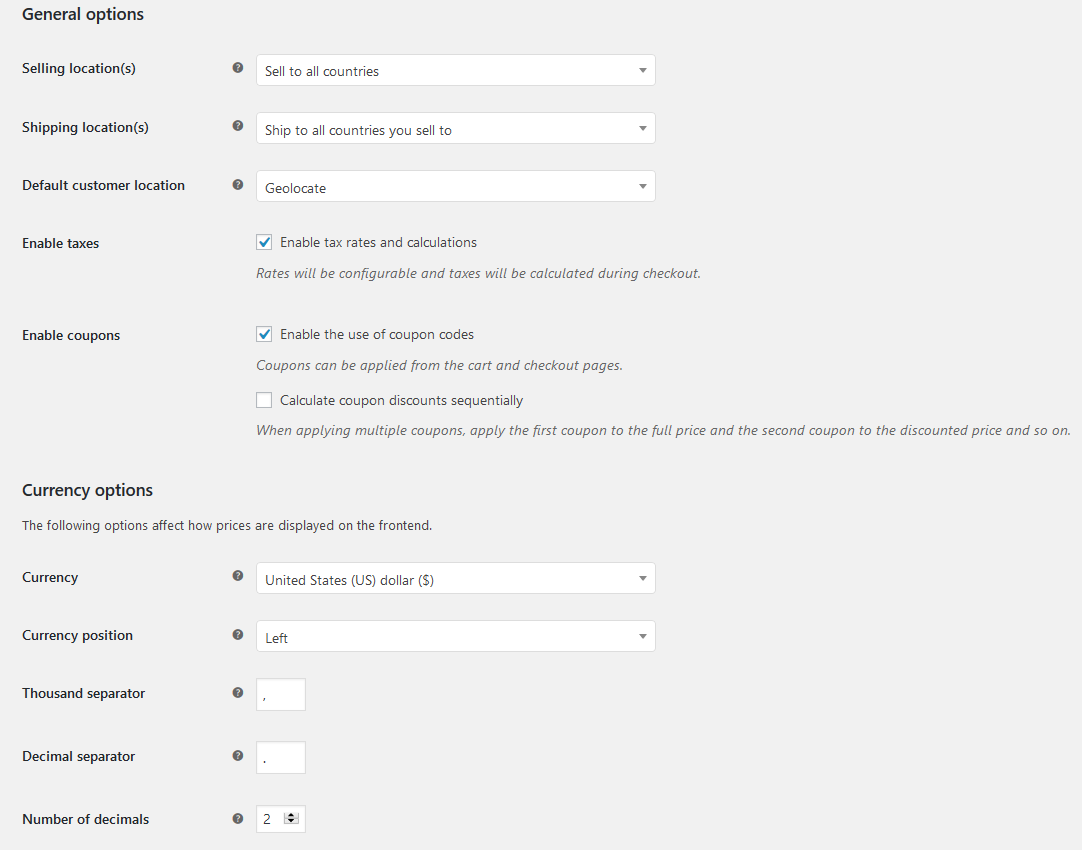
Depending on the geographical location you are selling products to or from, you may need to change your currency for your WooCommerce site.In this section, we’ll walk you through changing your currency in WooCommerce with just a few steps.
- First, log into your WordPress admin dashboard.
- Now that you are logged in, hover over WooCommerce, then click on Settings. By default, you will be sent to the General tab.
- On this page, you will see a header labeled Currency Options. Below this, you will see a dropdown box to set the currency. You may select your currency here.
- Depending on how your currency is displayed, you may also need to adjust the Currency Position as well depending on if the symbol is on the left or right side for your chosen currency.
- On this page, you will also see options here for separators and decimals. Most currencies should work with the default settings, but if you need need further custom options, you may set them here.
- Once you have made the appropriate changes, be sure to click the Save changes button at the bottom to ensure that your changes become active.
Now that you have made the necessary changes within the WooCommerce settings for your currency, you should now see your currencies displayed properly within all areas of your site.
Setting How Many Products Display per Row in the Storefront Theme
If you are using the Storefront theme in WooCommerce, you may want to change how many products display in each row. This can help maximize the amount of products visitors see on a page. In this section, we will show you how to *change the number of products displayed per row*in the Storefront theme.
Changing the Products Per Row Setting
- Log into your WordPress Dashboard.
- ClickAppearance then Customize.
- Select the WooCommerce option.
- Now click Product Catalog.
- Below the Products per row option, enter the quantity you want to display (the default setting is 3). The changes will display immediately.
Before After 

- Click the Publish button to save your changes.
Congratulations, now you know how to change the number of products that display per row in the WooCommerce Storefront theme!
How to Use Coupons
WooCommerce allows you to add and manage coupons in your store. You can add as many coupons as you want and control necessary restrictions.
Any WooCommerce store manager will want to make use of the coupon system at some point. It is a great way to encourage sales. For example, with a coupon, your customers may purchase items that they otherwise might not have. Likewise, you can provide coupon codes alongside advertisements to see which ads are driving more business to your store.
Enable Coupons
First, coupon use must be enabled from the Checkout settings page.
- Log into WordPress Dashboard
- Under WooCommerce choose Settings
- Select the Checkout tab
- For Coupons check the box for Enable the use of coupons
- Under WooCommerce choose Coupons
- Click Add Coupon
- Fill in Coupon Code the customer will use when applying the coupon
Beneath, you will see the Coupon Data menu.
Coupon Data
What can you do with coupon data? Check out the table below to see a summary view of what you can do from the Coupon Data menu.
| Coupon Data | Options |
|---|---|
| General | Discount type can be applied to Cart or Product. You can also control whether Free Shipping will be available when coupon is used, and when the coupon expires. |
| Usage Restriction | From this menu, you can control restrictions such as Individual use only, maximum spend, Exclude sale items, Exclude categories, Products, etc. |
| Usage Limits | Here you can configure a limit on how many times a coupon can be used or how many times a customer can use the coupon. |
When ready, click Publish to activate your coupon.
How To Create Coupon Codes
Coupon codes are a great way to encourage customers to purchase products from your WooCommerce shop. If your customer is armed with a coupon code that will give them a better deal, they will be much more likely to buy from you. In this section, we’ll show you how to create coupon codes for your site that is running WooCommerce.
Creating Coupon Codes
- First, log into your WordPress admin dashboard.
- Once logged in, hover over WooCommerce, then click on Coupons
- On the Coupons page, you’ll see any coupons you have created. To create a new one, click on Add Coupon. It should look something like the screenshot to the right.
- Now, you will see several fields to fill out. The top field, is the coupon code that you want to create. You could create something like 5OFF to create a 5% discount, or FREESHIPPING to give customers free shipping.
- The next field you will see here, is the description. This is something that will display within the back end of your site, as well as the front end depending on your theme and how it interacts with coupon codes. You’ll want to enter something descriptive in here to ensure that it can easily be identified.
- Of course, a coupon code doesn’t do much good without applying a discount. In the next section, we’ll show you how to apply discounts.
How to Make Product-specific Coupon Codes
Sometimes when creating coupon codes in WooCommerce, you will want to set that coupon code to only be valid for a specific product. In this section, we will show you how to set a coupon code to be valid for a specific product.
- First, you will need to be within the edit/creation screen for the coupon that you are making product-specific.
- Within the coupon creation page, click the Usage Restriction tab located within the Coupon Data box.
- Inside the Usage Restriction tab, there is a field labeled Products. Within this field, you will be able to search for any products within your WooCommerce installation. Simply search for the product that you want to make the coupon code active for, then click on it to add it. If you want to add additional products that the coupon will be active on, you may add them within this same box as well.
- In addition to making the coupon active for a single product, you may include full categories as well. To do so, use the same steps as you used for a single product, but enter it into the Product categories box instead.
- When you’ve set all of your products that will be discounted with your coupon code, be sure to save your changes by clicking either the Publish or Update button depending on if your coupon has already been published.
Now, you will be able to set coupons to become active on specific products.
How to Exclude Products From Coupons
In some circumstances, you may want to exclude a product from being able to use a coupon code on it. In this section, we will show you how to exclude a product from a coupon code in WooCommerce.
- First, log into your WordPress admin dashboard.
- Once you are logged in, visit the coupon code that you want to disable products on. To do so, hover over WooCommerce, then click on Coupons, then on the coupon that you want to edit. If you have not already created a coupon and need to learn how to do so, take a look at our article on creating WooCommerce coupon codes
- Within the coupon edit screen, look toward the Coupon Data box and click on the Usage Restriction tab.
- You should now see various fields here. The fields that we will be modifying will be the Exclude products and Exclude categories. In these fields, you may begin typing the product or category that you want to exclude from the coupon. When you see that product that you want to exclude, simply click on it to add it to the exclusion list.
- Once complete, be sure to save your changes.
How to Add a Handling Fee to Checkout
WooCommerce has a wide-range of hooks and filters which allows the plugin to be easily customizable by the user for almost any theme. Currently, WooCommerce doesn’t allow users to add a handling charge to a checkout order from the dashboard, however, it does have an action that allows you to add a handling cost to the order total prior to the customer finalizing their purchase.
Adding a WooCommerce Handling Fee
This function will allow you to add a $5.00 handling charge to every order. The function will need to the placed in the body of your theme’s functions.php file.
add_action( 'woocommerce_cart_calculate_fees','endo_handling_fee' );
function endo_handling_fee() {
      global $woocommerce;

      if ( is_admin() && ! defined( 'DOING_AJAX' ) )
	    return;
      $fee = 5.00;
      $woocommerce->cart->add_fee( 'Handling', $fee, true, 'standard' ); }
How It Works
The endo_handling_fee is prompted whenever the woocommerce_cart_calculate_fees action is fired. The data from the order is grabbed from the global variable $woocommerce which will attach the handling fee. The amount and title of the fee is determined by using the add_fee rule. You are able to set the fee type (in this case “Handling” and the amount to the checkout screen).
Customizing your Handling Fee
Now that the handling fee function has been added to the body of the function.php file you can easily adjust the fee type and amount to fit your needs. The example below will show an adjustment to the fee amount from $5.00 to $2.00 and the type from ‘Handing’ to ‘Processing’ by making simple changes to the $fee = $5.00; and $woocommerce->cart->add_fee(‘Handling’ , $fee, true, ‘standard’); lines of the function.
add_action( 'woocommerce_cart_calculate_fees','endo_handling_fee' );
function endo_handling_fee() {
      global $woocommerce;

      if ( is_admin() && ! defined( 'DOING_AJAX' ) )
	    return;

      $fee = 2.00;
      $woocommerce->cart->add_fee( 'Processing', $fee, true, 'standard' );
}
Now you know how to add a handling fee to your WooCommerce checkout page, customize the WooCommerce function to fit the fee type and amount you’d like to set for your customers, and have a better understanding of the overall function to explain the importance of the key elements that allow the function to work.
How to Update your WooCommerce Database
Are you seeing the following notice in your WordPress Dashboard? “We need to update your store database to the latest version.” In this section, we will show you how to run the WooCommerce updater to update your database. This step is only displayed periodically after an update to WordPress or WooCommerce. This ensures the database tables are correct so your WooCommerce website can continue to function.
Update WooCommerce Database
- Backup your WordPress website
- Log into your WordPress Dashboard
- You will see a notice stating “WooCommerce data update – We need to update your store database to the latest version.” Click the button titled Run the updater
- A box will pop-up asking “It is strongly recommended that you backup your database before proceeding. Are you sure you wish to run the updater now?” Click the OK button.
The database update will begin, and you will see a message stating “WooCommerce data update – Your database is being updated in the background. Taking a while? Click here to run it now.”
- If you don’t want to wait for it to run in the background, click the link titled “Taking a while? Click here to run it now.”
You are finished when a message saying “WooCommerce data update complete. Thank you for updating to the latest version!”
Congratulations, now you know how to run the WooCommerce database updater! Now you can ensure your WooCommerce database remains compatible with your WordPress site.
If you’re ready to start an eCommerce store, get up and running fast with a WooCommerce Hosting plan from InMotion.
