Stripe is a popular credit card processing solution that is available in WooCommerce. This article will focus on the use of the Stripe processor for recurring payments through WooCommerce subscriptions.
In order to demonstrate the use of Stripe for recurring payments in WooCommerce, we will step through the installation of the Stripe plugin and the creation of a subscription.
This article uses the free WooCommerce Payments option for support of subscriptions. There is also a paid extension called WooCommerce Subscriptions. One of the key differences is that the free version applies a fee for processing a subscription. The paid version of the extension does not charge a fee for its use.
We will also summarize the requirements for a subscription and show its interface as well as the setup of the Stripe account in WooCommerce to use for processing recurring payments.
- Setting Up the WooCommerce Stripe Payment Gateway Plugin
- Setting Up a Stripe Account to Get Your API Keys
- Setting Up Stripe in WooCommerce Settings
- Setting Up the Subscription with Recurring Payment
Setting Up the WooCommerce Stripe Payment Gateway Plugin
For the purpose of this tutorial article, we are using the WooCommerce Stripe Payment Gateway plugin. Once the plugin is installed, you will need to set up the Stripe (Credit Card) Payment area in WooCommerce settings.
- Go to the WordPress Plugins page to find and download the plugin. Search for “WooCommerce Stripe Payment Gateway.” Once you find the plugin, click on it.

- Click on the Download button to the right of the screen. This will give you the zip file required for its installation.
- In WordPress, click on Plugins in the main menu.
- Click on Add New, then click on the button labeled Upload Plugin.
- Upload the zip file that you downloaded earlier.
- The list of Installed Plugins will now list WooCommerce Stripe Payment Gateway. Click on the Activate button to enable it and complete the plugin installation.
Setting Up a Stripe Account to get your API Keys
You must create an account to use Stripe for credit card processing. Follow their directions to set up a free account, then verify it through email. Future logins to the Stripe account will require the use of two-factor authentication.
Your Stripe account opens to a dashboard like this:

The Stripe dashboard contains the API keys and also an area to manage your customers’ payment information.
Click on Developers in the top right corner in order to access the API key. This will bring you to the developer’s page:

Take note of the API Keys and Webhooks options in the left column. You will need these keys for the Stripe settings in WooCommerce.
Setting Up Stripe in WooCommerce Settings
- Use the WordPress main menu to go to WooCommerce Settings. Then you will need to click on the Payments tab.

- Once you’re in the Payments tab look for the link labeled All payment methods. Click on this link.
- When you see a list of all the Payment options, scroll down until you find Stripe Process Credit Card with STRIPE.

- Enable this option by clicking on the slider. If you’re not immediately brought to the API keys page, then click on the Manage button.
- You will then get a pop-up window that allows you to enter the keys that were presented to you in your Stripe account. Add the keys from your Stripe account and then click Save live keys.

- You should then see an overview of your Stripe account settings in WooCommerce. Make sure to review the settings. The Enable Stripe checkbox should be selected. Scroll down to review all of your account details

When you have finished reviewing your Stripe settings in WooCommerce and they are saved, then you’re ready to process payments through Stripe.
Setting Up the Subscription
Subscriptions require that both customers and products be properly set up. The payment of the subscription using Stripe requires the customer’s selection when they are invoiced.
If your payment settings are all set, then the next part of creating a recurring payment in WooCommerce is to have at least one product using a subscription model.
Creating the Subscription Product
- Set up a new product, or edit an existing one.
- The product will have the option of being a Simple Subscription or a Variable Subscription. In the screenshot below you will see a Simple subscription product. Make sure to add the subscription information for the product including the subscription cost and frequency of payment.

- Click on Save or Update in order to save your changes for the product.
Working with the Subscription Order
When you have subscription products set up, you can create subscription orders that accept recurring payments. There are a few ways that subscription orders can be placed. They can be done from the storefront or they can be created manually by an administrator. For the purpose of this tutorial and to demonstrate a subscription order, we will walk through creating a manual order.
Subscriptions are records in WooCommerce that are used to manage future payments per the subscription product. Here are the steps for manually creating a subscription.

- Click on WooCommerce in the WordPress Dashboard main menu, then click on Subscriptions.
- Click on Add Subscription.
- Select the customer from the drop-down. Make sure that the subscription is assigned to a customer. as they will select the payment method. Add a customer if needed.
- Click on Add Item to add a subscription product.
- When you finish adding items, make sure to click on the Recalculate button to get the total charge.
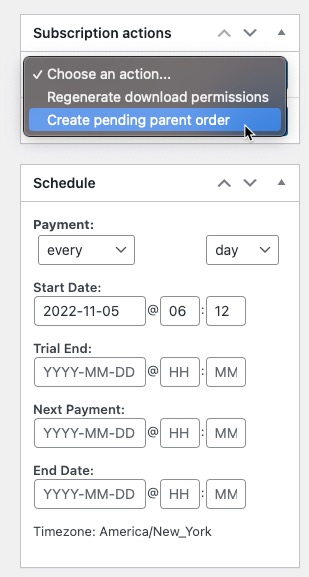
- Since this is a recurring payment subscription, click on Schedule on the right side of the screen. Set up the frequency of payment, start date, trial end (if there is a trial period), next payment date, end date, and time zone. This will determine the schedule of the recurring payment.

- Next, click on the drop-down arrow under Subscription actions. Select Create Pending Parent Order, then click the Update button

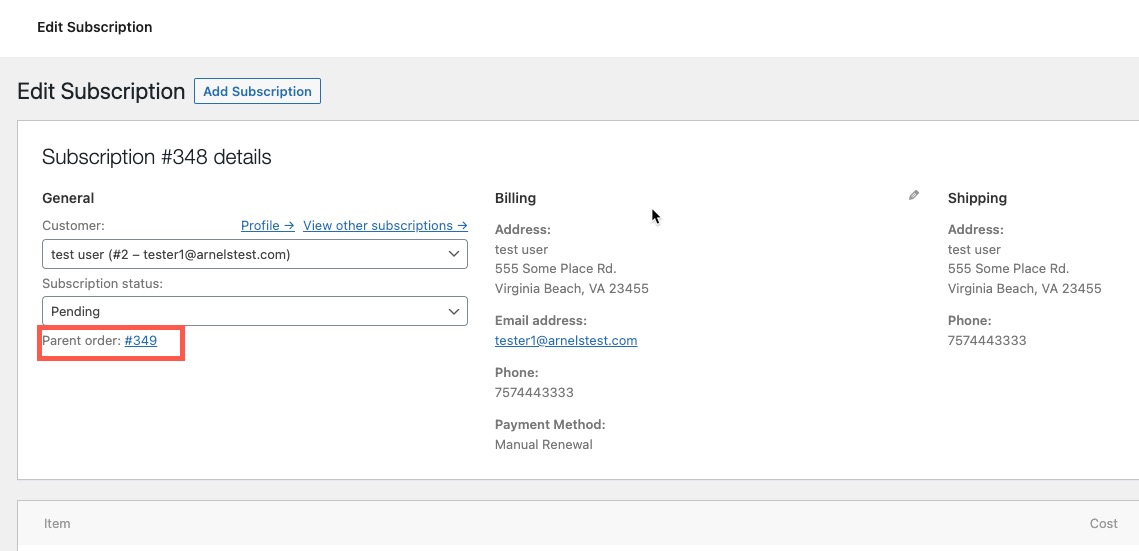
- This will create a parent order. There will be a link the order on your subscription page. Click on that link.

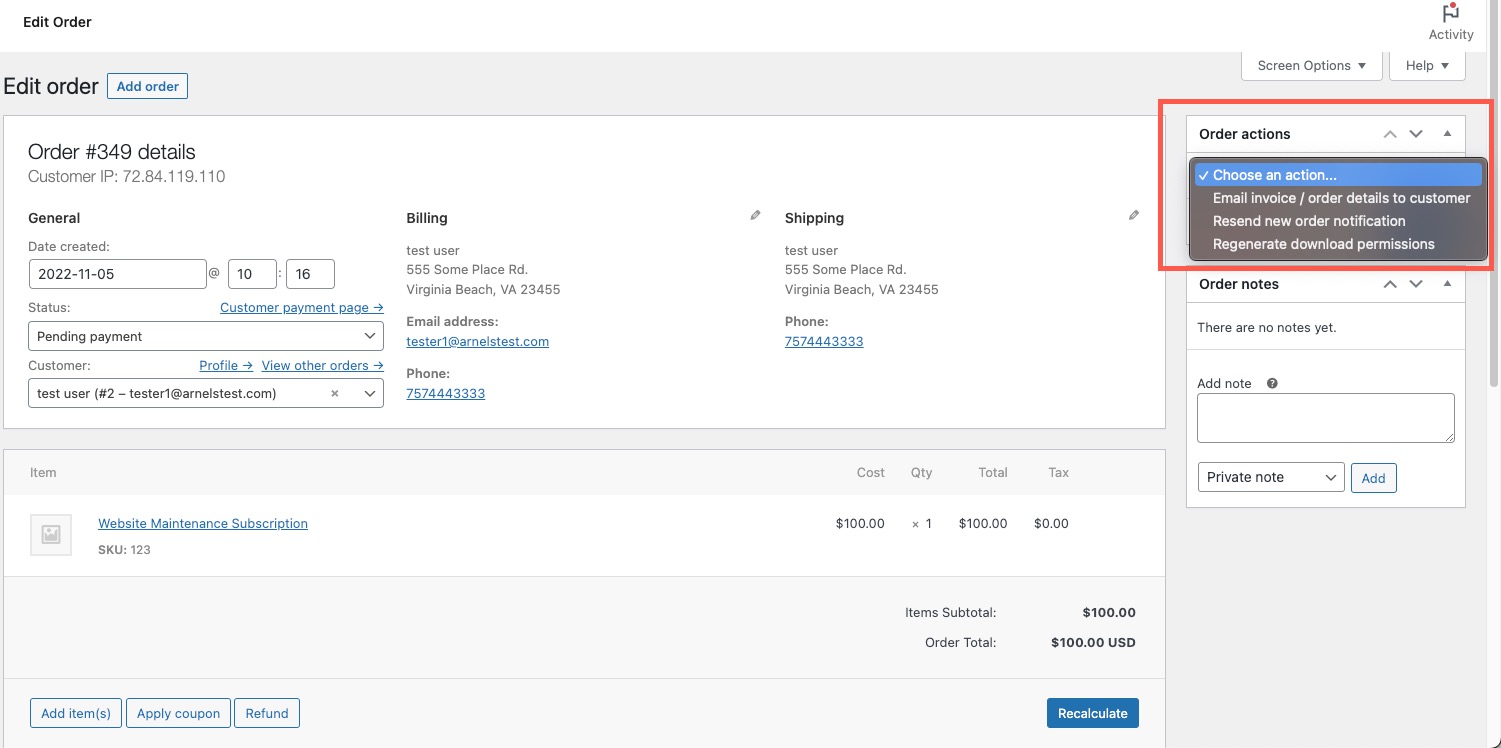
- This will bring you to the Order page. In the top right corner, click on the Order Actions drop-down arrow. Then select Email invoice/order details to customer.

- Click on Update.
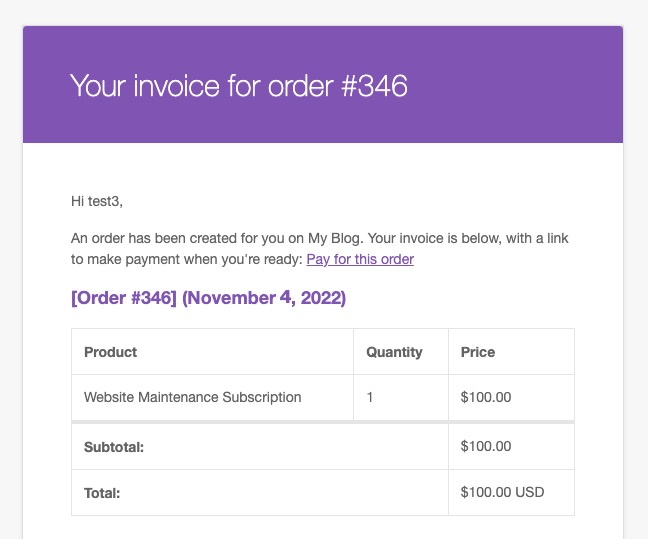
At this point, the customer will receive an email detailing their pending subscription order. The activation of the subscription depends on the customer making a payment method choice and completing the payment.
Customer Payment Method Selection
The customer will be emailed an invoice for the subscription. If they do not see the invoice or it is accidentally deleted, they can request for the email to be sent again.
- Open the email from WooComerce regarding your invoice.
- In order to process the payment through Stripe, the customer will need to select it when they log in to their account through the link labeled Pay for this order.

- The customer will then need to log into their account. Then click on Payment Method.

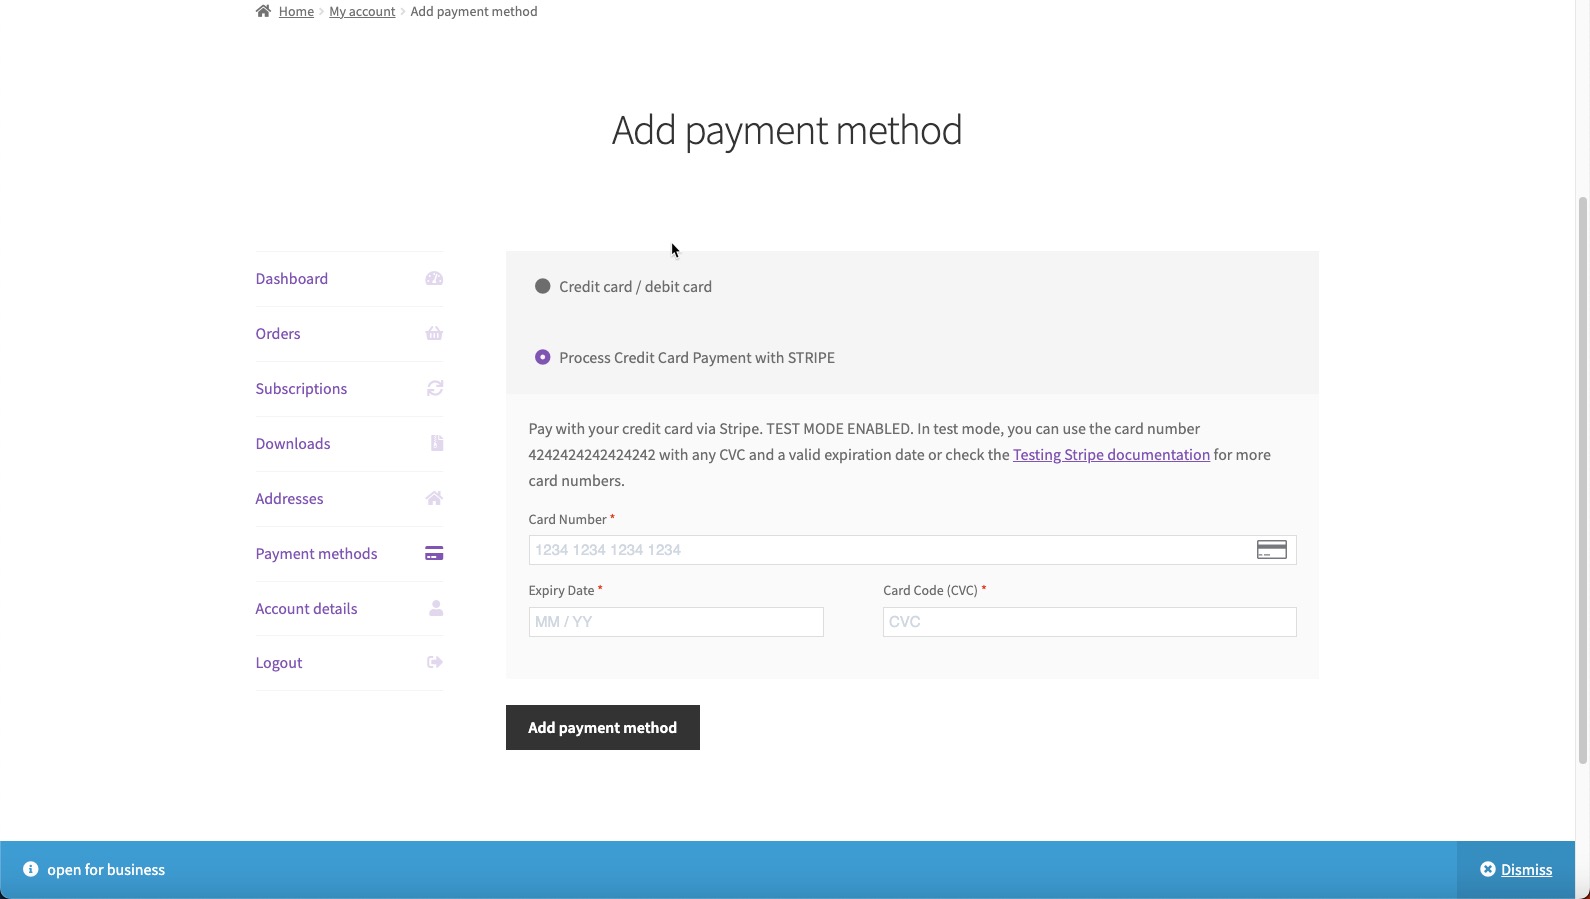
- Depending on the WooCommerce installation, there might be several processing options. If there are no payment options already set, then click on Process Card Payment with STRIPE option. Fill in your credit card information.
- Click on Add payment method.
- Click on Orders and then click on Pay to process the subscription payment.
Note: There is an added fee of +1% for any order using the free subscription option included with WooCommerce Payments.
When the user pays the subscription order with a valid credit card using Stripe, then the payment is complete. Since it is a subscription, the payment invoice will repeat based on the set schedule.
This completes the process of adding a recurring payment using Stripe in WooCommerce.
Stripe can process recurring payments using WooCommerce and its subscription options. There are a number of solutions that can be implemented, but the free version can work to an extent with the proper setup and management. Use Stripe and WooCommerce to help bring revenue to your business through secure and flexible interfaces while providing a positive experience.


