Everyone loves a deal!
 When we go shopping, my wife loves to look for sales. Sometimes we know about specific items because we got a flyer in the mail or local paper. Some stores, like my local Target, post the sales flyer at the front of the store.
We browse the sale items to see if any of them look like a good deal. Often we will find an item we have been wanting but putting off because it was not crucial. Other times we see something on sale where the price seems to be just right, so we purchase it, whether we needed it or not.
Sales can get customers to purchase sooner rather than later, or even get them to spend money on something they initially did not intend on purchasing. It works great in the brick and mortar stores and can work just as well in the online world.
PrestaShop Sales
PrestaShop operates in somewhat the same way. You can declare an item on sale and it is posted in the front of your store so visitors can take notice when they first arrive. Perhaps the item is just what the visitor was looking for, or perhaps the sale price just made sense and they decide to purchase. Either way, it is a win for you.
How to set a product to ‘On Sale’
Setting an item to an On Sale status in PrestaShop is relatively easy. It is done on an individual basis, meaning there is not a way to set multiple products on sale at the same time. Follow these instructions to learn how.
- Log into your PrestaShop 1.6 admin interface.

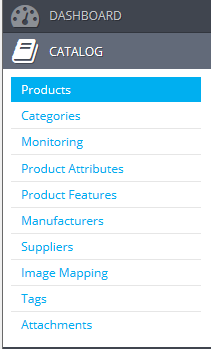
Click on the Catalog link from the left hand menu and then click on the Product option.

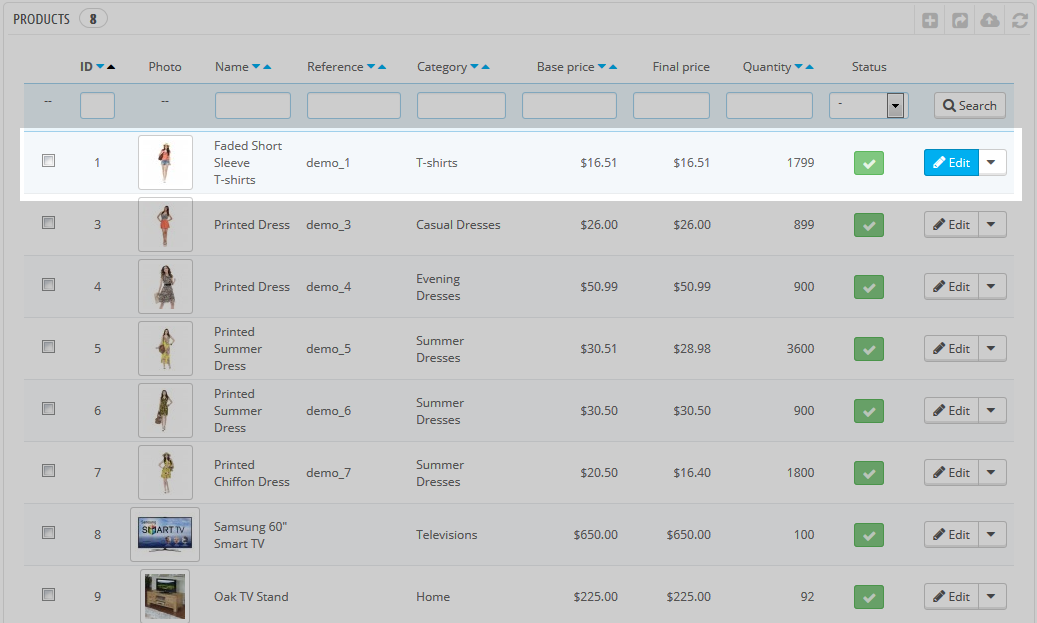
From the main Product list page, find the product you want to place on sale and click on the Edit option on the right side of the product row.

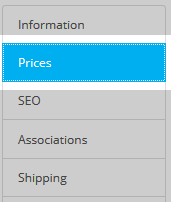
Look to the tabs on the left and click on the Prices tab.

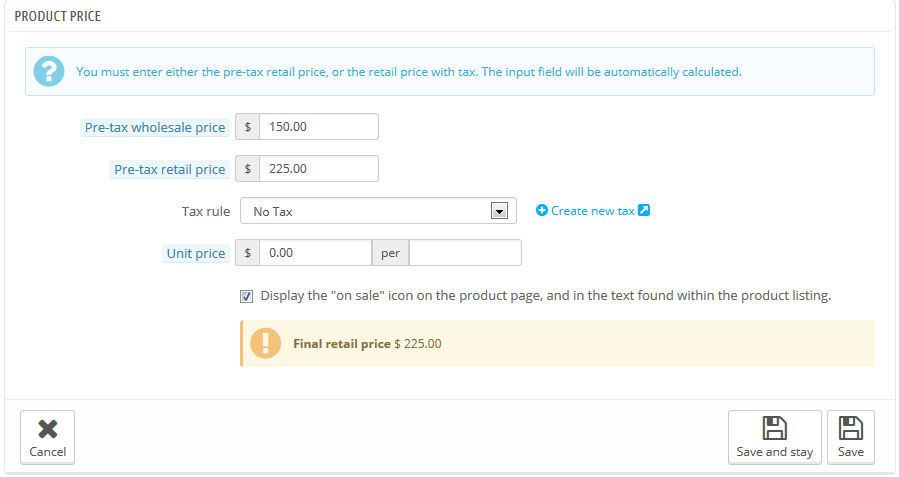
From the Prices data tab, look for a checkbox with the description “Display the ‘on sale’ icon on the product page, and in the text found within the product listing.” Click on the checkbox to activate the ‘On Sale‘ status.
- Click on the Save and Stay button in the Product Price section.

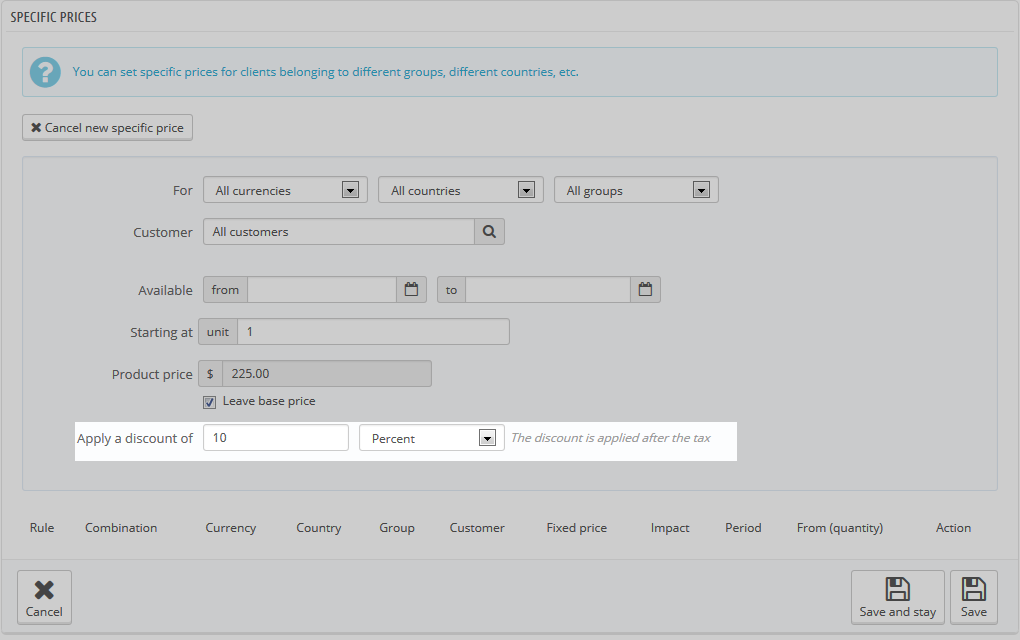
Next, look to the lower section titled Specific Prices to set the details of the sale. There are different options here, but for our example, we allow the discount to apply to all customers. We decided to allow a 10% discount.
- Click on the Save button in the lower right corner of the section.
Check out the view
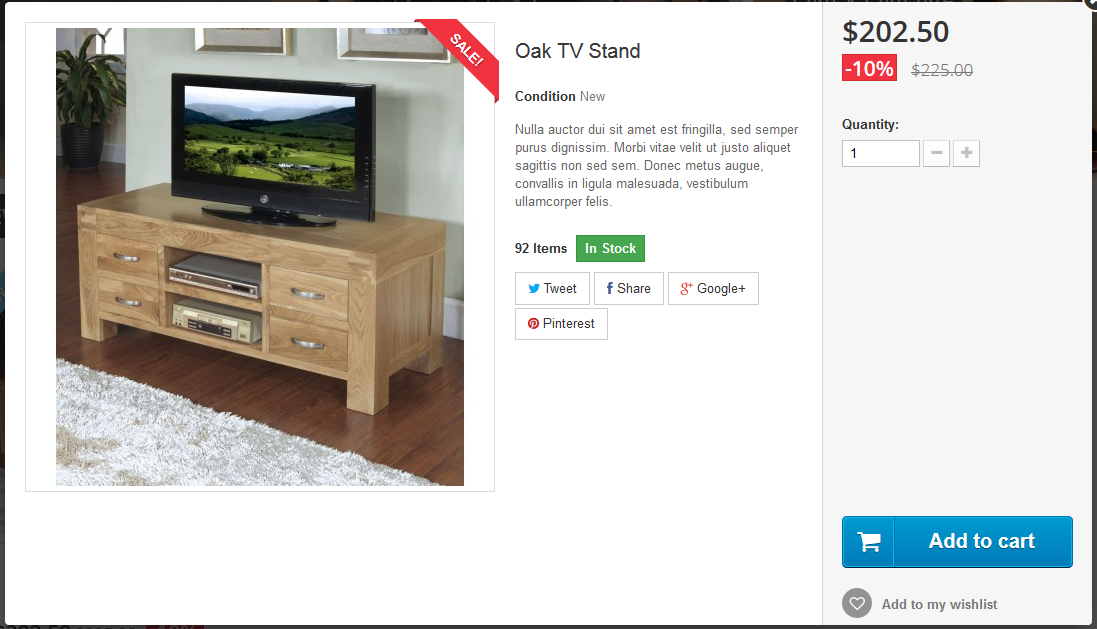
Now that you have set a product to Sale status, it will display differently within your store. For instance, it will have a preferential status and display on the front page of your store under the Popular category. The product itself will display the Sale banner in the corner of the image. This is shown on the front page of the store as well as the quick view and the product’s detail page as you can see below.
Now that you know how to set products on sale it is tile to go set some sale items and see what happens. Who knows, you may get some customers like me or my wife who cannot pass up a good deal!
Storefront
From the storefront view, sale items will display under the Popular section.
QuickView
When looking at the product’s Quick View you can see the sale ribbon as well as the discounted price.
Detail Page
The sale ribbon and the discounted price also display on the product’s Detail Page


Hi John Paul, thanks very much, but the support by theme gave me a solution. In Prestashop 1.7 have a fixed with discount-percentage (apply a 5% discount). I deleted in the database, table specific_price.
But now I have other troubles. The coin symbol in Peru is S/. like this: https://prnt.sc/eayxav
When I change the language to Peru the symbol S/. doesn’t work tinyMCE: https://prnt.sc/eayz5g
Is there any way to change the symbol? If so, what would it be? And I want to speed up my website. When I shop, it slows down. What I can do?
My website is www.rhinoparts.com.pe, and I have a reseller account with InMotion hosting.
Thanks very much
Maximo, I would recommend checking out the Character Map Plugin from TinyMCE.
Hi, iwant to remove discount price, i delete all the rules but it continues to apply
Can you provide a link to the site for us to test further?
Thank you,
John-Paul
Hello,
We have been creating a lot of promo codes and a lot of our business relies on them. But now we wanted to run a sale for everyone, but I dont want to effect the price the user gets when using a promo code that either reduces a set amount or reduces a % off of the price of the item.
Is there a way for me to set a sale but at the same time keep all the prices the same when using a promo code?
Example:
I have a product for $600, I have a promo code that will reduce the price by 50% (so that the product price in cart becomes $300 when using the promo code). If I run a sale that brings the price down to $500, I do not want the promo code to bring the price down to $250 I would like for it to remain at 300.
Is this possible?
Thank you,
Hello JKH,
Generally, the promo code does not work that way. If you’re showing a sale price BASED on the promo code, then the price will be displayed a sale only with the use of the promo code. There are many extensions that can also be loaded that make it easier to manage your product prices – especially for sales. You may want to view this post in the PrestaShop forums that addresses this issue.
If you have any further questions or comments, please let us know.
Regards,
Arnel C.
Hi,
Can you please tell how I can place “New” (similar to the Sale icon) over the images of new products on my presta shop 1.5.6.2 website? Thank you.
Hello Louise,
Products are labeled new based on a period of time in PrestaShop. Check out this tutorial to show you how it’s done.
If you have any further questions or comments, please let us know.
Regards,
Arnel C.
Thanks for sharing the information it’s reaally helpfull.
Hello, i would like to show the price in catalog mode in the products that are in Home page, can you help me please
Hello Leila,
By default, the catalog mode does NOT show the price. However, it can be changed if you edit the code – or use a plugin. Checkout this post in the PrestaShop forums – they have it solved.
If you have any further questions, please let us know.
Kindest regards,
Arnel C.
I am having trouble getting the ‘on sale’ to appear in the text found within the product listing.
The sale info and icon appear in the product page, but not on the main page with all of the products listed. My customers won’t know a product is on sale unless they go into it’s individual product page.
Thanks in advance!
Hello Megan,
The same setting that allows for the Sale to appear governs the front page display as well. If it is not displaying on the front page but is on the others, then there is an issue beyond the normal behavior. You may want to check with the PrestaShop forums to see if they have an answer on that specific issue.
Kindest Regards,
Scott M
Hi,
I need your help, I want to turn on sales label for a category of product(products on a category) or several products. is there any module or way to help me to do this?!
thank you.
Hello Soheyl Arab,
You would simply need to do a search for that type of module. I have seen particular sites that mention this type of module, but they are not part of the PrestaShop official site. They may also be paid modules so would need to purchase them in order to use them.
Kindest Regards,
Scott M
can i add new one product flag on product. i have to add “NEW UPCOMING” flag on product in prestashop.
Please help
i wont to show price in first page! i need it in product detail page.
Hello,
Thank you for contacting us. Since this setup can differ based on your Theme/modules, we will need some additional information. What theme/plugins are you using?
Can you provide a link to the page you are referring to?
Thank you,
John-Paul
I creat a produt.
Add it´s image, description, price, etc.
Then i add a discount, let´s say…. 5%.
A few days later, to sale it faster, i try to give it a bigger discount, let´s say 20%.
It gives me a message, that it has already a specific price and won´t let increase the discount….
Hello Duarte,
Sorry to hear that you’re having a problem. We’re not sure how you’re changing the discount. Also, if you have an existing discount, depending on the rule, you may not be able apply another discount. So, you need to look carefully at you created the discount. You have not given us any particulars, so we are unable to determine what may be causing the conflict. Discount vouchers are created in the CART RULES section. When you go to that section, click on the HELP icon in the top right and it will explain how discounts work in detail.
I hope this helps to answer your question, please let us know if you require any further assistance.
Regards,
Arnel C.
Sadly I don’t get the labels you got on your website.
Not on the product neither beneath the product price…
Any idea how to solve that?
What theme are you using? This pricing display can greatly depend on your theme itself.
Thanks, I switch to default theme and tried and it worked perfectly.
What can I do?
Hello ruu,
Thanks for your question. If you are determined to use that theme, you can attempt to contact the developer/creator, or search their site for a solution.
Alternately, if you enable Error Reporting in PrestaShop it can provide more detailed clues into the problem. Then you can attempt to correct the errors. Keep in mind this will require coding experience, or developer assistance based on the theme you are using.
If you have any further questions, feel free to post them below.
Thank you,
John-Paul
Pyrimedhs.com
I notice they save properly but still no luck
Hello Ruu,
Sorry you’re having problems with the sales notification. When I test it in a base copy of PrestaShop 1.5.6.2 I am unable to duplicate the problem. Can you please provide the exact steps you’re taking that lead to the problem? Also are you using a custom theme? We do not see any problem when clicking on the checkbox that enables the sale notification . Since you’re not on a server where we have access to look at your admin, we need your help in order to troubleshoot the problem. If you’re using another theme, can you switch to a default theme and see if the problem continues. Please provide some further info and we can proceed to determine what’s happening.
Regards,
Arnel C.
When I uncheck the sale on box, it removes “sale off” sign, If I recheck it say sale off, how can I have say “Sale On” ?
Dont seem to work for me, I cleared all cache
Hello Ruu,
Be sure when you are checking the box and clicking Save that there are no errors appearing at the top of the screen. As long as I get no errors, the Sale flag appears whenever I check the checkbox.
Kindest Regards,
Scott M
Hello Ruu,
Thanks for the questions. First, in terms of the sales notification, you would need to either modify the icon graphic directly, or purchase a separate module extension that can provide that functionality for you. What you’re asking is NOT part of the native functionality of Prestashop.
Second, you mentioned that the option above is not working for you. We need more information in order to help you. Can you please provide us a URL so that we can look at it? What version of PrestaShop are you running?
Please provide us more information on the issue and we would be happy to investigate the problem further. If you’re interested in finding a module, search through PrestaShop’s Addons for more specifics.
Regards,
Arnel C.
My products are displaying ” sale off ” , when I uncheck the put on sale box it does not up date and change anything. How can I fix this
You may simply need to clear your browser cache as well as clear the PrestaShop cache for this to update.
Can you please tell…which module is behind the Popular section?
Thanks
Hello Leonid,
Thanks for the question! Your question is a little vague, but I’ll try to answer based on “Popular” in the default theme for PrestaShop 1.6. The popular section shows BEST SELLERS. These products are shown based on the configuration of the Top Selling module – it doesn’t allow you to select the specific products, but allows you to determine how many would be displayed. It shows the top selling products in your store. The other option (usually under POPULAR) is the Featured Product. This option is set when you select HOME in the Associations section of a product in the Administrator backend for PrestaShop. For more help with assigning products to categories, go to Assigning your Product categories in PrestaShop 1.6.
Regards,
Arnel C.
Mabuhay and Thank you! It works on our site.