There may be times when troubleshooting your website that you need to check and repair a database in cPanel using phpMyAdmin. This can help you identify and fix corrupted database errors on your website..
Before continuing, be sure that you make a backup of the database you are working with in the event this does not resolve your issue.
How to Check Your Tables
- Log into your cPanel
- Click the phpMyAdmin icon
- Choose the database you are working with by clicking on it in the left menu
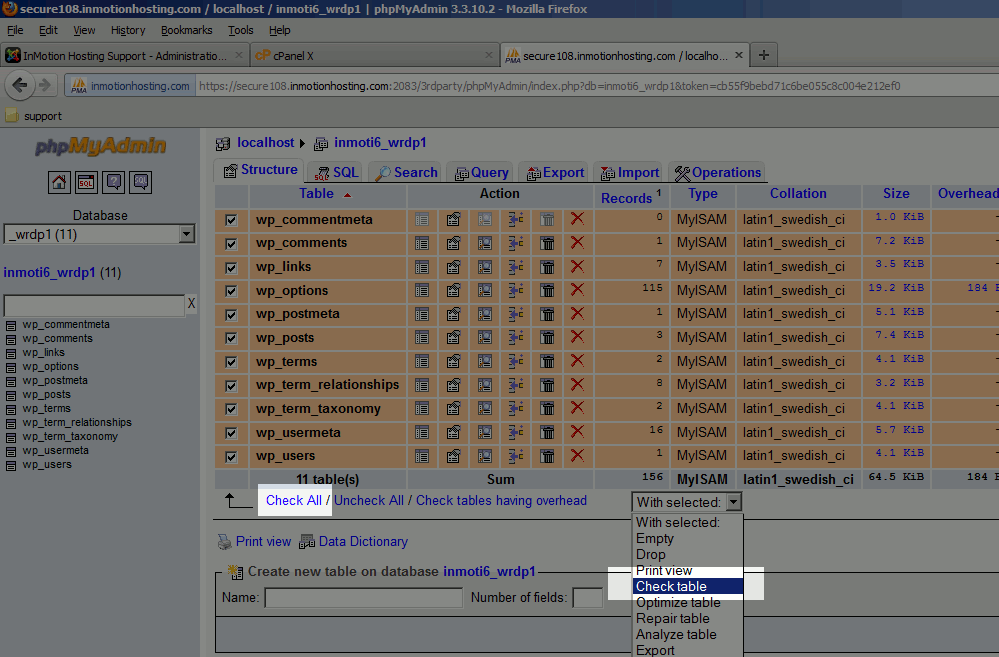
- On the right side of the page, you will see a listing of your tables. Click “Check All” and then from the drop down choose “Check Table“

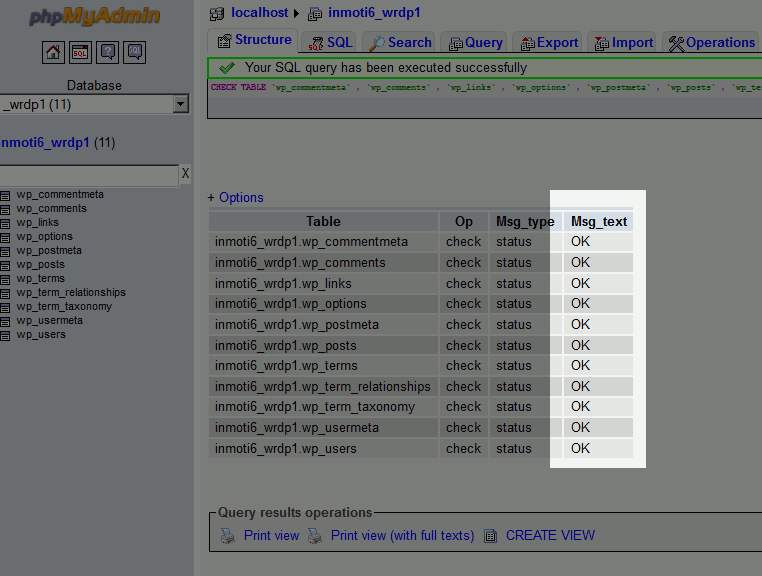
- The page will refresh and give you a summary of table that may be corrupted. As you can see from the screenshot below, all the tables are OK. If you receive any errors, you can continue reading to find how to repair your tables.

How to Repair Your Tables
- Log into your cPanel
- Click the phpMyAdmin icon
- Choose the database you are working with by clicking on it in the left menu
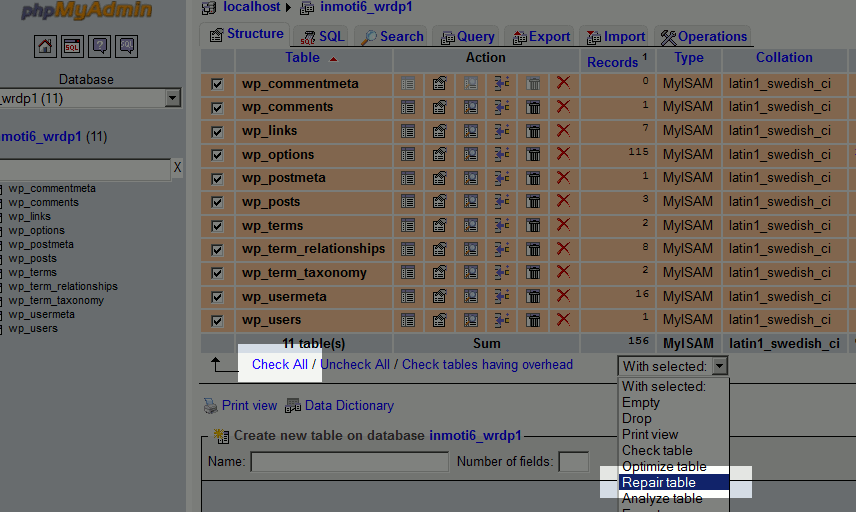
- On the right side of the page, you will see a listing of your tables. Click “Check All” and then from the drop down choose “Repair Table“

- The page will refresh and give you a summary of the tables that were repaired.
Congratulations, now you know how to check, and repair your database in phpMyAdmin. We also have a helpful guide on how to Check and repair databases in the MySQL Databases section of cPanel..
Post navigation
21 thoughts on “How to Check and Repair a Database in phpMyAdmin”
Was this article helpful? Join the conversation!
- The page will refresh and give you a summary of table that may be corrupted. As you can see from the screenshot below, all the tables are OK. If you receive any errors, you can continue reading to find how to repair your tables.


My problem is I’m getting some of the tables marked as Incorrect file format and then corrupt.
Repairing the database does nothing
Unfortunately, we are not able to diagnose the issue and determine a resolution with the information you have provided.
What is the exact error you are receiving?
Do you have a backup of the database?
What kind of database are you using?
These details are pertinent to properly troubleshoot the issue and determine a resolution.
Here are the another methods that will help in case, phpmyadmin has shown it has been repaired but actually it is not.
Method 1:
Method 2:
Method 3.
If this is not your area of expertise then hire someone that do this job of you or try 3rd party software like Stellar Phoenix (Vist here to get detaled information https://www.stellarinfo.com/mysql-repair.htm)
Apparently I have no database connection. Only some of my tables are showing up. They’re all okay. But I need to check and repair the others so I can get my site back up. Here’s the error message I got. Please help! Thanks.
wp_users: Table ‘steppe9_wp814.wp_users’ doesn’t exist
wp_usermeta: Table ‘steppe9_wp814.wp_usermeta’ doesn’t exist
wp_posts: Table ‘steppe9_wp814.wp_posts’ doesn’t exist
wp_comments: Table ‘steppe9_wp814.wp_comments’ doesn’t exist
wp_links: Table ‘steppe9_wp814.wp_links’ doesn’t exist
wp_options: Table ‘steppe9_wp814.wp_options’ doesn’t exist
wp_postmeta: Table ‘steppe9_wp814.wp_postmeta’ doesn’t exist
wp_terms: Table ‘steppe9_wp814.wp_terms’ doesn’t exist
wp_term_taxonomy: Table ‘steppe9_wp814.wp_term_taxonomy’ doesn’t exist
wp_term_relationships: Table ‘steppe9_wp814.wp_term_relationships’ doesn’t exist
wp_commentmeta: Table ‘steppe9_wp814.wp_commentmeta’ doesn’t exist
Sorry to hear those tables are reported missing. It’s possible the tables are there but there is an issue with your SQL service. If you have a VPS or Dedicated server I advise restarting the SQL services. Or, if you’re unsure of that you can contact our Live Support and request a restart.
What about errors like “Too many connections”?
Hello Roger,
It will never hurt to check and repair your database. If you are still getting errors, you can always contact the Live Support team so they can take a look at what is causing that many connections to your database.
Kindest Regards,
Scott M
Alex, I feel your pain. I’ve been a customer for 5 years and things have really gone south lately. Our site has gone down several times in the last few weeks alone. There is a service interruption every week. Yesterday, another outage, this time with DB corruption. Utterly unacceptable reliability issues. The problem is systemic. I’ve spoken with everyone from Level 1 support, L2, Billing, all the way up to Customer Service managers over the past year. Nothing has been done to fix the underlying reliability issues. No sense of urgency to help their customers. For example, yesterday’s DB corruption issue was promised to have been fixed yesterday after business hours. Now its end of day 24 hours later, still no resolution and no communication.
Clearly, InMotion is no longer concerned about customer satisfaction. We’ve given them more than enough 2nd chances. Second chances for the numerous billing errors. Second chances for the embarrassing number of reliability issues, outages, DB issues, and the list goes on. At this point, they’re just taking advantage of their customers.
Like you said, no confidence in them, time to find another provider.
i asked InMotion for suport and they gave me this link
https://www.inmotionhosting.com/support/website/databases/check-repair-database
i did what they said, first i check all table and all said OK also i run for repair but it was still nothing happen!! now my site working because they help me but i still did’t know how to fix database if this happe again??
Hello Alex,
I’m sorry to hear that you’ve been having problems with your WordPress site. Unfortunately, your comment has no specific information on your account. The Support Center is here to help if you require it. Please provide us some information on your hosting account, and a description of the issue and we would happy to investigate, if you wish.
Kindest regards,
Arnel C.
This is the 2nd time you guys have taken down my site in a couple of months.
I’ve been a customer for 6-7 years, but I’m done. If you can’t reliably keep up a simple wp site on a vps, you shouldn’t be in business.
I no longer have confidence in your team, and am going to AWS or Rackspace.
You may need to run a full database check from cPanel. To do so, log into cPanel and click on Databases. Inside there, there is an option to check a particular database.
i don’t know always my databases shot down and my site stop and saying Error in databases!!
I have the error “Error establishing a database connection.” I was sent here from support.inmotionhosting.com during a broad problem where apparently many people were experiencing this due to a server error.
The messages on the site imply that I should be able to get my site back up on my own by following these instructions.
I now anticipate that I am about to call InMotionHosting back, wait on hold for a while (tying up your resources and wait times), and I expect to be told that this will be fixed at your end as soon as possible. But I am not sure, so I have to call.
I have checked my tables using the steps above. There are no errors shown. This article does not say what to do if the error persists, but there are no bad tables.
Thank you for putting up the information that you HAVE put up, but this article is not quite on the mark for what is needed today, I think.
Hello Mansour,
Did you run the repair on the databases? Did it work for you or are you still getting errors?
Kindest Regards,
Scott M
Hello Matt,
First, we thank you for your patience and understanding during the issue, you are quite the gentleman here. The fix was indeed meant for the vast majority, however there are some databases that may need individual attention. You may want to contact the Live Support team so they can take a more in-depth look at your database since you have already tried the recommended fix.
Kindest Regards,
Scott M
Followed instructions, says “table doesn’t exist” even though I can click on it.
Well, there is a bit of CRITICAL information missing in your reply. It’s not simply “-pPasswordHere” it MUST be –password=’PasswordHere’ The password MUST be in single quotes, not in brackets or double-quotes. So, for anyone else like me out there here it is:
mysqlcheck -u CPANELNAME_DBUSER –password=’DBPassword’ –auto-repair –optimize –all-databases
In place of CPANELNAME_DBUSER you can also use your WHM username, it works as well I have found.
I tried many others and this is the one that works with InMotion.
Jason
Hello Jason, and thanks for your comment.
Sorry for the lack in clarification, while typing in -pPasswordHere, you literally have a -p then no space, then your password. You can also just leave the password option off altogether and it will prompt you for one, but that wouldn’t be ideal for a cronjob. I’m guessing you might have a character such as a ! in your password possibly causing the shell to interpret it as another command, so that’s why only using quotes works in your case.
The long hand form that you’ve mentioned also works, so thanks for pointing that out as well. Here is the part when you do a man mysqlcheck on the server about the command itself and how it functions:
The password to use when connecting to the server. If you use the short option form (-p), you cannot have a space between the option and the password. If you omit
           the password value following the --password or -p option on the command line, mysqlcheck prompts for one.
Thanks again!
– Jacob
Does ANYONE know how to set-up a cron job in order to perform database checks and/or repair? I have searched on this for hours and NOTHING is working with InMotion.
Thanks.
Hello Jason,
The basic command structure you need to run that is below:
userna5 – replace with your database username
wrdp1 – replace with your wordpress database name.
PassWordHere – replace with your database user’s password
Be sure to follow the instructions from our article on how to run a cron job for it to run properly.
Kindest Regards,
Scott M