Now that you have installed a Write Freely blog it’s time to write your first post. Write Freely is a great blogging tool, and it doesn’t require Managed VPS Server hosting, it works great on cloud VPS hosting as well.
Write Freely is very much unlike other content management systems (CMSs) you may be familiar with. Write Freely emphasizes long form distraction-free writing with as little friction as possible. This means there is no customary “admin area” or series of buttons and menus you must navigate through in order to start writing. Just click the New Post link and your entire browser window becomes your canvas and editor. Read on to learn more.
Experience full control over your server environment and deploy the best operating and management systems that fit your needs with our reliable Cloud VPS Hosting!
How To Create a New Post In Write Freely
As mentioned above, Write Freely does its best to emphasize simplicity and provide a friction-free writing environment. However, in order to create a new post you will need to be logged in with the user account you created in the blog configuration phase during the installation process.
Write Freely will have likely cached your login information from the last time you logged in. If not, just hover over the menu in the top left corner and click Log in. Provide your login details and you’ll be ready to post.
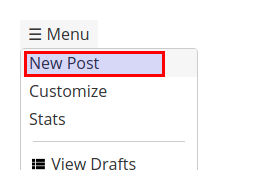
Hover over the Menu again and click New Post.

You will now see that the window has become your editor and writing space. Start filling in your post content.
Titles are optional for Write Freely posts. But if you want a title, the first line of your content will default to your title. If you want the title to be hierarchical, as in a level 1 or 2 HTML heading, then you can use Markdown or HTML formatting on the first line of your post.
When you’re ready to post, click the arrow in the top right of the window.

Posts and Drafts
When you create a new post it is automatically saved as a draft. You can view your active drafts at any time by clicking the View Drafts link in the main menu. Drafts are the best place to store ideas and freewrite content before deciding to publish it. You can store as many drafts as you want for as long as you want.
Writing Formats
Write Freely accepts two types of input for rendering your posts in beautiful HTML.
Markdown
The most basic option perhaps is to write in the simplifed Markdown syntax. All Markdown elements in your writing space will be rendered as HTML when your post is published. Likewise, if you need to edit the post later, it will display in the Markdown format just as it was when you first composed it. Make your edits, publish your changes, and the final result again will be styled HTML on your blog.
Bare HTML
If you prefer to compose your post in plain HTML you are welcome to it. All HTML elements will display as written on the front end when you publish your post. Also, remember that you can mix both markdown and custom HTML in the same post and both will display the same on the front end when your post is published.
