A WordPress Network, also known as a Multisite network, is a feature of WordPress that allows you to run multiple WordPress sites from a single installation of WordPress. With a WordPress Multisite network, you can create multiple sites with their own unique domain names, themes, and plugins, all managed from a single dashboard.
WordPress Multisite Network Advantages
Here are some of the advantages of using a WordPress Multisite network:
- Easy Management: With a Multisite network, you can manage multiple websites from a single dashboard, which makes it easy to keep all of your sites up to date with the latest updates, themes, and plugins.
- Lower Costs: Rather than paying for separate hosting accounts for each site, you can host multiple sites on the same server, which can be a cost-effective solution for managing multiple sites.
- Consistent Design: With a Multisite network, you can use the same design or theme across all of your sites, which can help create a consistent user experience across all of your sites.
- Easier Content Sharing: With a Multisite network, you can share content across multiple sites, which can save time and effort in creating new content for each site.
- Scalability: With a Multisite network, you can easily add new sites to your network as your needs grow, without having to set up a new installation of WordPress for each site.
Does InMotion Hosting support WordPress Network Multisite?
Absolutely! At InMotion Hosting, we’re proud to support WordPress Network Multisite. Our hosting services are optimized to empower you with the scalability and flexibility needed to run a network of WordPress sites efficiently. Whether you’re managing a personal blog empire or a complex corporate network, our cPanel WordPress Hosting and Managed VPS Hosting solutions are tailored to provide you with the reliability, speed, and support you require. Experience the ease and power of WordPress Multisite with InMotion Hosting, and take your web presence to the next level. Get started today and unlock the full potential of your WordPress Network Multisite.
WordPress Multisite Prerequisites
Before you start the process of setting up a WordPress Multisite, please review the following precautions.
- If you have an existing WordPress site, it will be updated when creating a multisite network.
- Verify that Pretty Permalinks work on your single WordPress install.
- Deactivate all active plugins. Once the network is created, you can reactivate your plugins.
- If you plan to run WordPress out of its own directory, do that before activating Multisite.
How to Set up a WordPress Network (Multisite)
Now that you’ve decided to use a WordPress Multisite or Network, you’ll need to change your existing WordPress install. Follow these steps to enable the WordPress Network feature known as Multisite. Before proceeding, you should decide if you want the site created in separate subdirectories or subdomains.
- If you are using the subdomain option, setup a wildcard subdomain first. If you are using subfolders just proceed to the next step.
- Edit the wp-config.php file.
- Add the following code to your wp-config.php file after the line that says “That’s all, stop editing! Happy publishing.” Save it.
/* Multisite */
define( 'WP_ALLOW_MULTISITE', true );
- Log into your WordPress Dashboard.
- Click Tools then Network Setup.
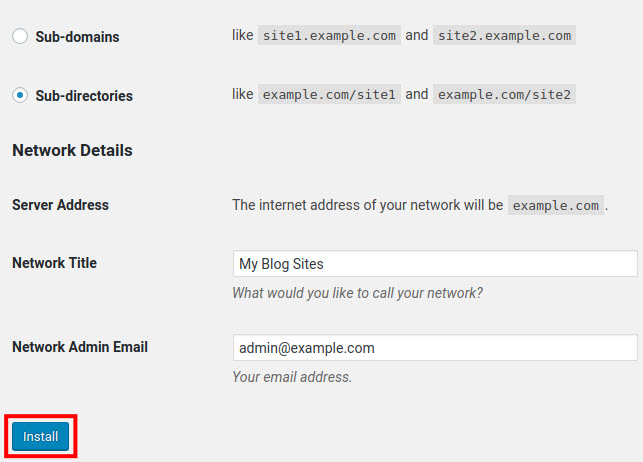
- Choose if you want to use the Sub-domains or sub-directories.
- Enter your Network Title.
- Add your Network Admin Email address.
- Click the Install button.

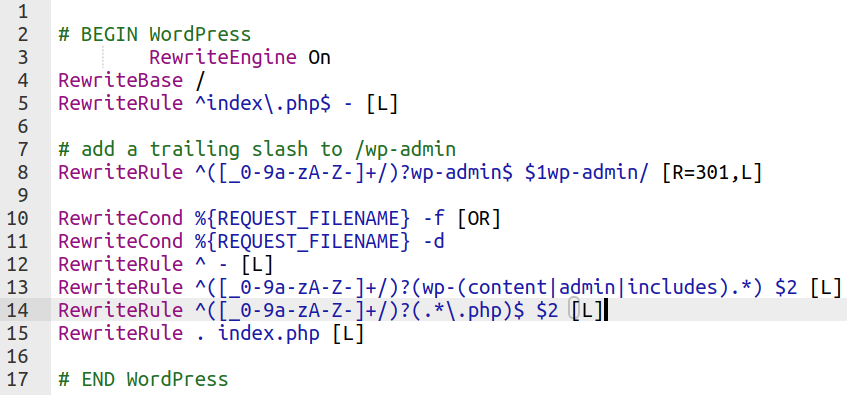
You will then see two sections of code.

- Copy & Paste the first code into your wp-config.php file before the line that says “That’s all, stop editing! Happy publishing.” Be sure to save the changes.

- Copy & Paste the second code to your .htaccess file and replace everything between the “# BEGIN WordPress” and “# END WordPress” lines. Save your changes.

- Log back into your WordPress Dashboard. You can now click My Sites then Add New to create new WordPress sites in your network.
- If you want to allow users to register, roll your mouse over My Sites and Network Admin then click settings. Next to “Allow new registrations” you can choose if you want to allow users to register accounts, sites, or both.
A WordPress Multisite network can be a great solution for managing multiple websites with ease and efficiency. Now that you know how to create a WordPress Network (Multisite), you can start creating WordPress websites on demand.

