When creating a WordPress website, one of your first tasks will be adding your company logo. Adding your logo to your WordPress website header will help your customers recognize your site and build trust around your digital brand. It verifies your website with users and encourages them to buy your product/service and/or become regular readers.
This article will give you resources on how to create a logo, as well as show you how to add a logo to your WordPress website header.
Enjoy fast, secure hosting for your WordPress site with our optimized WordPress hosting plans.
The below instructions will assist both WordPress and BoldGrid users add a logo to their website header.
Tools to Create a New Logo
There are many free tools that will allow you to create a logo on your own if you don’t have one. One of the best free online tools is Canva. The easy-to-use design tool has hundreds of logo templates to choose from to get started. Once you’ve chosen a template, you can use their intuitive editor to customize your design to fit your brand. While creating your design, here are a few things to keep in mind:
- Use a format like JPEG, JPG or PNG because they are accepted by WordPress
- Use PNG format for graphics with transparent backgrounds
- Try not to add a lot of text to your logo. Depending on the size, some may not be able to read it
- Add a Title and alt tag
You can also try one of the below free graphics programs to create your logo:
Adding a Logo to WordPress Header
Once you’ve created your logo and downloaded the appropriate logo file from the design tool you used, it’s time to add your logo to your website! The below instructions can assist both BoldGrid and WordPress users.
- Log into your WordPress site or the BoldGrid Administrator
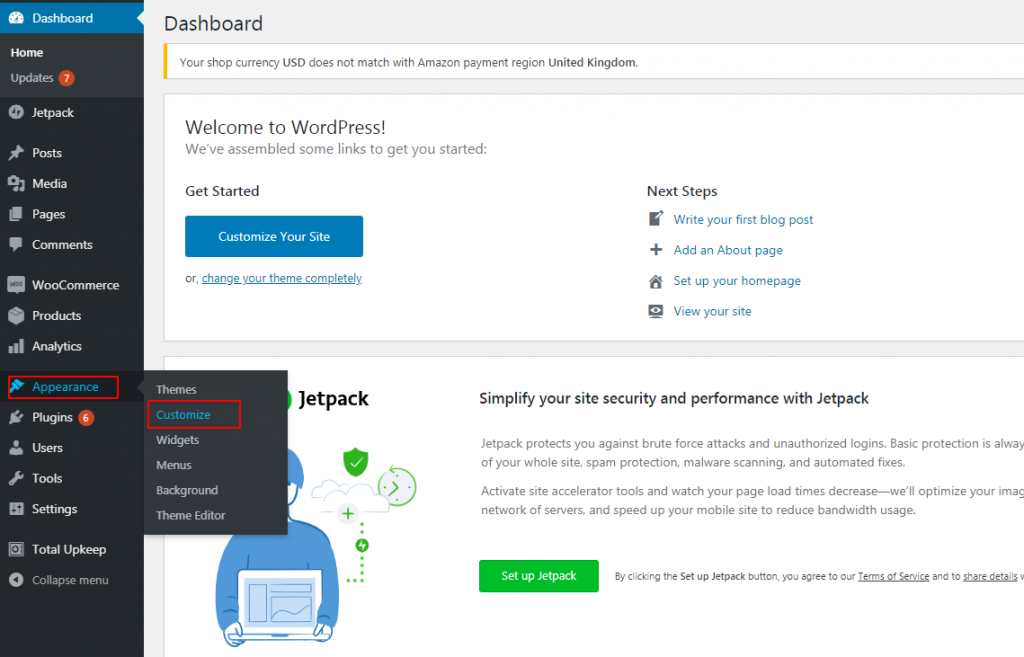
- Click on Appearance > Customize. This will take you to the Customizer screen
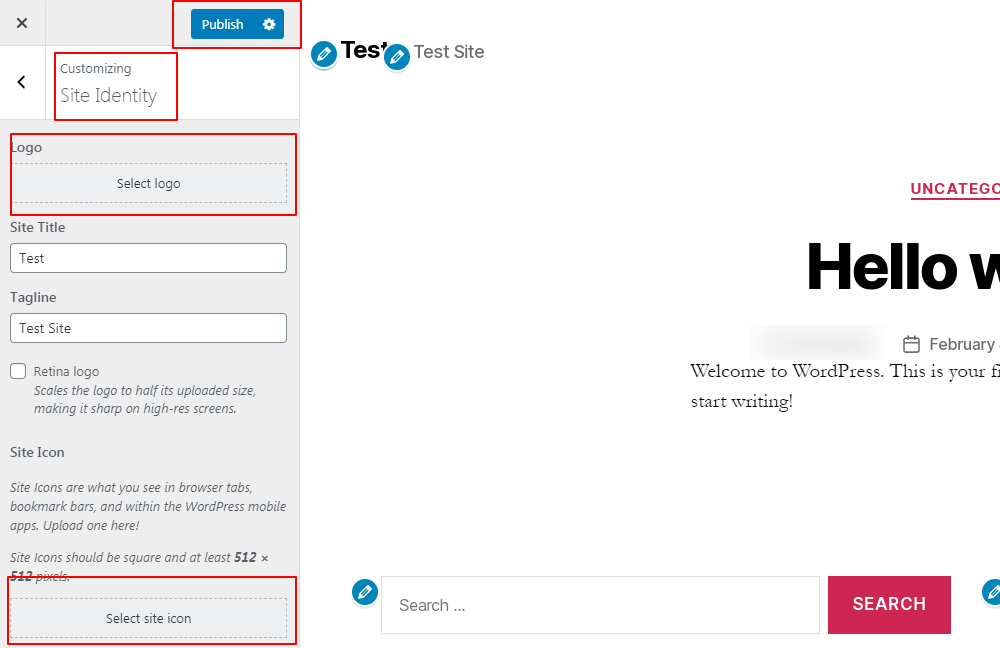
- For WordPress users, click on Site Identity > Select Logo
For BoldGrid users, click on Site Title & Logo > Select Logo - Upload your new logo by clicking Upload Files then follow the prompts
- Before the logo is added to your site, you will be asked if you would like to crop the image. Select Skip Cropping or Crop for the image to be saved and added to your header
- Once you’ve added your logo, you will see it in the Customizer screen
- The logo placement will depend on the WordPress theme or BoldGrid Inspiration that you select to use.
- Click Publish in the Customizer to save your changes
- Also in the Site Identity section, you have the option of adding a site icon (also known as a favicon) by clicking Site Icon and following the steps above
A site icon, or favicon, is the iconic image that shows in the browser tab your website is loaded in - Click the X in the upper left-hand corner of the Customizer screen to return to the WordPress Dashboard
Now that you know how to add a logo to your website, explore more WordPress and BoldGrid design tips and tricks to help you create a great website for your brand!
Check out more WordPress articles from the support center:
- How to Add a User Role In The Members Plugin
- Why We Use Nginx In Our WordPress Hosting
- How to Backup WordPress to Dropbox
- Easy WordPress “Hardening” in the Htaccess File
- How to Backup WordPress with FTP
- How to Create and Delete a WordPress Page Using WP-CLI
- How to Backup WordPress over Email
- Optimize WordPress Guide: Tuning for VPS & Dedicated Servers
- How to Restore a Previous Version of a Page or Post


