In this Magento installation guide, we’ll show you how to install Magento and get your store up and running in no time. Since Magento is going to be manually installed without the use of a third party installer, there are quite a few steps, however, the installation process is quite easy.
Before installing Magento, please note, you will need a Magento Hosting plan on either a virtual private server or dedicated server, due to the resources required to run Magento.
Set Up a Database for Magento
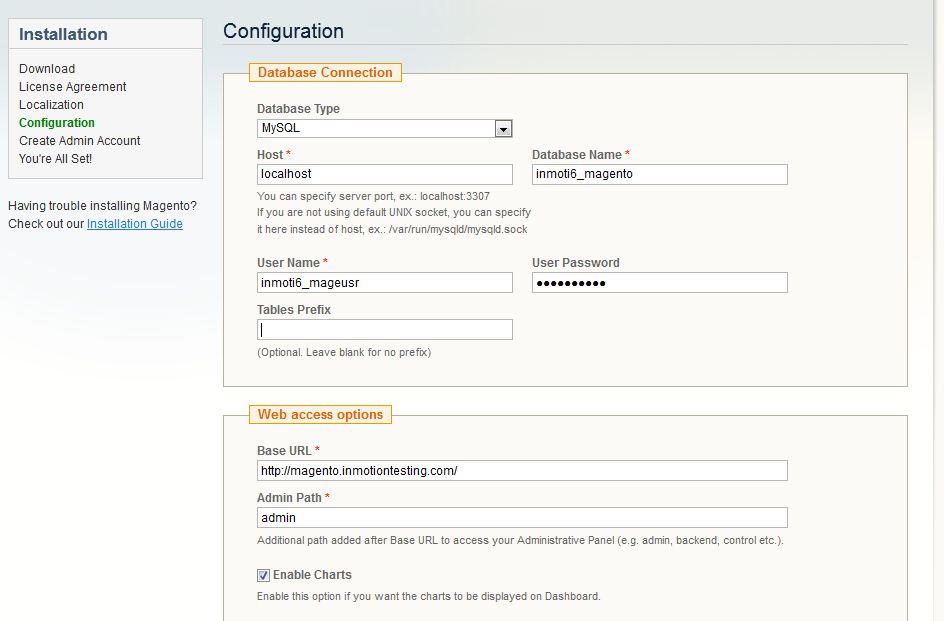
Log into cPanel and using the MySQL Database Wizard, set up a blank database for your new Magento installation. Be sure to make note of the database credentials as we’ll have to use them later on in the installation process. Here’s the credentials we’ve used:
| Database Name | inmoti6_magento |
|---|---|
| Database User | inmoti6_mageusr |
| Databse User Password | ******* (We’ve left out our password to protect the security of our database |
Download Magento Install Package
- Download the Magento install package from the Magento website: Magento Downloads page
- Under the “Full Release” section, select any of the files under “Select your format” and click “Download“
Upload Magento To Your Server
Now, using the cPanel File Manager upload the compressed package you just downloaded from the Magento website. Upload it in the same directory you wish to install Magento in. In our example we’re installing Magento in a subdomain called “magento.inmotiontesting.com” so we’re uploading the .zip file to the root folder for that subdomain.
- In File Manager, right-click on the .zip file and extract the file to the current location.

- This will create a folder called “magento“. We need to move the contents of the “magento” folder to the parent folder above. If we do not do this step our store will install in the “magento.inmotiontesting.com/magento” location instead of “magento.inmotiontesting.com“. Open the Magento folder, and “select all” files and folders.
- Right-click with the files selected and select “move“. Change the “move” location to the parent folder above the “magento” folder.
Edit the .htaccess file for Magento
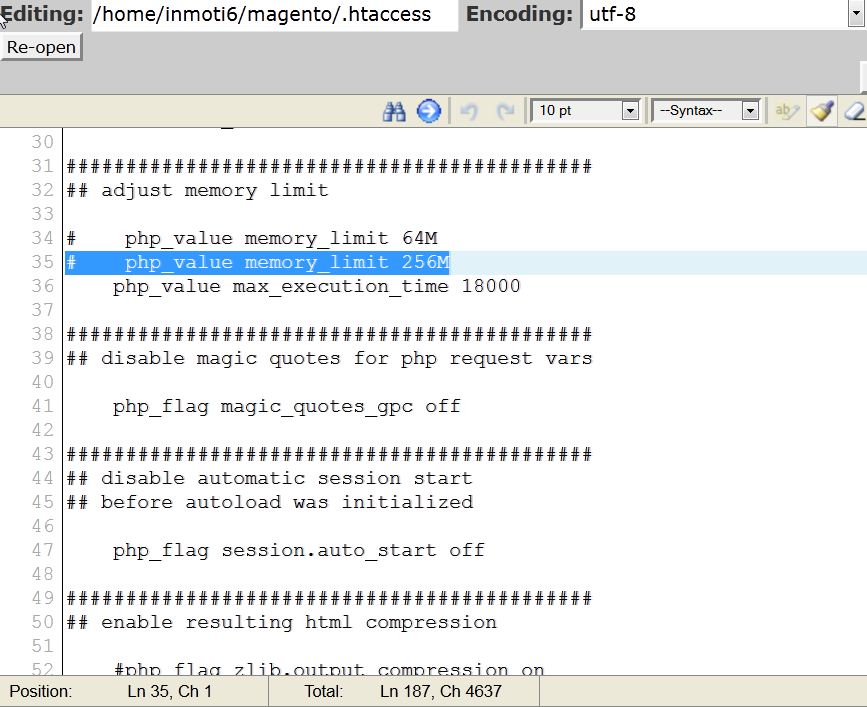
- In the root folder, find the .htaccess file and right click on it. Then choose “Edit“.
- Find this line of code:
php_value memory_limit 256M
And change it to this:
# php_value memory_limit 256M

Configure Your Magento Install
- Now, visit your new Magento installation in your web browser. We installed ours in the subdomain “magento” so it would be: https://magento.inmotiontesting.com
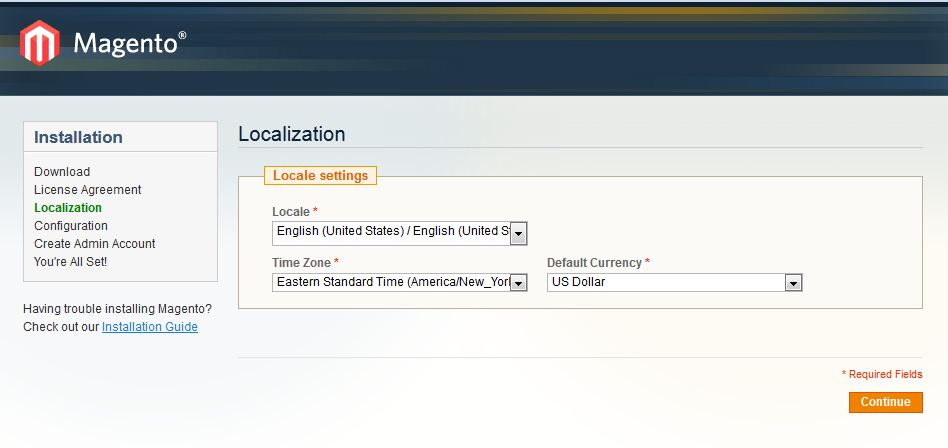
- On the next screen, select the Localization Settings for your timezone, currency, and language.

- Fill in your database credentials that you wrote down from the first step and click “Continue“.

- Fill in the Admin Account Details and click “Continue“.
- On the next screen, Magento will provide you with an encryption key. Copy the key down and store it in a safe place.
At this point, you’ve initially installed and configured your new Magento shopping cart. You can visit your website frontend, or log into the Magento Admin Panel.

I installed Magento2 on subdomain.
The installation stack in 71%.
The reson is apache2 default config.
According apache documentation, it must be configured by default
other case,
.htaccessdoes not would.please inmotion, config for me on apache this, in order my magento2 work on my hosting.
I checked all options on my local already. I stack now.
Thanks
I’m not quite sure what configuration you are looking for. Can you please reply back to provide more details or any errors that you are seeing?
I have installed magento 1.9.x through the softaculus. But I can not access the admin, although the password and the username are correct. What can happen?
Hello!
If you navigate to Softaculous > All Installations, you can click on the pencil next to the installation you are experiencing login issues with. Under the Admin Account section, you can enter the admin username and password, to have Softaculous change this for you. Then test out the login with the new username and password you’ve entered.
Also, you should be able to click on the icon of the person, under the Admin column on the All Installations page. This will log you into the dashboard automatically. I hope this helps!
Sincerely,
Carlos E
I installed Magento with Softalicious but I am getting an error that the Magento cron job is not running. I don’t know how to solve this problem. Can you please help?
If you have root access you can check if the cron job ran, otherwise Live Support can help you review the logs to determine if the cron job ran. You can check the cron configuration settings in the Magento dashboard.
As a test try disabling mod_security in cPanel.
Thank you,
John-Paul
yes there was an index file inside public_html. after doing some search, i transferred my magento files inside public_html and happily, the installation wizard came on type my domain but now i cant click on continue over there, even though all other links in that page are working.
can you help me with that?
Hello karan,
Thank you for contacting us. I’m glad you were able to get the installation wizard to load.
Can you provide a link to the site, so we can test it?
Thank you,
John-Paul
i followed the procedure as it is … but still when m opening my domain link… its just do nothing, magento installation its not asking for … its giving me same thing that its hosted by miles web.
what should i do?
Hello karan,
Thank you for contacting us. I recommend checking your account for any index files, such as: index.htm, or index.html (If these are there, they will load before the index.php of your magento site).
Also, make sure your website is pointed to the correct server.
If your problems persist, I recommend contacting your Host, so they can check your account for issues.
Thank you,
John-Paul
my hosting provider have a one click install for magento. will that be ok to go with that? does that make a difference if i do it manually or not?
sorry m beginner
Hello karan,
Thank you for contacting us. Yes, it should be fine to use the “one click” installation. We recommend using our 1-click installation (Softaculous) whenever people are having trouble manually installing the software.
Thank you,
John-Paul
Hi,
I am trying to install Magento to the hosting but it keep saying database error. I have creating SQL database and assigned a user with proper password as permentioned and i have given the previllages to the user also.
As I am directly uploading magento files inside the public_html folder, so for that reason I don’t think I don’t need to change the .htaccess file, Please let me know if i am wrong. coz I am still getting the msg saying database error. 🙁
Regards,
Kunal
I am also facing trouble its keep saying database connection error. I hosted all the files under public_html folder in the server.
So i believe i don’t need to change the .htaccess file, Please let me know what I am doing wrong.
Please Note: I have created the database and user and assigned all the privileges to the user.
Regards,
Kunal
Hello Kunal,
Can you please provide your domain so we may look into the error. How did you install Magento? (via Softaculous or manually).
Best Regards,
TJ Edens
Hello Maddy,
Can you please provide your domain so we may look into the issue further?
Best Regards,
TJ Edens
Hello, Anirban
When Magento installs, it should also include a .htaccess file in its root folder. This file should have quite a bit of information in it. Also, there is another file named.
Edit the .htaccess file in Magento
in the opened file, i don’t see what in the picture, but the followin,
# To set your custom php.ini, add the following line to this file:
# suphp_configpath /home/yourusername/path/to/php.ini
# php_value mbstring.func_overload 4 # Required for PWSB support. Please do not uncomment this line.
what should I do ?
Hello David,
When Magento installs, it should also include a .htaccess file in its root folder. This file should have quite a bit of information in it. Also, there is another file named .htaccess.sample with a copy of that base information. If you have that, simply replace the current .htaccess file code with the .htaccess.sample code. Then you should be able to see the code you need to alter in the instructions above.
Kindest Regards,
Scott M