Drupal Mixpanel integration grants access to a product analytics stack with powerful features centered around deep user segmentation and A/B testing. This is much more complex than most popular web analytics tools like Matomo. Those are primarily focused on reporting user activity, not modifying a website in accordance with someone’s user agent, geolocation, etc. From Mixpanel.com you can develop complex integrations and API calls to modify web sites and applications automatically based on reported user analysis.
As great as it is, Mixpanel integration with a content management system (CMS) can be difficult. Many Mixpanel CMS integrations only provide basic integration using the Mixpanel token ID. For anything more you’ll need to develop API calls within code that may not be accessible in an admin dashboard by default.
Depending on your goals with Mixpanel, and your comfort level with editing code, there are three ways to integrate Mixpanel with Drupal:
Drupal Mixpanel Integration Module
As of Spring 2021, Drupal 7 users can use the Mixpanel Drupal module (version 7.x-1.3). The Drupal 8 port is still in progress, according to the module description. If you choose this method, remember that it is covered by the security advisory policy but was last updated in 2016. Ensure you’re using the latest PHP version and a proactive server malware scanner to handle cyber threats.
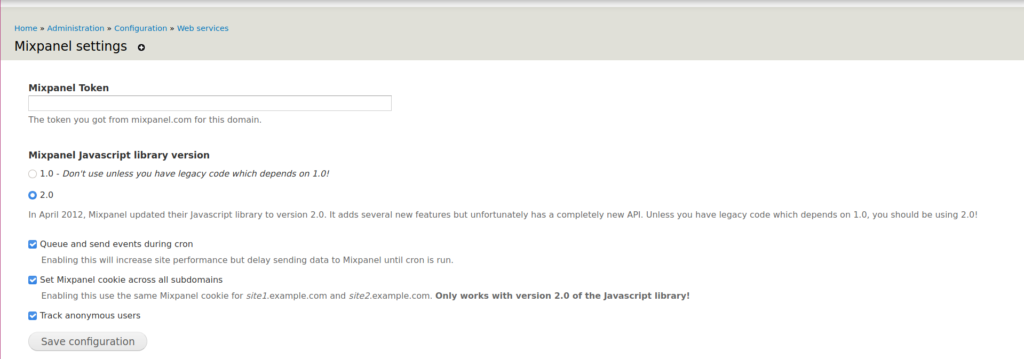
- Install the Drupal module using the Mixpanel download link for your Drupal version.
- Click Enable newly added modules.
- There will be a dedicated section for Mixpanel. Check the boxes for Mixpanel and Mixpanel defaults. You’ll need the separate Rules module to enable Mixpanel rules which can assist you with configuring what data is reported.
- At the bottom, select Save Configuration.
- To the right of Mixpanel, select Configure.
- Uncheck Queue and send events during cron for immediate data reporting.
- Uncheck the option to track anonymous users to focus on Drupal users instead of all visitors.
- Log into your Mixpanel.com account.
- In the upper-right corner, select the gear icon and the project name from the menu.
- Copy the alphanumeric project token string and paste it in the Drupal Mixpanel Token text field.
- Select Save Configuration.
- Clear your Drupal cache to ensure the tracking code is public immediately.
- Log into your Drupal site in a private browsing session. The Mixpanel defaults module will send data for joining/leaving a group, modifying users, user login/logout, modifying a node, and creating a comment. Page views stats aren’t sent by default.
- In Mixpanel, select the gear icon in the upper-right corner and Set up Mixpanel.
- At the bottom, beside Check for Incoming Data, select Check. The notification should change to “We successfully received your data!”
- Select Start Using Mixpanel.
- You’ll need to configure your insights report to see the logged event. Under Events & Cohorts, select + Add and Event.
- In the Select event drop-down menu, you’ll see options from recorded events. To see everything, choose All Events.
- The line graph at the bottom will update accordingly. You may choose to learn more about sending custom events to Mixpanel in a custom module or the Rules module.
- You can use the Header and Footer Scripts module covered below to add tracking code for additional events including page activity.

Manual Mixpanel Drupal Integration
For Drupal 8 users, and those who prefer not to use an old module, there are other methods. The first one is to use the Header and Footer Scripts Drupal module. Like the Mixpanel module, this scripts module is covered by the security advisory policy and hasn’t been updated in 2-3 years (as of Spring 2021).
Unlike the Mixpanel Drupal 7 module, it is much more popular with over four thousand installations and available for Drupal 8. Still, ensure you have a solid cybersecurity posture beforehand.
Header and Footer Scripts Module
- Install and enable the Header and Footer Scripts module for Drupal 7 or 8.
- Select Header and Footer Scripts from the Configuration page.
- Go to the Set up Mixpanel page.
- Under Install Library (SDK), copy the HTML snippet and paste it into the Header Scripts, not “Styles,” text box.
- Select Save Header Settings.
- Select the Body Scripts tab.
- Add this tracking code in the Body Scripts field. This will only gather page views but it is a starting point to ensure your setup works:
<script>mixpanel.track("Viewed Page", {'Page Name': document.title, 'Page URL': window.location.pathname});</script> - At the bottom, select Save Body Settings.
- Clear your Drupal cache to ensure the tracking code is public.
- View a few pages of your Drupal site in a private browsing session.
- At the bottom of the Mixpanel setup page, select the Check button. The notification to the left should change to “We successfully received your data!”
- Select Start Using Mixpanel.
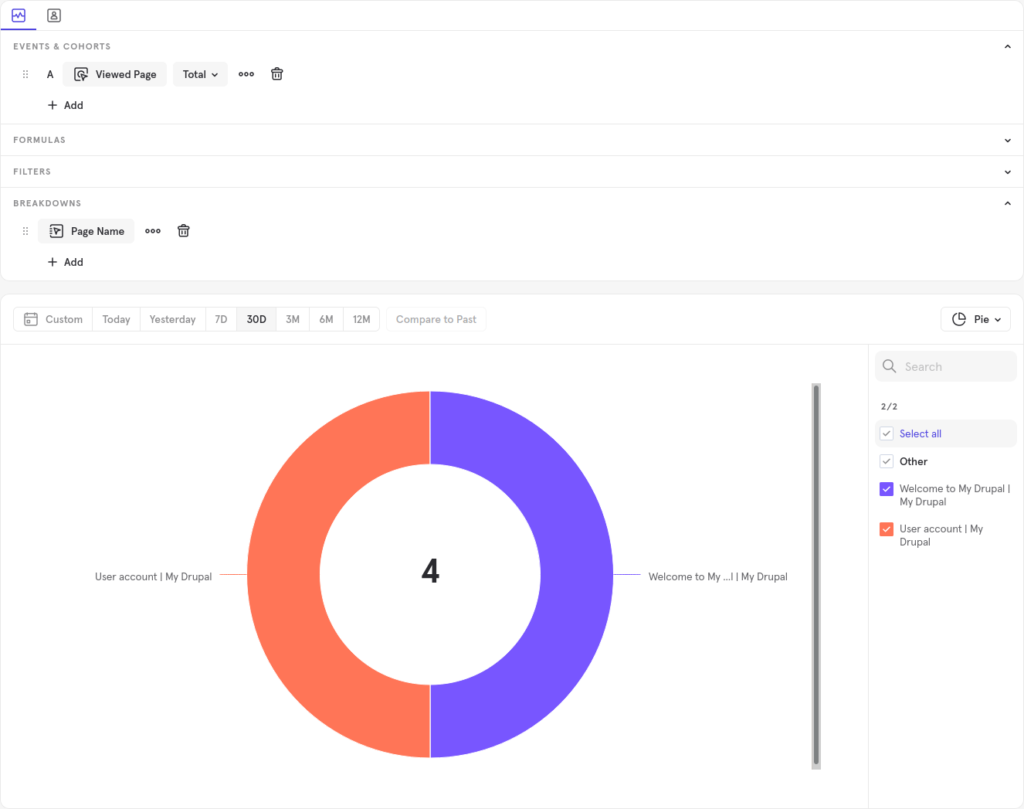
- At the top, ensure Insights is selected.
- Under Events & Cohorts, select + Add.
- Select Event, then Viewed Page. The graph at the bottom will update accordingly.
- Under Breakdown, select + Add.
- Select Page Name or Page URL.
- Change the visualization to a pie graph for a different representation.

Manually Editing Drupal Core Files
If you’d prefer to not use any modules at all, you can edit Drupal core files. There are multiple methods for this including:
- Editing core and theme files
- Structure blocks
- Native Drupal APIs
Unless you’re comfortable editing Drupal core files, you should first create a backup and seek assistance from Drupal developers via Freenode internet relay chat (IRC) channels and other Drupal communities. You could also contact Mixpanel technical support directly. This allows you to best determine which method would work best for your needs and Drupal hosting plan. Let us know if you have any questions regarding Drupal Mixpanel integration.
For more step-by-step guides and practical tips, visit our Drupal Education Channel.
Ignite your online presence with cutting-edge Drupal Website Hosting. Elevate speed, security, and reliability for a seamless website experience.
