The main thing you will do with Sprout Invoices is to create invoices. If you’re new to the subject, the definition of an invoice is:
an itemized list of goods shipped usually specifying the price and the terms of sale : BILL
merriam-webster.com
An invoice can be used for goods or services that you provide to your clients. The purpose of the invoice is to be paid for what you have provided. Creating an invoice with Sprout Invoices is a simple task. Follow the steps below to learn how to create an invoice.
Searching for a new home for your WordPress site? Look no further than InMotion’s WordPress Hosting solutions! You’ll find secure, managed servers that are configured to meet your budget needs.
Create the Invoice
Before you start creating the form, make sure that you have completed the initial steps to configure the settings for Sprout Invoices. This ensures that your contact information, company logo, and template selection have been selected for your invoice. You will need to be logged into the WordPress Administrator Dashboard in order to create the invoice.
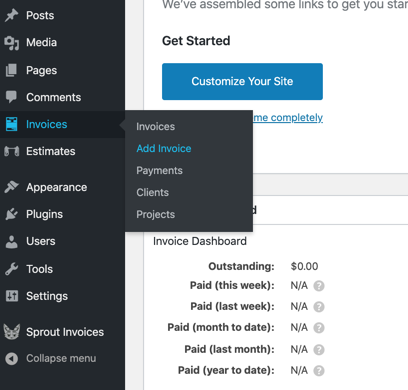
- Click on Add New under the Invoices menu in the WordPress Administrator Dashboard.
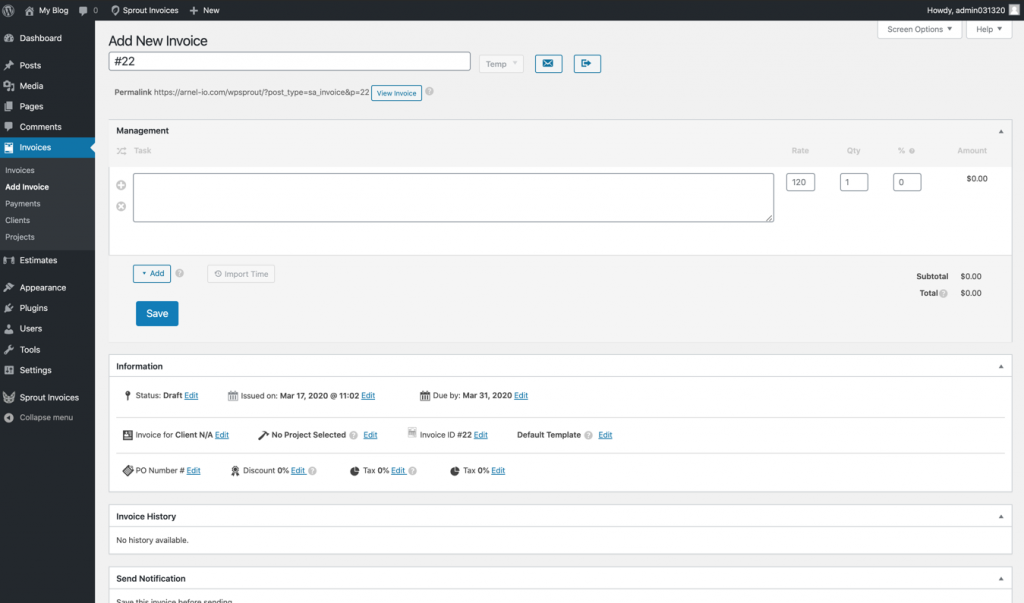
- You will then see the template for the invoice that you are creating. It will be numbered, but you can replace the number with a meaningful name. Click on the number and rename the form for your purposes. Note do not close your invoice editing screen unless you have saved your form first. If you do so, then you will lose your work.
- Next, you will need to add line items for the invoice. This can be a task, service, or product. By default, the invoice starts with a task, but you can remove it by clicking on the X symbol. In order to change the line item, click on the circled plus symbol and you will see a drop-down menu appear for each type.
You will be able to assign cost and discount values for each task, service, or product. These values are assigned after the description. The percentage is actually used for discounting from the sub-total of the billable line item. This is a summary of each line item type:
Product – this line item is typically a tangible item that you’re selling to your client. It could also be an item that you’re billing the customer as part of your service. Products will include a SKU (Stock Keeping Unit), Price, Quantity (Qty), and Discount(%).
Service – this line item is a performed task that is a complete unit. Your client would be paying for the overall cost of the service. Service line items include a Price and a Discount (%).
Task – the task line item is typically associated with a project. If you add values to the cost, you will not see a total until it is associated with a project where time has been assigned. The values associated with this line item are Rate (dollars per hour), Quantity (qty.), Discount (%). - Once you have completed adding your invoice line items, click on the blue Save button in order to save your work. If your invoice is long, we recommend periodically saving the invoice to keep from losing any work.
Use the Slideshow below to see the screenshot for each step as described above.
Information Section

The next section is labeled Information. Here you can set the following follow options:
- Status – when you create an invoice, it is set to Draft.
- Draft – invoice is being created
- Pending – sent to the client and awaiting response
- Scheduled – scheduled to be sent at a particular date
- Outstanding Balance – requires completion of payment
- Paid – client has completed the payment
- Written Off – canceled by you
- Archived – old invoice saved for records
- Publish on – publish date of the invoice
- Due by – due date for the invoice
- Invoice for Client – associated with a created client
- No Project Selected – project associated with tasks
- Invoice ID – invoice ID; defaults to number, but can be changed here
- Default Template – template used for invoice
- PO Number# – identification number for existing PO
- Discount 0% – discount for overall invoice
- Tax 0% – tax applied before discount
- Tax 0% – additional tax field if needed
Terms and Notes

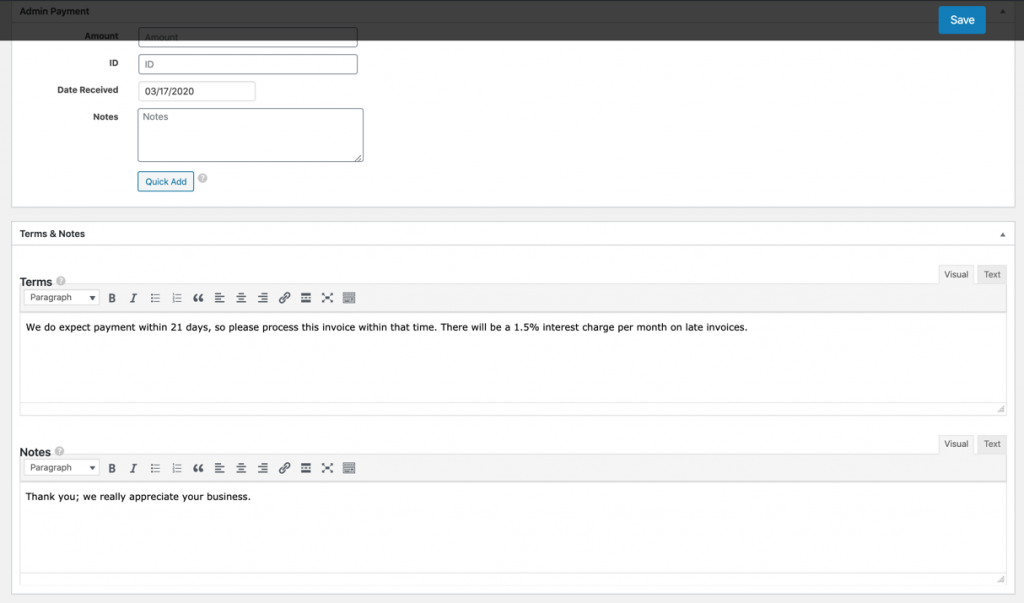
To complete the creation of the invoice, scroll down until you find Terms & Notes. Here you can set the terms of the payment or other legal issues that concern the payment of your invoice. You can also add notes in the notes section concerning this particular invoice or the tasks/products/services you have provided. When you have completed this section, click on the blue Save button in the top right corner.
Now you can send your clients notifications that their invoice is ready.
Congratulations! You have created an invoice with Sprout Invoices! Now you are ready to create a project in Sprout Invoices. Learn more about by going to the Sprout Invoices Product Guide.


