Google Analytics is one of the most used website statistics applications on the internet. You can easily find Google Analytics specific plugins that make it easy for you to integrate the application into your WordPress website. There is also the option to add Google Analytics directly to your WordPress site without using a plugin. These guides can help you make use of Google Analytics for tracking your WordPress site statistics.
- Install Google Analytics to WordPress with a Plugin
- Install Google Analytics to WordPress without a Plugin
- How to Add the Google Analytics Tracking Code in BoldGrid
Want a better home for your WordPress site? Check out InMotion’s WordPress Hosting for secure, optimized servers that are configured for your budget needs.
How Do I Add Google Analytics to WordPress Using a Plugin?
WordPress provides different options to measure its performance, but Google Analytics is the most used option for checking the statistics of your website. Google Analytics can be installed without a plugin but this tutorial will demonstrate how you can install it using a Google Analytics plugin. There are many Google Analytics plugins, but the one used in this tutorial will be the Google Analytics Dashboard for WP. It provides you access to the Google Analytics data without having to leave the WordPress Administrator interface.
Installing the Plugin for Google Analytics – Google Analytics Dashboard for WP
- Log into the WordPress Administrator
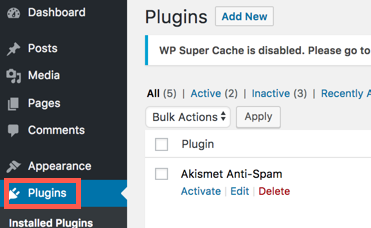
 Click on Plugins.
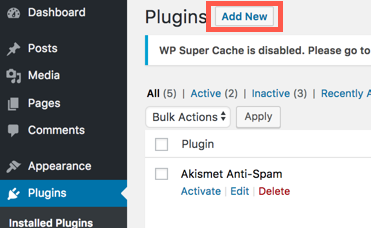
 Click on Add New.
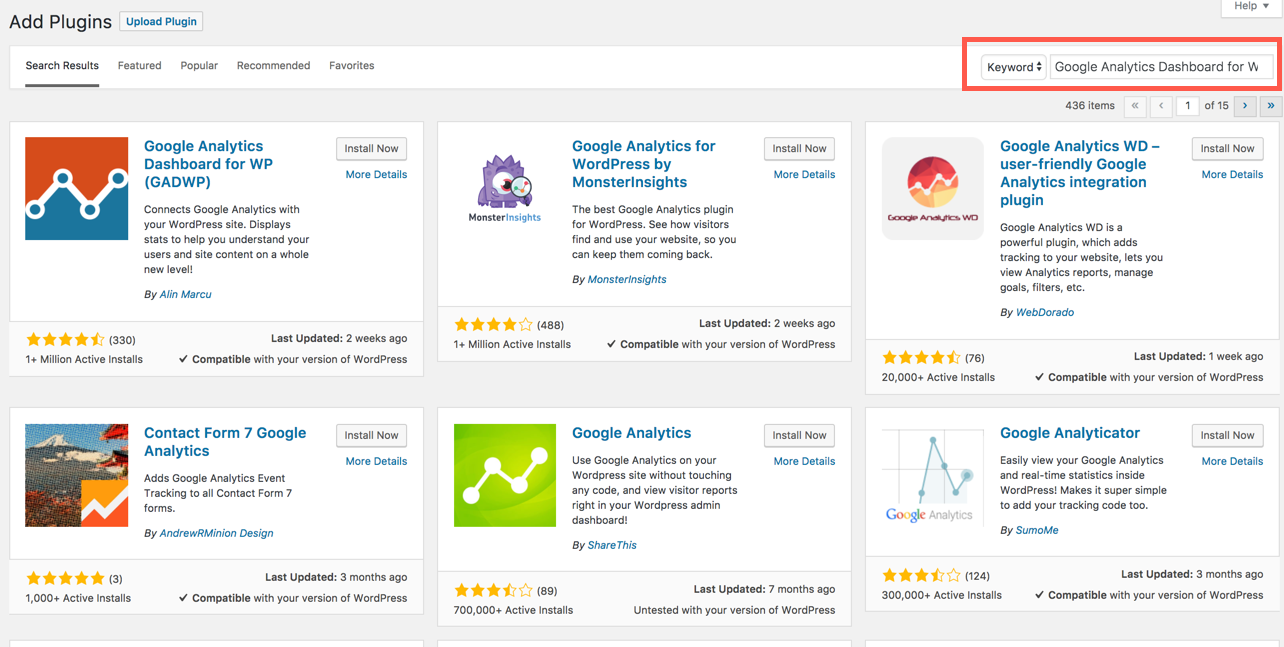
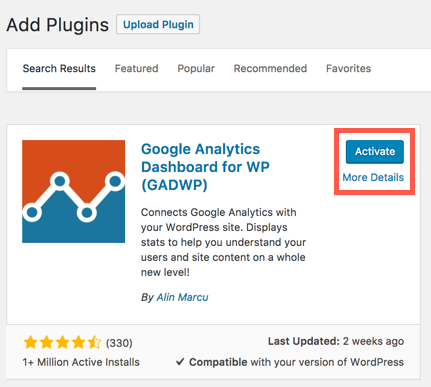
 Search for the plugin that we will be using in this tutorial – Google Analytics Dashboard for WP.
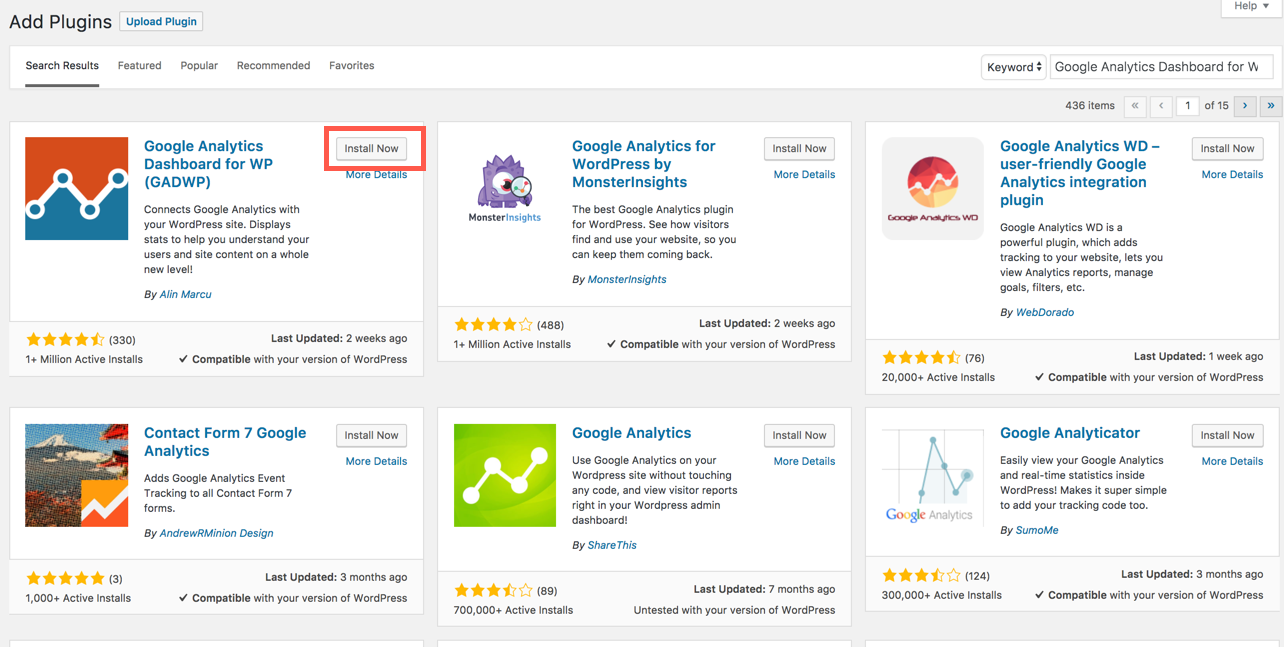
 When you see the plugin option appear, click on the Install Now.
 Click on Activate.
How to Authorize the Plugin to connect to Google Analytics
Once the plugin has been installed, the next part is to authorize the plugin to connect to Google Analytics.
- If you are not logged in to the WordPress Administrator, log in.
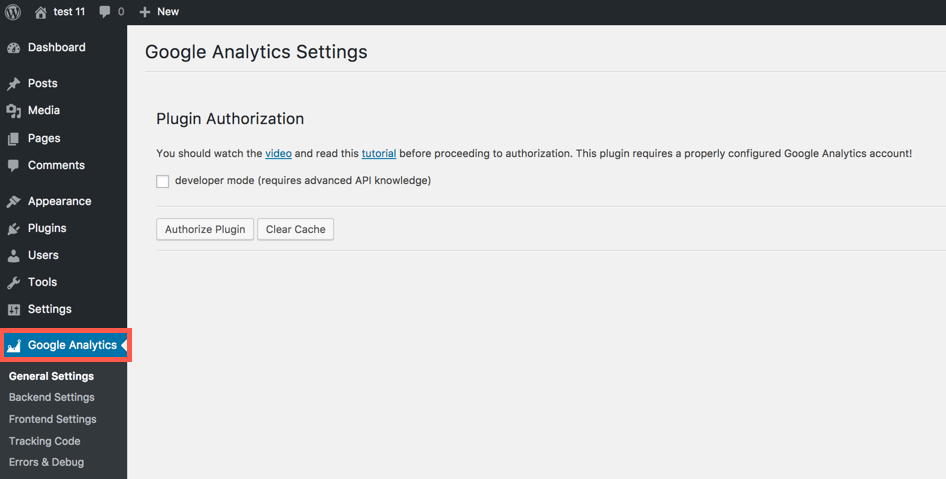
 With the plugin installed, you will see the option for Google Analytics on the menu. Click on Google Analytics.
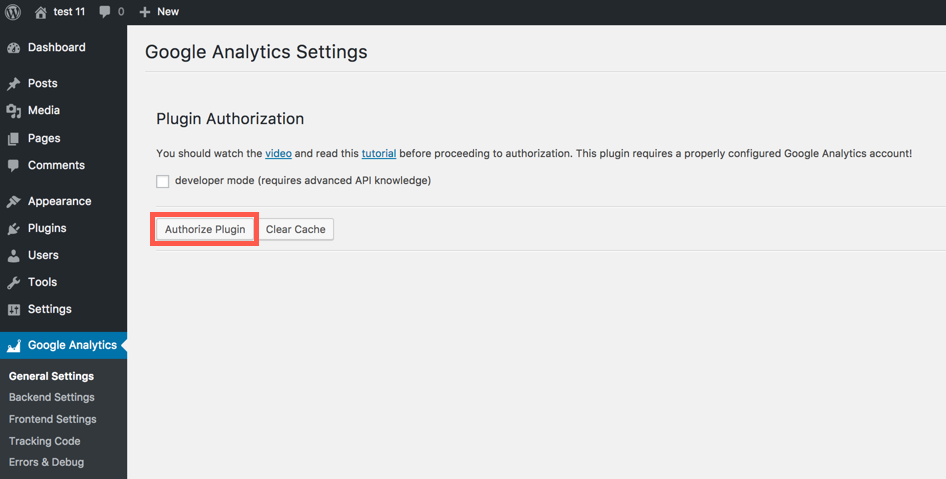
 You will be brought to the Google Analytics Settings page. Click on Authorize Plugin in order to start the plugin authorization process.
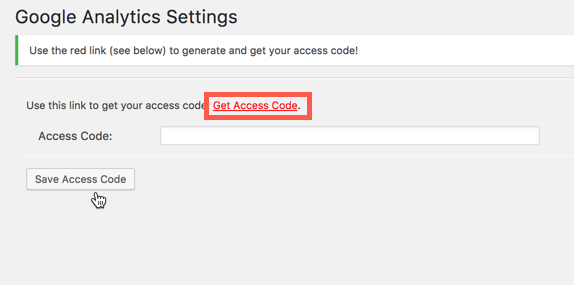
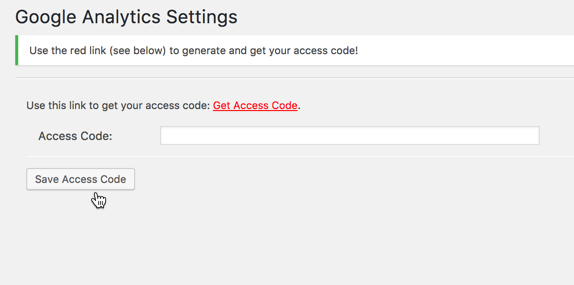
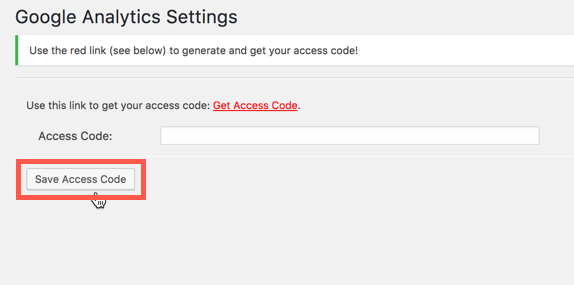
 You will see the Google Analytics Settings page. You will see a link labeled Get Access Code. Click on this link.
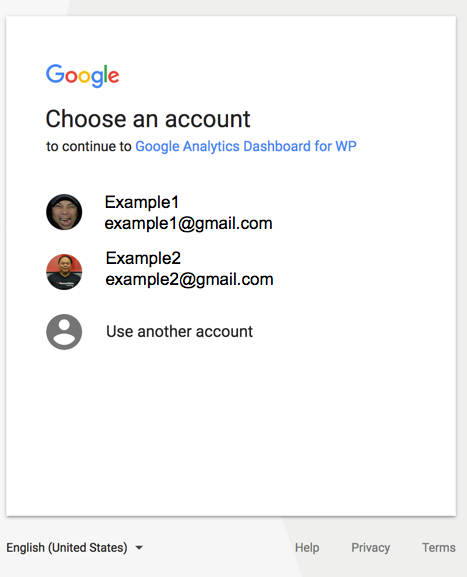
 It will attempt to login to your Google Account. You will need to select the appropriate account.
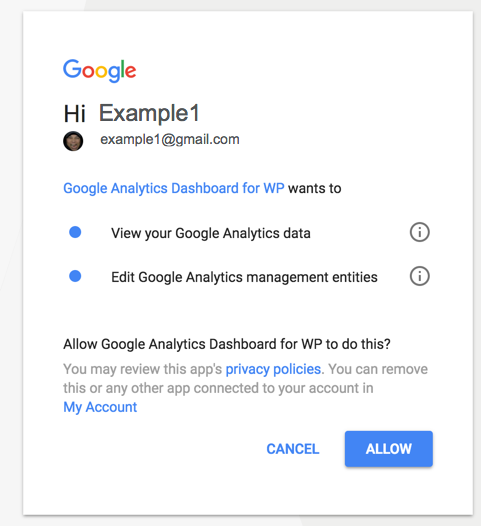
 Once you have selected the account there will be a window asking for you approval to allow access to Google Analytics. Click on the Allow button to proceed.
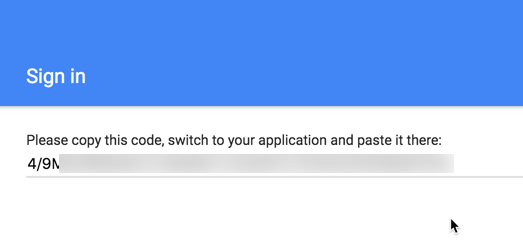
 Copy the code that you see next.
 Go back to your WordPress site and paste the code into the Access Code field.
 Click on Save Access Code.
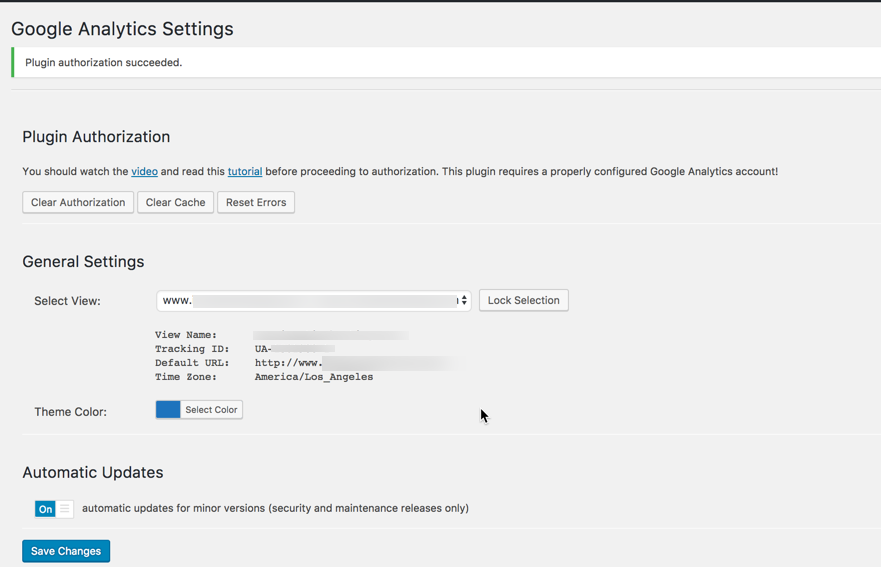
 You will then be brought to the General Settings page. Select the account that you wish to track if you have multiple accounts. Make any settings changes if need.
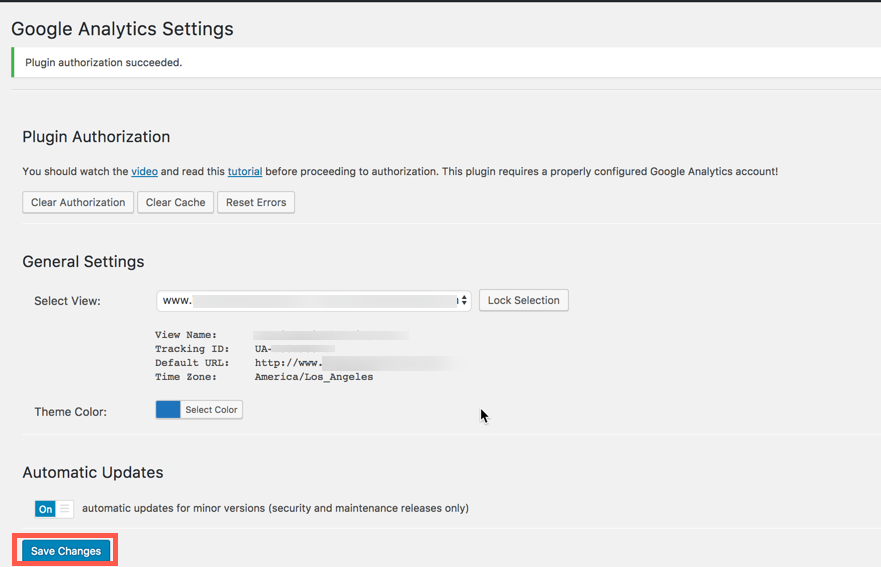
 Click on Save Changes.
That completes the plugin authorization. You will need to add the tracking code to your website in order for Google Analytics to track your website activity. Follow the steps below to add the tracking code.
Adding the Google Analytics Tracking Code to your WordPress Website without a Plugin
Google Analytics requires that you add code to your theme files. As with any change made to your site, it is highly recommended that you perform a full backup of the site so that you can recover should anything unexpected happen during the installation process.
Obtain the Google Tracking code
- Login to Google Analytics
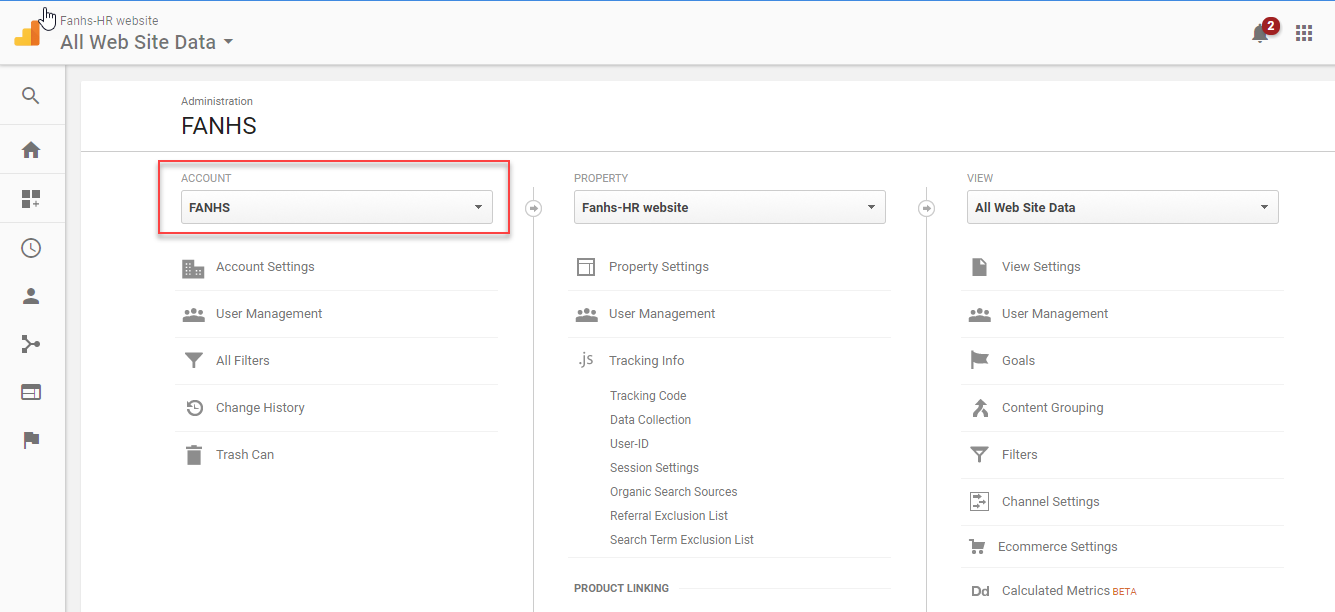
 In the menu at left scroll down until you see the gear icon that is used for the Admin section. Click on this section.
 Select the property (website) that you wish to track by clicking on the drop-down menu under the property section.
 Under the column, you will see an option labeled Tracking Info. Click on Tracking Info.
 This will bring up another set of options. Click on the one labeled Tracking Code.
 A column of text will appear on the right with your Tracking ID, Status, and then a Website Tracking section. You will see a window with the Global Site Tag (gtag.js) Copy this text and then go to your WordPress site.
Apply the Google Tracking Code into the WordPress theme’s header
- Log into the WordPress Administrator
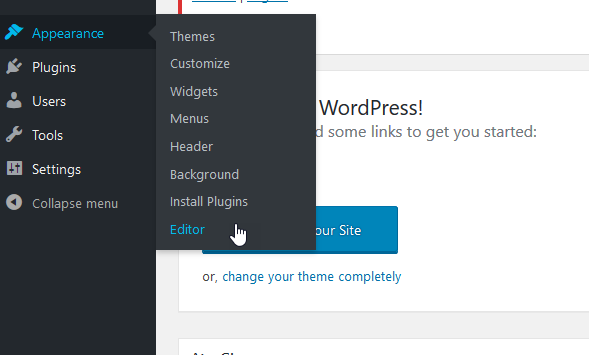
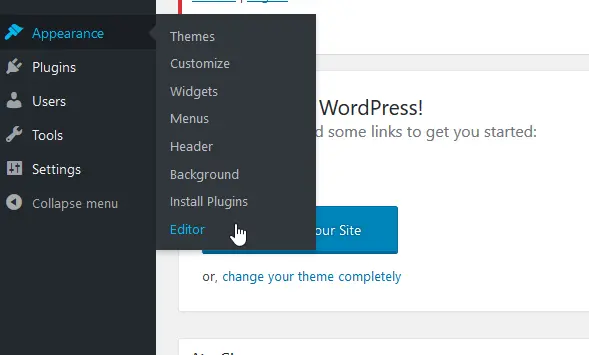
 Click on Appearance and then click on Editor.
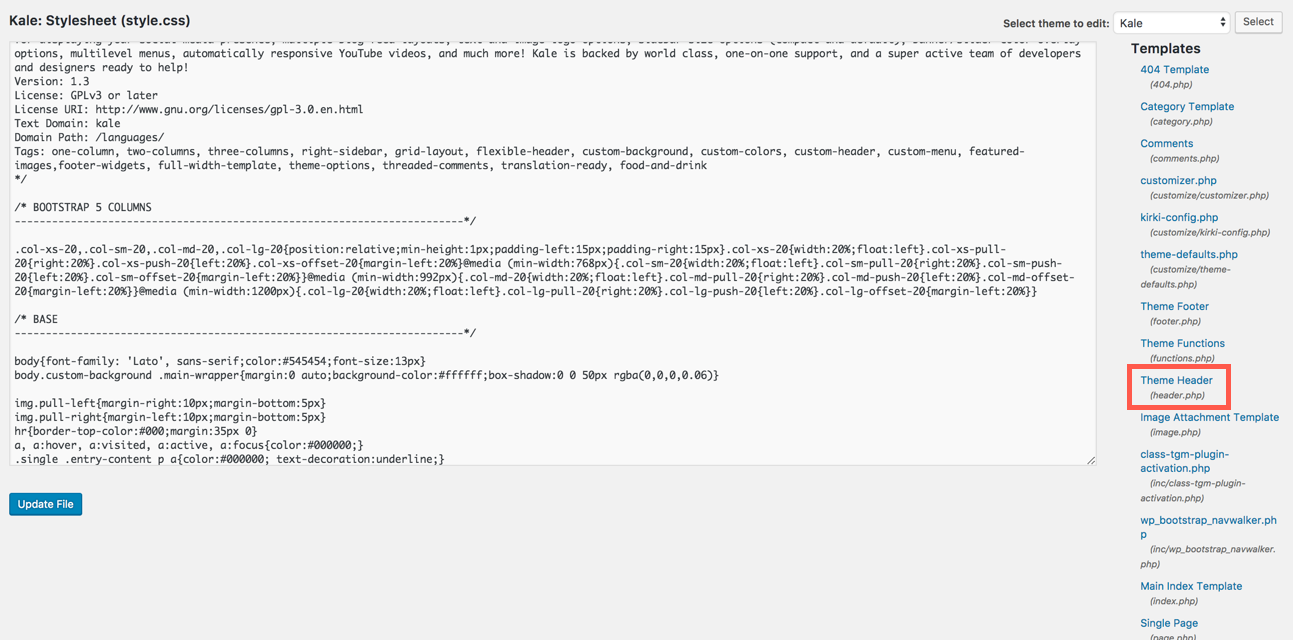
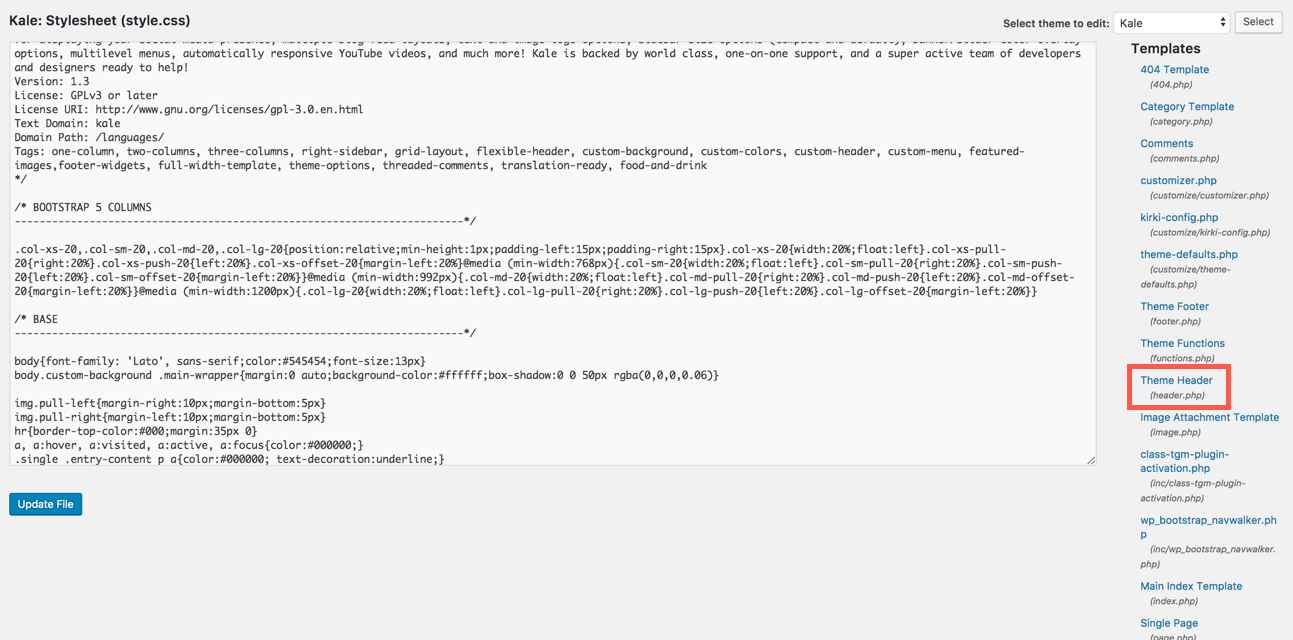
 A typical WordPress theme will have a Theme Header (header.php). Find this file in the list at the right, then click on the file link. It will open the file in the editor. If you have a theme where the file doesn’t seem to have a header.php file, then contact the theme’s developer for assistance.
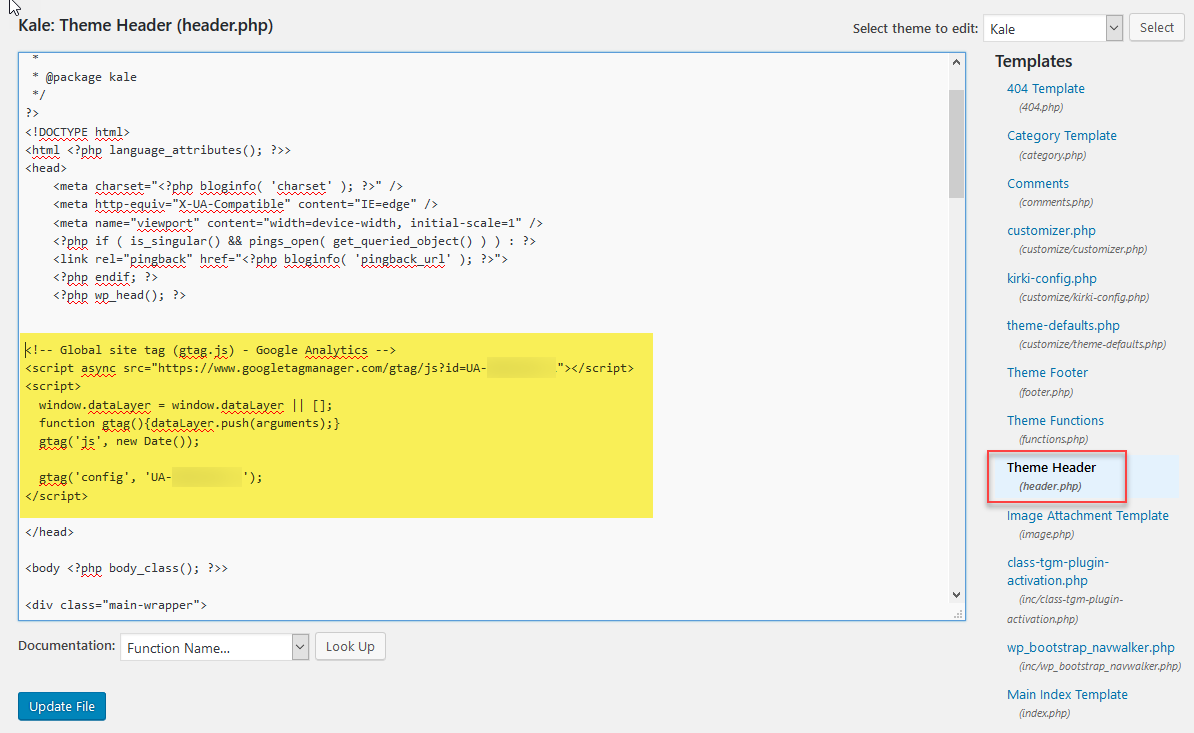
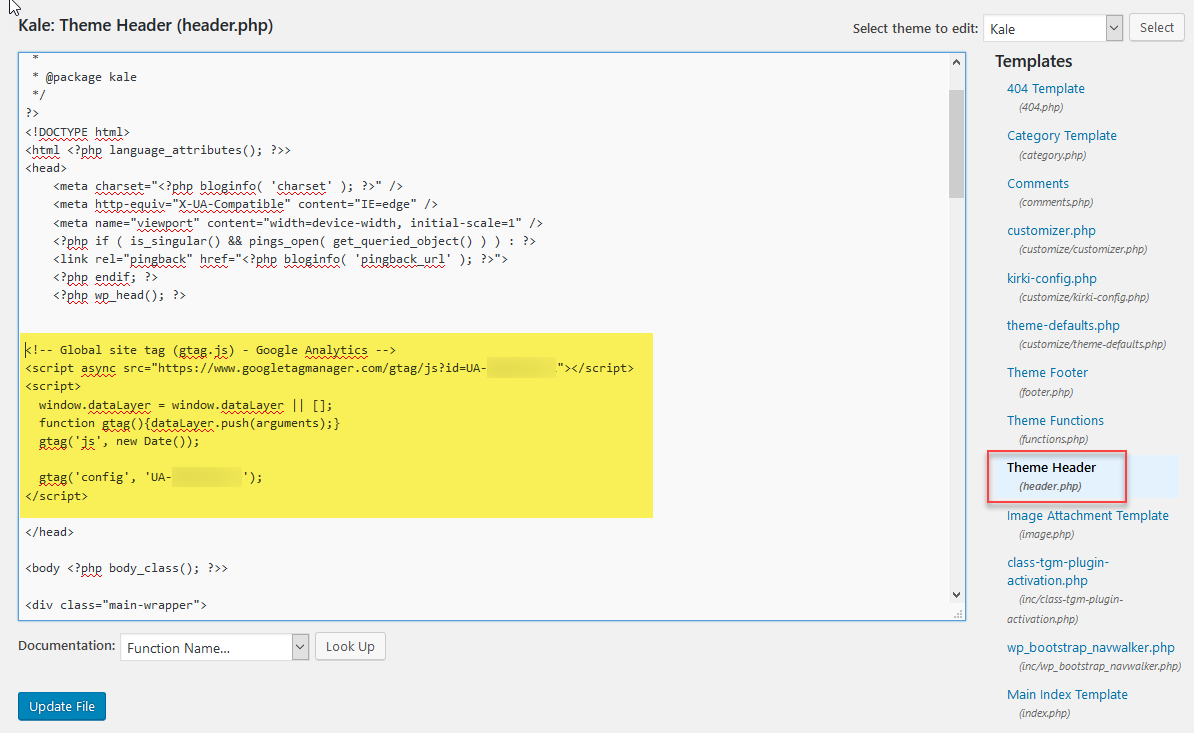
 Paste the Global Site Tag (gtag.js) code that you copied earlier into the header.php file above the “</head&rt” tag in the header.php file.
- Click on Update File in order to save the code changes.
Once you’ve finished adding the tracking code into your theme header then you be ready to start using Google Analytics with your website. Next, we will provide more information on installing Google Analytics without using a plugin.
How to Use Google Analytics on your WordPress site without a Plugin
If you’re using WordPress, it is possible and easy to add Google Analytics to your website without using a plugin. When you have added Google Analytics to your site you will be able to track data, produce charts and reports directly from the Google Analytics application.
.
Google Analytics requires that you add code to your theme files. As with any change made to your site, it is highly recommended that you perform a full backup of the site so that you can recover should anything unexpected happen during the installation process.
Your first step will be to obtain the tracking code within Google Analytics. This means that you must have created a Google Analytics account. Then you must have already set up a property (your website) so that Google Analytics will be able to track it. If you have already completed these steps, then you can begin the steps below.
Obtain the Google Tracking code
- Login to Google Analytics
 In the menu at left scroll down until you see the gear icon that is used for the Admin section. Click on this section.
 Select the property (website) that you wish to track by clicking on the drop-down menu under the property section.
 Under the column, you will see an option labeled Tracking Info. Click on Tracking Info.
 This will bring up another set of options. Click on the one labeled Tracking Code.
 A column of text will appear on the right with your Tracking ID, Status and then a Website Tracking section. You will see a window with the Global Site tag (gtag.js) Copy this text and then go to your WordPress site.
Apply the Google Tracking Code into the WordPress theme’s header
- Log into the WordPress Administrator
 Click on Appearance and then click on Editor.
 A typical WordPress theme will have a Theme Header (header.php). Find this file in the list at right, then click on the file link. It will open the file in the editor. If you have a theme where the file doesn’t seem to have a header.php file, then contact the theme’s developer for assistance.
 Paste the Global Site Tag (gtag.js) code that you copied earlier into the header.php file above the “</head>” tag in the header.php file.
- Click on Update File in order to save the code changes.
When you have finished adding the tracking code to your theme header, then you’re ready to start using Google Analytics to track your website.
BoldGrid users – how to add the Google Tracking Code to your theme’s header
The BoldGrid plugin can affect how the menus appear. Please refer to the directions below to properly add the code to the header section of your BoldGrid site.
- Log into the WordPress Administrator.
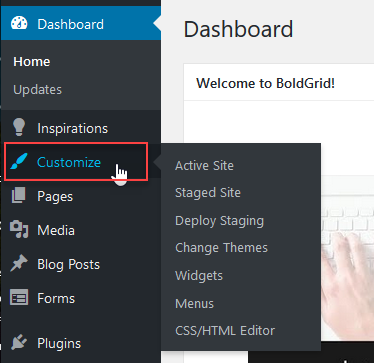
 Click on Customize.
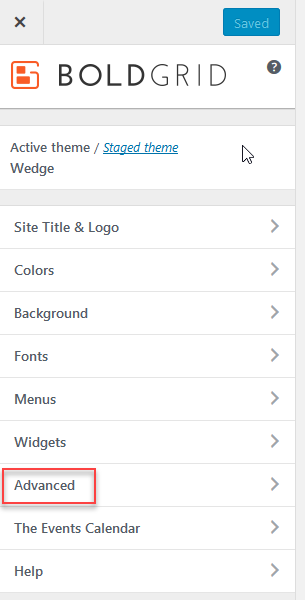
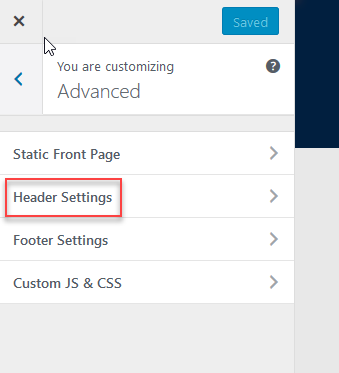
 Click on Advanced.
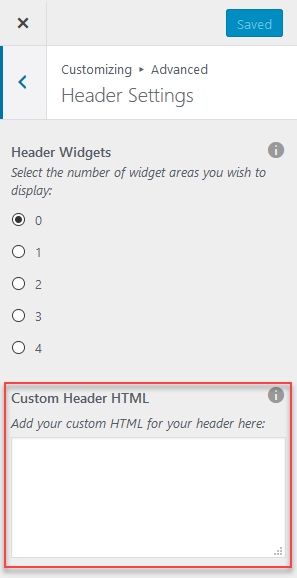
 Click on Header Settings.
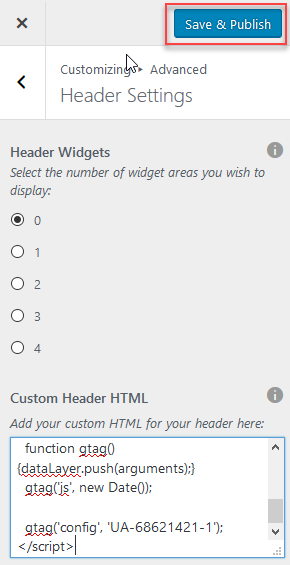
 In the field provided under Custom Header HTML paste the Global Site Tag (gtag.js) code.
 Then click on Save & Publish button at the top of the column in order to save your changes.
Once you have completed adding the code and saved it, then the website is ready to be tracked with Google Analytics. For more information on using Google Analytics, please see the Getting Started with Google Analytics. For further information on the use of the Google Analytics Dashboard plugin, please see this tutorial or video.
