The formatting of Images and text is done using CSS. They can be aligned and floated to allow the images to be placed in particular locations on the page. Using these options will help you create content that is easier to understand.
Aligned images do not wrap text around them. Aligning images will only position the image left, right, or center with the text following before and after the image. Aligning leaves quite a bit of white space on your site. You will see the white space when you go through the aligning section.
A floated image will let the text wrap around the image as a regular book or newspaper would. Images can also be floated, so they appear horizontally on your site. This is good for displaying images like a gallery. The following sections will explain how to float and align images using CSS.
Left, Center, and Right Align
Images can be aligned left, right, and center using the div tag and an inline CSS style. Text DOES NOT wrap around images that are simply aligned. The following explains how to align your images left, right, and center using CSS.
Left Align
The line of code below is for aligning an image to the left.
<div style="text-align: left"><img src="image/your-image.png" width="100" /></div>
Center Align
The following line of code is for centering an image.
<div style="text-align: center"><img src="image/your-image.png" width="100" /></div>
Right Align
The following line of code contains the CSS attribute for aligning right.
<div style="text-align: right"><img src="image/your-image.png" width="100" /></div>
Floating Images Using CSS
Floating images allow images to align horizontally with each other and allow text to wrap around the image. The following will explain horizontally aligning images and floating images around the text.
Floating Images Left to Wrap Text
This code aligns an image to the left of a text block. Note that the margin in the code determines the space around the image. The code defines the space in pixels going clockwise: top, right, bottom, and left.
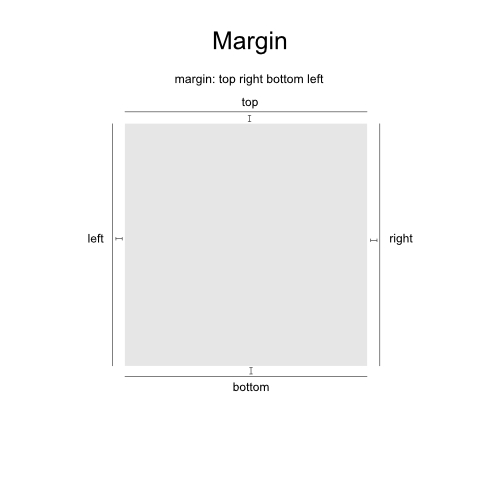
You can see that the code below has a margin of 0px (top), 15px (right), 15px (bottom), and 0 px (left). The code allows for 15 pixels of space to the top and right of the image.
<img style="float: left; margin: 0px 15px 15px 0px;" src="image/your-image.png" width="100" />
Nunc pulvinar lacus id purus ultrices id sagittis neque convallis. Nunc vel libero orci. Vivamus at dolor a nibh aliquet luctus. Duis imperdiet mi id lorem pellentesque tempus. Ut quis felis posuere tellus feugiat ultrices. Praesent id tortor non tellus viverra placerat.
Nullam cursus varius tellus, id laoreet magna hendrerit at. Nulla sit amet purus at nunc blandit ultricies eu a urna. Proin euismod porttitor neque id ultricies. Proin faucibus convallis elit. Maecenas rhoncus arcu at arcu. Proin libero. Proin adipiscing. In quis lorem vitae elit consectetuer pretium. Nullam ligula urna, adipiscing nec, iaculis ut, elementum non, turpis. Fusce pulvinar.
Important! Floated images will overlap each other if the float is not cleared. Ensure you place a clear float code after each section your image is floating in. Below is the code to clear your floats.
<br style="clear:both" />Floating Images Right to Wrap Text
The following code floats an image to the right. Notice that the margin differs from the code used when an image is floating to the left.
<img style="float: right; margin: 0px 0px 15px 15px;" src="image/your-image.png" width="100" />
Pellentesque mattis tincidunt porttitor. Maecenas condimentum iaculis ligula, sit amet scelerisque nibh aliquam in. Quisque ornare gravida est ut fermentum. Nam venenatis pretium enim, in laoreet nibh tristique sit amet.
Nullam cursus varius tellus, id laoreet magna hendrerit at. Nulla sit amet purus at nunc blandit ultricies eu a urna. Proin euismod porttitor neque id ultricies. Aenean sed turpis. Pellentesque habitant morbi tristique senectus et netus et malesuada fames ac turpis egestas. Donec sem eros, ornare ut, commodo eu, tempor nec, risus. Donec laoreet dapibus ligula. Praesent orci leo, bibendum nec, ornare et, nonummy in, elit. Donec interdum feugiat leo. Vestibulum ante ipsum primis in faucibus orci luctus et ultrices posuere cubilia Curae; Pellentesque feugiat ullamcorper ipsum.
Floating Images Left Horizontally
This will use the same code as before (See below). The images are simply placed one after another to get them to float horizontally. Floating images in line with each other is another way to display your images as a gallery.
<img style="float: right; margin: 0px 0px 15px 15px;" src="image/your-image.png" width="100" />


Nullam cursus varius tellus, id laoreet magna hendrerit at. Nulla sit amet purus at nunc blandit ultricies eu a urna. Proin euismod porttitor neque id ultricies. Aenean sed turpis. Pellentesque habitant morbi tristique senectus et netus et malesuada fames ac turpis egestas. Donec sem eros, ornare ut, commodo eu, tempor nec, risus. Donec laoreet dapibus ligula.
This concludes how to align and float images with CSS. Use these options to help create more informative and creative content by blending your text and images on your web pages.
Join our community to receive specialized help with HTML and design, special hosting offers, and more! The next tutorial will show you how to make a simple CSS Drop Down Menu. We also have a helpful article on External, Internal, and Inline CSS styles.
Looking for more help with CSS? Check out our introduction to CSS guide!
hi, any chance you can help out? on desktop i am displaying images on left so that text is shown on the right and both at the same level, but for mobile I want the image to be displayed center so that the text will show underneath, do you know any css responsive code that will do what I want? any help is kindly appreciated, thank you!
I have question.. I aligned my own image and text it worked for me but when I added more images.. i jst came to the side of my own image… Can you teach me how to align images vertically with text on the side?
There is an important note in this article that (I believe) applies to what you are asking. In order for the images to not overlap, you will need to use a “clear float” code.
For example:
<p><img style="float: left; margin: 0px 15px 15px 0px;" src="image/your-image.png" width="100" /> Nunc pulvinar lacus id purus ultrices id sagittis neque convallis. Nunc vel libero orci.<br style="clear: both;" /></p><p><img style="float: left; margin: 0px 15px 15px 0px;" src="image/your-image.png" width="100" /> Nunc pulvinar lacus id purus ultrices id sagittis neque convallis. Nunc vel libero orci.<br style="clear: both;" /></p>
This would display both images vertically with text aligned to the right. I hope this helps!
Can you help me please..?
Hello! What do you need help with specifically?
Thank you so much. its very helpful.
Thanks for this post. Really grateful.
We are glad that it helps!
is there any code with HTML and CSS that can insert images vertically one after the other?
You may want to try the “Floating Images Left Horizontally” method but put
<br>after each image to create a line break.I need to float images but have them centered, or at least have them jump up and down and be responcive to change in topography like you see with multiple images floated to the left.
what would that be called?
this website is no help
Are you having trouble with a specific section?
Thank you,
John-Paul
Arn thank you for the information. but i tried to align the image with css in the center and it didnt worked at all i tried the code on this side and some others noone worked ill just forget about this now i tried to get the <nav> left of the image and the image in center + right side of the image the text wrapping arround but now ill just make it simple image on left (which works same for right with css but not center) with some text right next to it and the <nav> on the bottom
hi your tutorial is good but im missing one thing how can i Center the Image and wrap the text right arround it? thats my code
https://code.sololearn.com/WekBDVC8V90p
i want the text arround it and the img in the middle the nav on left :/
Hello Davi333,
We, unfortunately, can’t alter your code or provide coding support for you. As per the tutorial above:
Images can be aligned left, right, and center using the div tag and an inline CSS style. Text DOES NOT wrap around images that are simply aligned. The following explains how to align your images left, right, and center using CSS.
I hope this helps to answer your question, please let us know if you require any further assistance.
Regards,
Arnel C.
In the “Floating images left to wrap text” section, the paragraph wraps underneath the image.
What would be the best way to avoid this? I’d like it if my image on the left had nothing underneath, with all the text properly aligned.
Hello Andre,
You would need to either change the margin-bottom of the image to a higher number or put the image in a separate div than your text.
Best Regards,
TJ Edens
Thanks for sharing me this blog. this blog is very helpful for me.
facing issue with UL’s above code for float:left for Image to wrap. with out Margin-left: any solution.
Hello Vinod,
I would suggest using your browsers inspect element feature and change around the css settings in there to get a preview before making the changes within your actual css files.
Best Regards,
TJ Edens
Hi. I stumbled upon this site trying to figure out how to have text over an image. I currently have 4 boxes, each going to have a different ‘background’ image. I want each image to fill the box that it is in, and allow text to be right over it. My image is going to be 40% opaque which is why I can’t just make the image as a background to the div. When I change the div opacity, it makes the font the same opacity and cannot overwrite that. Any suggestions? Please and thank you.
Hello Gasana,
Thank you for your question. The margin is in pixels, and goes counter clockwise (top, right, bottom, left).
For example this (margin: 0px 0px 15px 15px), would result in this:
Top margin: 0px
Right margin: 0px
Bottom margin: 15px
Left margin: 15px
So if you wanted a 15 pixel margin on the top of the image too, you would change it to:
(margin: 15px 0px 15px 15px)
If you have any further questions, feel free to post them below.
Thank you,
John-Paul
Hello Nick,
Did you use our tutorial on creating drop down menus in CSS?
Kindest Regards,
Scott M
this was really helpful!
Thanks a lot
Hi, I want to display images of my products on a web page they would be 4 rows, each with 4 images across. I also need to display the product number under each product. I was using a table, but is there a way to do this using CSS. Thanks for your advice
Hello Greg,
There is but it would require intense knowledge in CSS and would be better suited within a table.
Best Regards,
TJ Edens
hai , i m farhan , how create a image top, bottom, left & right setting in bootstrap.
Hello Frahan Ahmad,
If you’re looking for more information about images and how bootstrap can be used to format them, then please go to their official documentation page: BootStrap – CSS – Images.
Regards,
Arnel C.
Hello Jacob,
How do you wrap images around the text- so that a text will appear over an image?
Images and text are considered elements on the page. Getting to go on top of each other will not work in HTML, unless you set the image to a background image. This can be done in HTML or CSS. Here’s the simple HTML for a background image:
<body background=”URL”>
Check out this link for further information on the use of background in CSS.
Common errors for background images?
I think the most common is simply the color of the text. Very often, people will set a dark colored text over a dark colored image making it hard to read or simply un-readable. Make sure to view your end result if you’re working with text on a background.
Regards,
Arnel C.
Arn thank you so much for this solution!! I’ve been trying to figure out how to position images for so long. It makes sense that I can position them as a text rather than as an image. That being said, a few questions, one, how do you wrap images around the text- so that a text will appear over an image? And secondly, what are the most common errors when making this code? I have been having so much trouble with centering images, but, you guys seem to have posed the only solution with centering and aligning images that I’ve found yet.
What about floating? What instances will I use floating or will I just use this?
Hello and thank you so much for giving us this information!
I would like to know if there is a way to float image ‘center’ horizontally. So far I haven’t found a code that works. It seems simple enough to put <img style=”float: center;” but of course, it doesn’t work…. Can you show me what I’m forgetting? Thank you so much for your time.
Hello LL,
Thanks for the question. Centering images can be a pain. The best way is to create a style class that you put in the HEAD of your HTML page. It will look like this:
<style type="text/css">
  .centerimage
    {
    text-align:center;
    margin-top:0px;
    margin-bottom:0px;
    padding:0px;
    }
</style>
Then in the code for your image element, you would specify:
<p class=”centerimage”><img src=”graphic.jpg” ></p>
You can your add the ALT text, size, etc. for your image as well. If you want it to apply to ALL of your pages, then you would add the style to your CSS. I hope this helps to answer your question, please let us know if you require any further assistance.
Regards,
Arnel C.
Its really helpful bt you just given only the code… For beginners it will be little tough to learn.. So i request you to give some examples for this code and also editing the code in online…. The users can modify or edit the code they can learn more… So i feel it will be useful for the users….
provide a online editing console like in W3School then it will be very grateful to understand it properly for anyone in any level.
hi good day. please I am trying to align my images vertically on the left so they orderly in a line. What will the code be. presently as I put in the codes, the images outling themselves horizontally. your promot response will be greatly appreciated. thanks alot
To do so, you will need to add clear: both to the styling of subsequent images after the first.
Hi John-Paul,
I’m trying to align 2 images on the left margin of the pagedown the page – but the 2nd image keeps wrapping to the right of the 1st image
If you add clear:both the the CSS of the second div, it shoould put it below the first one.
Thank you for this beneficial episode
Hi John-Paul,
Yes, my issue was meant to be a css solution. Apologies for not making that clear. I tried to solve it in both ways with no effect. I’ll try to align them on the top. That may be the way to go. Thank you for your advice, it is helpful.
Miguel
Hi John-Paul,
Tried vertical-align: bottom; too. Admittedly I did it in html, right after the img src in the link for the contact page, not in the css, but it did nothing for me.
The link to the page is www.havana-today.com I just put it up (still in design) for you to have a look.
Thanks!
Hello Miguel,
Thank you for the information. This article and my previous response are only in regards to CSS, and not HTML.
If you want to work with the image in HTML, please see this img tag reference. It explains the options for using the img tag in depth, however, I recommend doing this in css.
I could not identify the specific CMS you are using, but keep in mind your theme/plugins may be over riding the code you are working with.
I see the envelope on the top right of the page. While it is slightly above the text next to it, the underline underneath (it appears when you mouse over) is lined up with the rest of the menu. So, the bottom does seem to be aligning.
It really boils down to how you want to code the site, and your comfort level. But you may want to try aligning the top of the other menu items with the top of the envelope, or making the header bar larger to accommodate the envelope sliding down.
Thank you,
John-Paul
Hi John-Paul,
How about aligning an image used as a link. I want to use a small image instead of the word for “Contact” but it sits slightly above from the rest of the meny text links. I tried align:”bottom”, vertical-align:”bottom” and align:”baseline”, but the image never moved. Any other tricks to get the image to sit in line with the text in other menu links (the menu is horizontal)?
Thanks!
Hello Miguel,
Thank you for your question. It really depends on your site, if you can provide a link we’d be happy to test further.
But, you may want to try testing the vertical-align.
Possibly:
Thank you,
John-Paul
I’m a bigginer trying to follow this course step-by-step but i got stuck.
Can anyone help me understand the margin used in floating images:
( margin: 0px 0px 15px 15px)
Thank you ver much!!!!
Hello Gasana,
Thank you for your question. The margin is in pixels, and goes counter clockwise (top, right, bottom, left).
For example this (margin: 0px 0px 15px 15px), would result in this:
Top margin: 0px
Right margin: 0px
Bottom margin: 15px
Left margin: 15px
So if you wanted a 15 pixel margin on the top of the image too, you would change it to:
(margin: 15px 0px 15px 15px)
If you have any further questions, feel free to post them below.
Thank you,
John-Paul
Thanks for your sharing, great knowledge.
Thnx
Hi,
Thanks for the code and the effect of the cod.
Its help me to set my image name in the center after the image.Thanks agian.
Keep keeping it simple for easy understanding.
This is a good introduction to css for the beginners
I would not call myself a CSS beginner, but neither would I call myself an expert. I have been playing with HTML and CSS for about 8 years, just started getting deeper into HTML5 and CSS3. Articles like this are sometimes a kick in the pants for me and reminds me of things I already know, just not thinking about.
Thanks for the reminder!