In this guide, we’ll show you how to create a phpinfo page to view the current PHP settings for your php host. PHP has many environmental variables that you are able to update as needed. For example, you may need to update your php memory_limit to prevent certain scripts from running out of memory.
Before you change these values, you must first be able to see what they are. To do that, you will need to create a phpinfo page. A phpinfo page shows you all of your php environment settings.
A phpinfo page is simply a page with the following PHP code:
<? phpinfo(); ?>
Go Unlimited with Exceptional Shared Hosting
Upgrade your Shared Hosting today and take your business to the next level! Get unlimited NVMe SSD storage, cPanel, professional email and over $400 in savings.
Free Domain
24/7 Human Support
100% Money-Back Guarantee
How to Create a phpinfo Page
If you’re not familiar with how to create a php page, follow the steps below to create a phpinfo page using your File Manager. You can also use an FTP program if you prefer.
- Log into your cPanel.
- In the Files section of your cPanel, open the File Manager option.
- Navigate to the directory you are working with. This is important because each folder can actually be set to have different PHP settings. In this example, we are viewing the PHP settings for our main domain, so we are navigating to the “public_html” folder.
- In the top menu, click +File option to create a new file.
- When prompted for the file name, enter phpinfo.php (it can actually be named anything, phpinfo.php is simply a common name for the file).
- Find the phpinfo.php file in your list of files (it should have automatically updated). Right-click on it and choose Edit. If you see a “Text Editor” prompt, choose “utf-8” from the drop-down list and then click Edit.
- Enter the following code into the phpinfo.php file.
<? phpinfo(); ?>
- Then click Save Changes.
How to View your PHP Settings
Now that you have created the phpinfo page, we’ll show you how to access it and view your PHP settings.
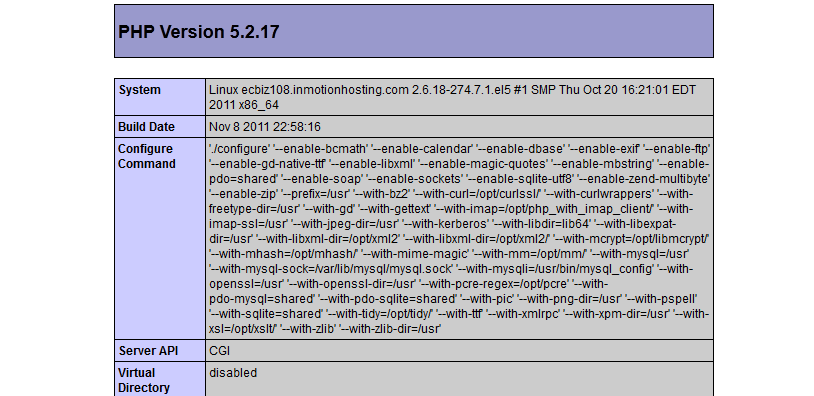
- You can now access this page from your browser. If you created the file in your public_html folder, then you would visit https://example.com/phpinfo.php. Be sure to replace example.com with your actual domain name. The results should look similar to the below screenshot:

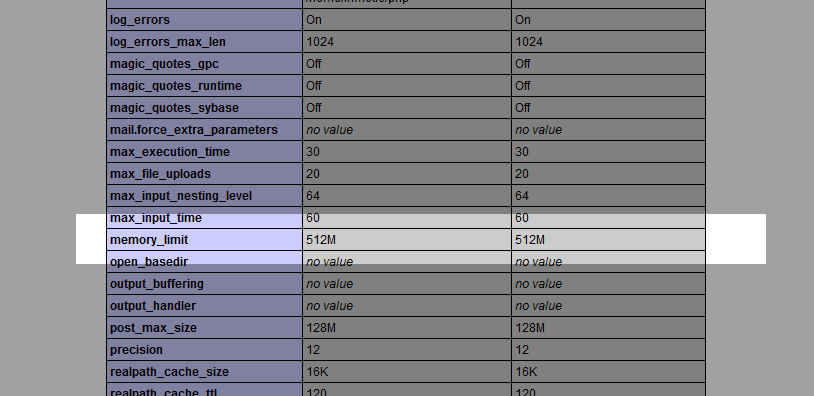
- To find the specific value of a setting, search the page for what you’re looking for. In this case, we used our browser’s search feature (Ctrl + f) and searched for memory_limit. The first value you see is what is set for the current directory (local value), and the setting value is the master value. The local value is the actual setting and is the important value, because the local values will override the master value:
 WARNING: Your phpinfo page has many PHP settings that you don’t want to broadcast to the world. When you’re finished using the file, be sure to delete it. Another route you can take instead of deleting it however is naming the file something other than phpinfo.php. As phpinfo.php is such a common name, ‘bots’ on the web will randomly search for files named phpinfo.php. Setting the file name to something like 9823592374823.php would never be guessed by a bot (so no one would ever find it) however it may be difficult for you to remember this in the future.
Now you know how to create a phpinfo page and view your PHP settings. If you need to change any of these values, here are some helpful guides.
Check out our Website Tutorials section for more helpful guides to help you build a successful site.


hello sir
hopeing you could solve my problem
i want to host a webpage using aws in phpcode.I actully mean tat on typing “www.task.com” i shuld get phpinfo page as index.so i did the folling to make my task happen :
installed http using source code and configured to my required location
configured php 5.6 to my location and also make and installed bothe the services
and in conf file of http i gave the code in virtualhost ald in htdocs i gave the code for phpinfo();
also in /etc/hosts in localhost i mentioned my ip and link address as said above …
bt thw problem is the page prints only as “it works ” can you please solve my problem
If you’re unable to see the phpinfo page, you can use your temporary URL in lieu of your domain along with the path to that file. I recommend you contact our live support for additional assistance with this.
hi sir im trying to install prestashop through godaddy cpanel getting following errors
Requirements:
php-session ON (detected: OFF)
php-fileinfo 1- (detected: OFF)
php-gd 1- (detected: OFF)
php-mcrypt 1- (detected: OFF)
php-soap 1- (detected: OFF)
php-dom 1- (detected: OFF)
how to turn these on on webserver. pls guide me i have zero knoweldge about this.
regards
Those are PHP modules, You can install these under the EasyApache configuration in your WHM, If you do not have WHM access you will need to contact your host to see if they can install these for you.
<? phpinfo(); ?>
This is the syntax I used for complete success the first time around. without the extra “php” in front. Just as described in the information.
MAYBE the correct syntax is this one…
<?php phpinfo(); ?>
Also ensure allow scripting of <? ?> commands is enabled 😉
Hi.
When I try to go to the phpinfo.php page, I get the (HTTP 500) error. The file was already created with <?php phpinfo(); ?> in it and the permissions is at 0644.
Thanks’
Hello Marcel,
Make sure that your spacing is correct. If it’s not correctly spaced then it will not work. Permissions are okay. You can’t create a second one if it already exists.
If you have any further questions or comments, please let us know.
Regards,
Arnel C.
Excellent article. It worked fine and appears to have the problems I was having with Word Press. Keep up the great work!
If i put the code as “<? phpinfo(); ?>”, and browse https://www.zemtvs.com/phpinfo.php, it returns blank page.
But if i put the code as “<?php phpinfo(); ?>”, then it retuns php information in result.
Hello Jafar,
Yes, the shortcut tags are being deprecated. It is always best to use <?php ?> when working with php code.
Kindest Regards,
Scott M
I want to upgrade php on specific folder in my server, i have diffrent websites and dont want to upgrade php for all websites. will it work perfect on specific folder in my server without disturbing the other websites?
I have nerver tried it before, so afrid if it effect on other folders as well 🙁
Hello Rehana,
As long as the server you are on has multiple versions of PHP installed you can use the .htaccess file to change the version for the folder it resides in. To do this you would use the following code in your .htaccess file:
AddHandler application/x-httpd-php54 .php
Where php54 is PHP version 5.4.
Best Regards,
TJ Edens
DEar all.
I have a problems with my current hosting contract because it is not possible to connect to paypal sandbox environment since paypal has recently changed the protocols .Right now, TLSv1.2 and http 1.1 are required.
The limitations of my current hosting is that the curl version is 7.20 and we need to have 7.34 and above.
Please, could you tell me the overall php characteristivs provided by phpoinfo(). What is the culr version ?
It is very important for us because we are looking for a new hosting service.
All of the printed data available in the phpinfo file are too numerous to list here. I recommend checking the official PHP documentation if you need more information. If you have a VPS account with us we can work with you to get cURL to whatever specifications you require.
hi it said it not enable
Hello Gig,
We would need more information about what you’re doing in order to determine how to help you. If you’re following the directions in the article above, the phpinfo page will appear.
Regards,
Arnel
Excellent video! Thank you; this gave me the exact instructions that I needed to configure my site!
Ann
Hello,
Please let me know how can i check that Email service is enabled or not in my server. I have print phpinfo() function and it show whole detail LIKE- sendmail_from, sendmail_path.
But how i know my email service is working or not ?
Thanks
Hello Vijay,
The phpinfo would not inform you if the email service is working, for that please contact your hosts technical department to have them check the mail logs to be sure the service is working.
Best Regards,
TJ Edens