Vesta Control Panel, an open source hosting control panel, is a cost-effective alternative to cPanel. Granting you many of the same abilities as cPanel, Vesta gives you a low-cost option for your client management needs.
In This Article:
Please keep in mind this will only work on a Cloud Server or a Baremetal Server. Make sure your drive is empty before installing Vesta Control Panel. Data Migration is available with our Managed Hosting team.
Installing Vesta Control Panel
The Vesta Control Panel runs under the following operating systems:
- CentOS 5, 6, and 7
- Debian 7, 8 and 9
- Ubuntu 12.04 through 18.10
Before installing Vesta, you may need to install prerequisites. For Ubuntu, these include: curl, gnupg, gnupg2, and gnupg1.
There are two ways to install Vesta.
Option 1:
First, execute these commands:
- SSH into your server as root.
- Run “curl -O https://vestacp.com/pub/vst-install.sh” to download the install script.
- Install it by running “bash vst-install.sh”.
Using the above commands, your install will include the following:
- Nginx + Apache web servers
- Named for DNS
- VSFTPD for FTP
- Iptables + fail2ban for the firewall
- Exim / dovecot for email
- Clamav and Spamassassin for helping keep the bad email away
- MariaDB for MySQL
- Softaculous (to use Softaculous, you will need to provide your own license )
Option 2:
The second option is navigating to Vesta then filling out the Advanced Install Settings form. Doing this version, you will be given slightly different commands to issue.
If you first choose to go without Softaculous but then change your mind, you can install it again.
Using Vesta Control Panel
Now that you have Vesta installed, login with the URL it provides you at the end of the installation. The URL will look like the following: https://IP:8083.
Comparing Vesta Control Panel to cPanel / WHM you’ll quickly see that Vesta is like cPanel and WHM merged. There is only one URL to login, what you see depends entirely on who you log in as.
Vesta Admin:
The UI for Vesta is very simple to use. While logged in as an Admin you have the following menu options in the brown bar

- The Packages option is where you define what abilities other panels will have.
- The IP option will allow you to configure multiple IP addresses.
- The Graphs options will show you how your server is performing visually for many different components. For example: Apache, Database, Nginx, etc.
- The Statistics option will give you a brief summary of what your account has done over the time it has been active
- The Log option shows your server updates.
- The Updates option shows you recent updates.
- The Firewall option allows you to configure ports
- The Server option shows you how much each server is using of your computer
The White section below that with USER, WEB, DNS, MAIL, DB, CRON, BACKUP will show you what the Admin User has done.
If you click on USER, this is equivalent to going to List Accounts in WHM, from here you can choose a USER by scrolling down to the user of choice you will see something like the following:
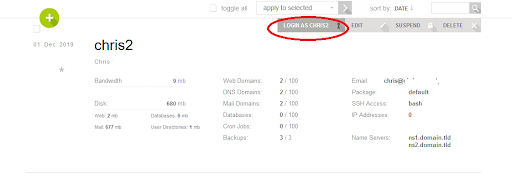
If you click the circled area, you will get a popup confirming you have logged in as the user and then see the following

You will know your logged in as a User from the Admin portion due to seeing admin -> user name in the upper right corner. If you click on Log out here, it will take you to the Admin panel again
Vesta User
If you login directly as a User, the menu looks largely the same as above, however with one minor change:

If you log out here, you will be fully logged out. Now you know how to install and use Vesta! Continue with adding users and domains.
Learn more about server administration from our Cloud Server Hosting Product Guide.
If you don’t need cPanel, don't pay for it. Only pay for what you need with our scalable Cloud VPS Hosting.
![]() CentOS, Debian, or Ubuntu
CentOS, Debian, or Ubuntu ![]() No Bloatware
No Bloatware ![]() SSH and Root Access
SSH and Root Access