The Secure SHell (SSH) command line is available through a Mac using the Terminal application. A private and public key pair is required before connecting to the server. These instructions are for use with a shared server. Learn more about SSH Hosting.
Generate Key for Shell Access
SSH access is allowed using a Public and private key. These keys are managed in the cPanel. Follow the steps below to generate a key.
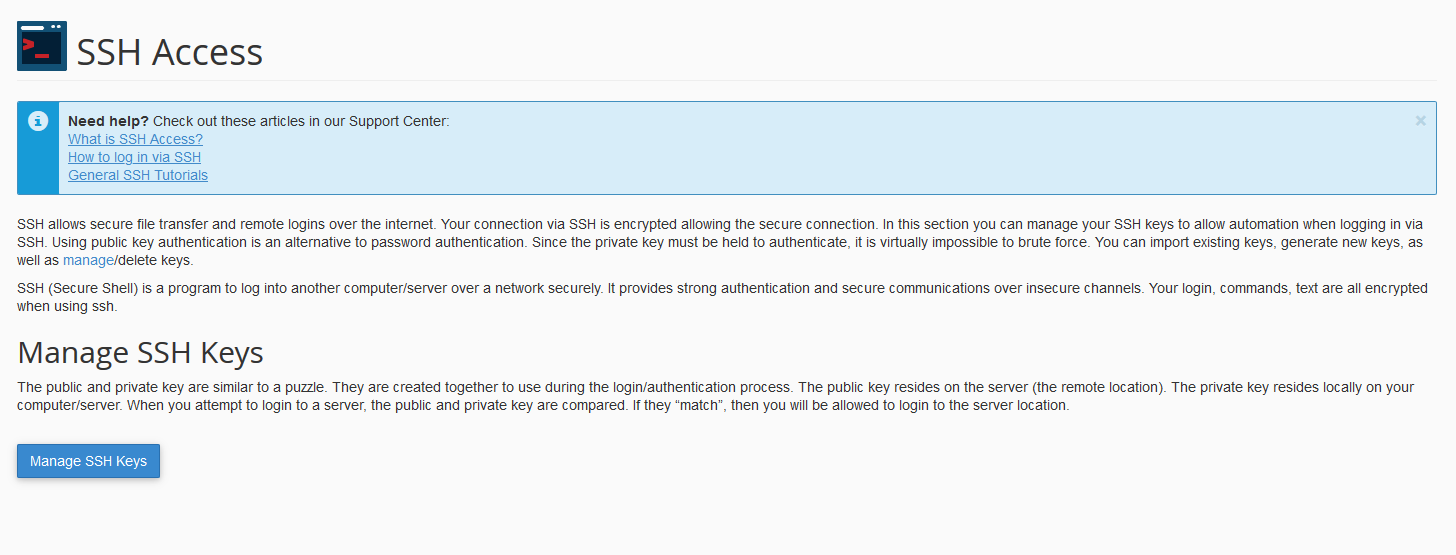
- Login to the cPanel and then go to the SSH/Shell Access icon. Click on it to access the section where you can generate the private key.

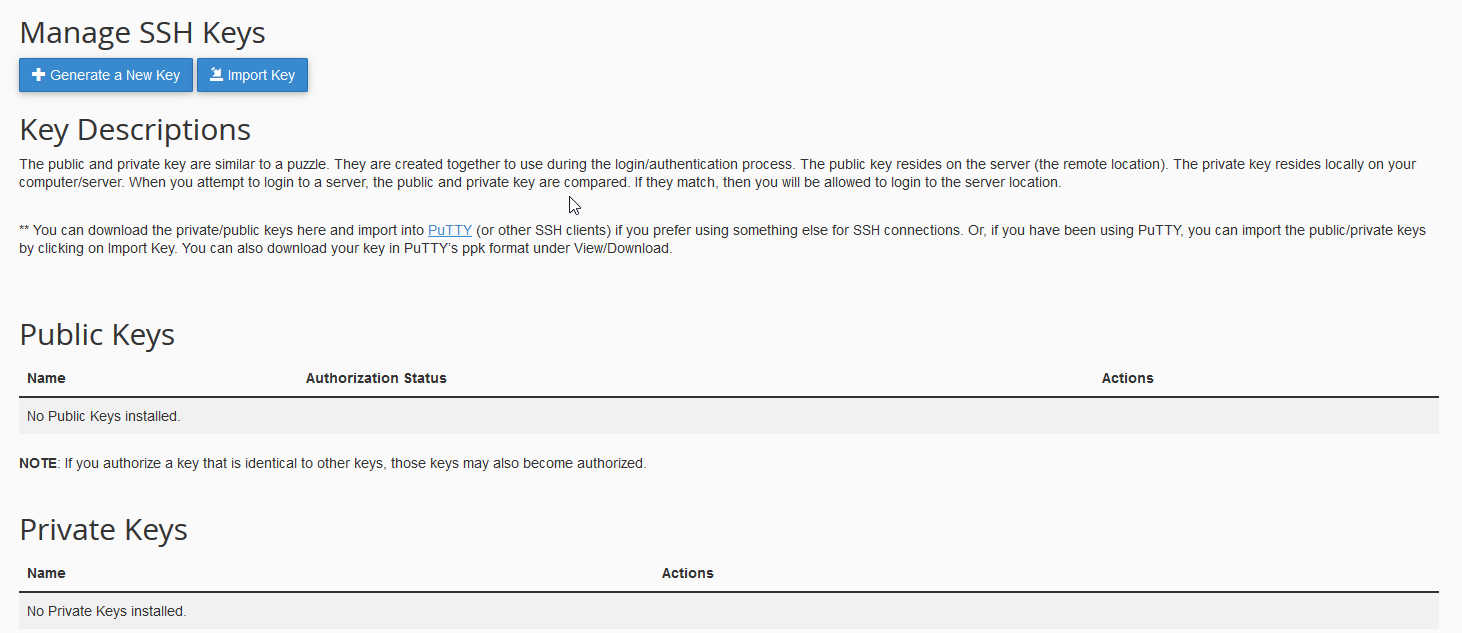
- Click on the button labeled Manage SSH Keys.

- Click on the button labeled Generate a new key.

- Type in a password (do NOT use the password generator), then confirm it. Make sure to write down your password or save a copy in a secure location. Leave the key type at RSA and the key size at 2048. You can choose to make it 4096 if you wish.
- If you are creating a key for the first time, click on the Generate Key button.
- You should then see a confirmation that the key was generated. Click on the Go Back button to return to the Manage SSH Keys page.
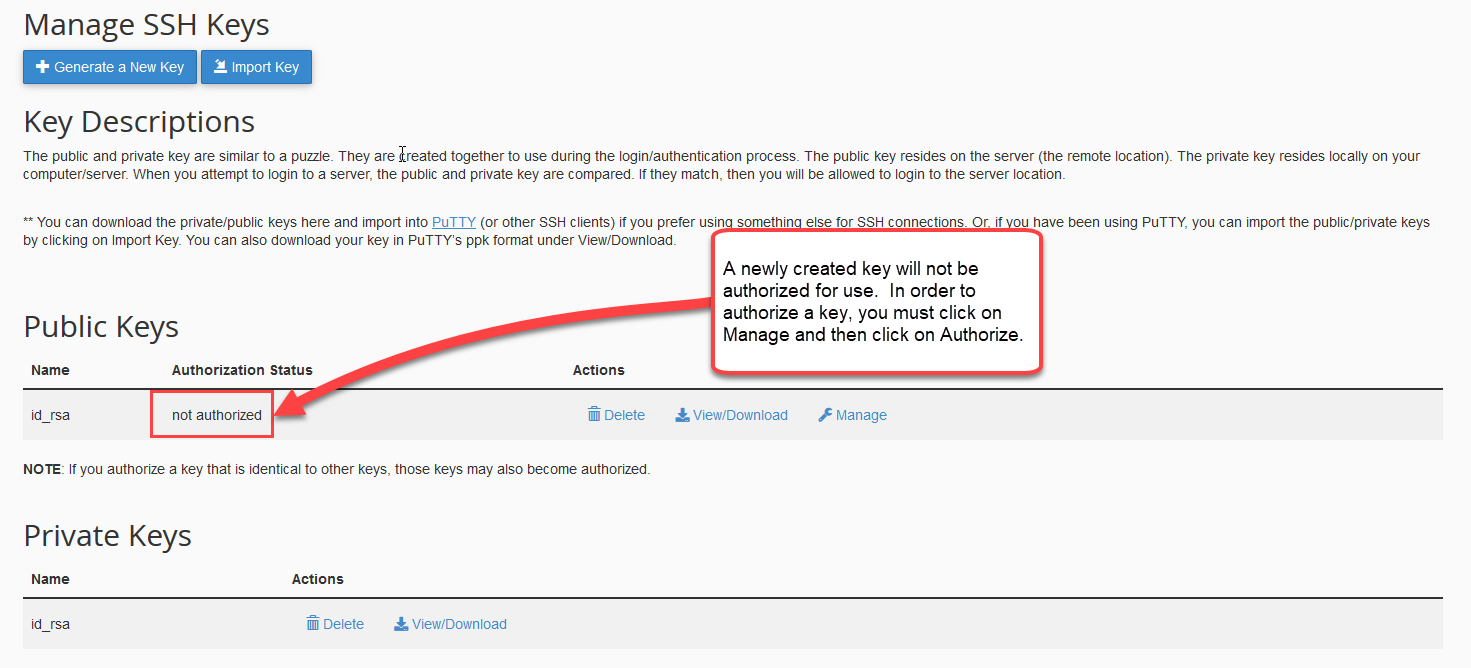
- You should see the Public key and the Private key generated with the name “id_rsa”. Click on View/Download for the PRIVATE key. This is the key that you will need to load onto your Mac.
- Download the file to your Mac client. To simplify this tutorial, copy the file to your desktop.
- Check to see if the Public key has an authorization status of NOT AUTHORIZED. Newly generated keys are not initially authorized for use. Click on the Manage link. You will see a blue Authorize button. Click on this button to authorize the key. NOTE: If you don’t authorize this key, it doesn’t matter what you do on the Mac side; you won’t be able to log in.

The next part of the process requires that you log in to your Mac as an administrator. We will be using the default Terminal application to log in to SSH using the key that we generated above.
Use Apple Terminal Program to Connect to SSH
- Login to your Terminal program. If you don’t know how to do this, go to the magnifying glass on the Apple desktop. This is usually at the top right and is called Spotlight Search in the current Mac OS. Type in “terminal,” then hit enter. You should see Terminal appear as an application. Select it, and it will launch. Note that if you are not logged into your Mac as the administrator, you will not be able to make these changes.
- Go to your desktop where you copied the ID_RSA file. The terminal command is cd Desktop.
- Make sure that the ID_RSA file is already on your desktop. Then type the following into your terminal: cp -frp id_rsa ~/.sshThis will copy the key into the .ssh folder.
- Next, make sure that the file permissions are correct on your file with the command chmod 600 ~/.ssh/id_rsa
- When this is complete, you can use the SSH command to log in to the server. The cPanel user name and the server name will need to be used. The command will look like this: ssh -p 2222 [email protected]’s an example: ssh -p 2222 [email protected])
- If this is the first time you have connected the server, you may see a message stating that it can’t identify the server. Just click on “YES” to proceed (make you’re connecting to the right server). The password should automatically work, and you should see the terminal connect.
This completes the tutorial for creating a new SSH key to connect your Mac terminal program to the InMotion Hosting shared server SSH. For best security practices, keep your key private and don’t share the password unless necessary.
Toggle panel: Easy SEO


Followed the instructions carefully, but I’m still prompted for my hosting password every time, not the passphrase, but the hosting account password.
Try checking the access logs for any errors or records of your connection.
I have tried EVERYTHING and it keeps giving me this error message after step 4: @@@@@@@@@@@@@@@@@@@@@@@@@@@@@@@@@@@@@@@@@@@@@@@@@@@@@@@@@@@
@ WARNING: UNPROTECTED PRIVATE KEY FILE! @
@@@@@@@@@@@@@@@@@@@@@@@@@@@@@@@@@@@@@@@@@@@@@@@@@@@@@@@@@@@
Permissions 0644 for ‘id_dsa’ are too open.
It is required that your private key files are NOT accessible by others.
This private key will be ignored.
PLEASE HELP! I have been trying to figure this out for three hours now.
Hello and thanks for contacting us. Please contact our Live Support if you’re still having this issue.
At the step5, I get the error “Permission denied (publickey).”.
I have no idea what causes that.
Hi Yano.
I recommend double-checking to make sure the key generated is “authorized”. By default, it is not authorized after you initially create it. If it is authorized, try downloading the file again and moving it to the .ssh folder on your Mac.
If issues persist I recommend removing the key and trying to generate a new one. Be sure to keep a note of the password, to ensure you are entering it correctly. Also, be sure that you complete the authorization step.
If you continue to experience issues, as an InMotion Hosting customer you can always contact our live Technical Support for further assistance with your account.
I hope this helps!
Hi,
Im following the instructions but still cannot ssh to my vps server.
Successfully added the key in my mac as below:
ssh-add -K id_rsa.dms
Enter passphrase for id_rsa.dms:
Identity added: id_rsa.dms (id_rsa.dms)
But cannot connect as it hangs during ssh:
These instructions are for shared hosting. With VPS, you should be able to use your default cPanel username and password. If that doesn’t work, I’d advise contacting Live Support so they can help check the SSH log.
On the 5/6th step and I can’t get past the
The authenticity of host ‘[server ip]:2222 ([server ip]:2222)’ can’t be established.
RSA key fingerprint is SHA256:…………………………
Are you sure you want to continue connecting (yes/no)? yes
Failed to add the host to the list of known hosts (/Users/clientuser/.ssh/known_hosts).
cpanelusername@serverip: Permission denied (publickey).
error.
I’m on mac version 10.13.3. I have a .ssh directory with the id_dsa file inside although I can’t physically see the .ssh folder anywhere and I chmod’d the privilege of id_dsa to 600 to add the identity and entered the correct cpanel credentials. I tried everything in the comments for this problem.
When you generated your Key for SSH access, did you authorize it? This is a required step to ensure that you are able to use the key you created.
thanks, that’s really help
When I did step 6, after I hit enter when I typed in yes, I get a message saying:
Failed to add the host to the list of known hosts (/var/root/.ssh/known_hosts).
But then I get a message saying this with my cpanel username and servername below.
Last login: Mon Jun 4 14:55:15 2018 from <my ip here>
[<mycpanelusername>@<myservername> ~]$
Does that mean it still worked and my termincal connected?
Yes, the cpanel username displaying a prompt indicates that you have successfully connected. I would check the permissions on that file and directory/location to ensure that the SSH Client you are using is allowed to read/write from/to that file to avoid the error in the future.
what do I do if I get the error: cp: /Users/<myname>/.ssh: Operation not permitted after using the command cp -frp id_dsa ~/.ssh
Sorry for the problem with running the command line that you are seeing. First, make sure that you are logged in as the Administrator with Root access. It might also be a part of the system integrity protection that is part of your operating system. A few people have run into this before and there is a fix for it discussed here. This issue may depend on the version of the OS that you are using. If you do a simple search for “operation not permitted Apple terminal”, you will see the different solutions that have been provided with the various conditions that can cause this.
I want to use ssh from work computer.
I need to restrict the access for sertain pair of keys to only one directory.
How can I do it?
I’m not aware of a method to accomplish assigning keys to a specific directory in SSH. The keys are implemented for login purposes only. Once a user is logged into SSH, the permissions to access and ownership of directories and files, apply as configured in the file system.
If you get the Permission Denied (Publickey) message, try to use the -i option to point ssh at the right private key file, e.g., ssh -i ~/.ssh/id_dsa.pem -p 2222 [email protected]
Thanks for the hint! If you are a user unfamiliar with the SSH command, type “man ssh” for a summary of the available commands. You can see the “-i” option for the identity file.
where I will find my public key in macbook ? I have generated but could not find the key!!
As per the article above you don’t need the public key to connect to SSH. The public and private key pair is generated on the server. The public key resides on the server and the private key is downloaded onto your Mac so that it can used in the client being used to connect to SSH. If you ever need to see all of the keys being used by your Mac, you can use the keychain app. I hope this helps to clarify the issue. If you have any further questions, please let us know.
I’ve tried everything in this feed and I still get operation timeout. Any ideas? I have generated the keys. They are authorized. Private key is in .ssh. I have chmod 600 and added to ssh. Trying to connect on shared server via -p2222. What am I missing?
An operation timeout generally means your SSH client go no response from where it was trying to connect to. The most common causes of this are an incorrect address or a firewall issue. I would recommend trying to SSH to the IP of your shared server instead of using the server name or your domain name. If that does not work I would check your firewall on your computer and local network to ensure they are not blocking your connection.
when I run this comand “ssh-add -K id_rsa“
I get this: “Permissions 0644 for ‘id_rsa.ppk’ are too open.
It is required that your private key files are NOT accessible by others.
This private key will be ignored.“
Please help
That means your permissions for your key file are set to 644, however, private keys should only be readable by your user for security purposes, you need to set the permissions to 400, 600 will work on most systems as well but 400 is what it should be. You can do this by running “chmod 400 path/to/your/private/key”
Hi,
I got following message. Any one can help me please
ssh_exchange_identification: read: Connection reset by peer
Thanks
Rdb
Hello Rdb,
The error you’re seeing may depend on how you’re connecting (or what you’re using to connect) to SSH. Check out this forum post and see if matches the issue you’re having. If you are unable to resolve it then please contact our live technical support team (if you’re an InMotion Hosting customer), as they have the necessary access to review the issue directly and resolve it.
how to connect ssh -p2222 [email protected] guide me on this what to typ correct credentials as im using godaddy. im at terminal everything added guide me this command according to my servername
I’d suggest reaching out to GoDaddy for specifics to connect to their servers.
Oly use your comand with “sudo” like this “sudo ssh -add -K ~/.ssh/id_rsa”. It resolve that message.
Simplest on Mac would be
1. Download your key
2. Open Finder Press Cmd+Shift+G and type ~/.ssh/
3. Drag & Drop id_rsa file from Downloads to ~/.ssh/ folder
4. Open Terminal type chmod ~/.ssh/id_rsa
5. Add key ssh-add -K ~/.ssh/id_rsa
6. Connect using ssh -p 2222 [email protected]
Your instructions say “Leave the key type at DSA and key size at 1024” but it defaults to RSA/2048. I’m assuming the default is the option we should go with now; if so, you might want to update your docs to say the same thing.
Yes, you can use 2048. We will make the edit to the article to reflect that.
I’m on linux (Mint), so the support agent directed me here.
After successfully `ssh-add`-ing the new id_rsa key, I’m still getting the same “Permission denied (publickey)”
…tried, both,
`ssh {my-user-name}@biz205.inmotionhosting.com -p 2222`
and
`ssh {my-user-name}@23.235.208.135 -p 2222`.
Same failure either way (as expected).
For Linux, this is fairly more simple than on Mac (which is what the above article is about). You just need to generate a key in your local computer with
ssh-keygen -t rsaand copy the public key into the “authorized_keys” file in .ssh folder on your server.many thanks folks for your quick feedback.
actually, I’m aware about that and i did follow to the letter your instructions with sensitvite K as I checked in man ssh that is the right command but I’m still getting the same error. Checking internet I could’nt find anything. What does it mean the error message? is it a bad file or wrong command option?
I’m in ssh folder and I’m running the following file:
ssh -add -K ~/.ssh/id_rsa.1475429822
after copying the id_rsa.1475429822 into the folder as it was described in your post.
If the command posted here is the command being used then it appears there is still a space after
ssh. I suggest trying to copy and paste the command from the article above to see if that gets the desired result.Hello Team,
many thanks for the tutorial. Actually, when I run the ssh -add -k ~/.ssh/id_dsa
I get the following error message:
ssh: illegal option — d
usage: ssh [-1246AaCfgKkMNnqsTtVvXxYy] [-b bind_address] [-c cipher_spec]
[-D [bind_address:]port] [-e escape_char] [-F configfile]
[-I pkcs11] [-i identity_file]
[-L [bind_address:]port:host:hostport]
[-l login_name] [-m mac_spec] [-O ctl_cmd] [-o option] [-p port]
[-R [bind_address:]port:host:hostport] [-S ctl_path]
[-W host:port] [-w local_tun[:remote_tun]]
[user@]hostname [command]
i’m stuck and I spent hours looking for a solution. Could you please help?
Trying using the command this way: `ssh-add -K id_dsa`. Remember these commands are case-sensitive.
Hi,
I’m stucked at step 4 where identity is supposed to be added in my computer. When I put command ssh-add -K id_dsa
It asked me for password and I enterd one that i used while creating key in cpannel but it is replying me
Bad passphrase, try again for id_xxx
I have tried many times and I created the key again with password but the problem is still there!
In our tests, the above guide works. If your problems persist, you may have to contact live support so they can test within your specific account.
Thank you,
John-Paul
Type sudo before the code for people with 0644 error!
After step 3 I was getting the same open permission problem as everyone else. I set the permission to 600 then cd into the SSH folder and it resolved the problem.
I’ve tried all the suggestions here. And still getting that error.
@@@@@@@@@@@@@@@@@@@@@@@@@@@@@@@@@@@@@@@@@@@@@@@@@@@@@@@@@@@
@ WARNING: UNPROTECTED PRIVATE KEY FILE! @
@@@@@@@@@@@@@@@@@@@@@@@@@@@@@@@@@@@@@@@@@@@@@@@@@@@@@@@@@@@
Permissions 0644 for ‘id_dsa’ are too open.
It is required that your private key files are NOT accessible by others.
This private key will be ignored.
Hello Sherissa,
According to the error you provided the private key is still set to 644 instead of 600. Please try changing the file permissions again to 600.
Best Regards,
TJ Edens
I got the same error message, I resolve it with chmod 600 id_rsa and all works fine)
Hi, Thanks for the tutorial. I have setup the ssh like this tutorial. But when I am going to connect it’s showing this message “ssh: connect to host [myServerIp Here] port 2222: Connection refused”. Any idea?
Hello Ali,
Some of our older servers do not allow SSH connections. If you definitely need it, you can contact our Live Support and they can move you to one of the servers that have that ability.
Kindest Regards,
Scott M
My cpanel says it is authorized, but when I try to log in via terminal, it says I’m not.
Anything I can do to fix this?
Hello Mike,
Sorry for the problems with getting into SSH. I know that you’ve posted your question in the SSH instructions for Mac, but what version of OSX are you using? Did you go through the steps listed above? Can you please provide account information so that we can check it? We would need more information in order to troubleshoot the issue. Please give us a little more info and we would be happy to help.
If you have any further questions or comments, please let us know.
Regards,
Arnel C.
That worked fine for me under Linux too. Thanks!
Hello,
Thanks for this tutorial. However, I am getting the following error:
Identity added: /Users/admin/.ssh/id_dsa (/Users/admin/.ssh/id_dsa)
Permission denied (publickey).
I’m running on OSX Yosemite 10.10.2
Thanks in advance!
Be sure that you have the correct user and server defined when connecting. If you are certain that you do, you may need to follow the steps again to re-generate a new key and add it.
I did every think like said but when I put the command ssh-add -K id_dsa
I get this message
Permissions 0644 for ‘id_dsa’ are too open.
It is required that your private key files are NOT accessible by others.
This private key will be ignored.
How to resolve this error?
Hello GASPAS,
Thank you for contacting us. The “permissions are too open” error is usually caused by the permissions level of the private key you are using.
Instead of 644, they should be set to 500. Here is a link to our guide on How to change file permissions and ownership settings while in SSH
Thank you,
John-Paul