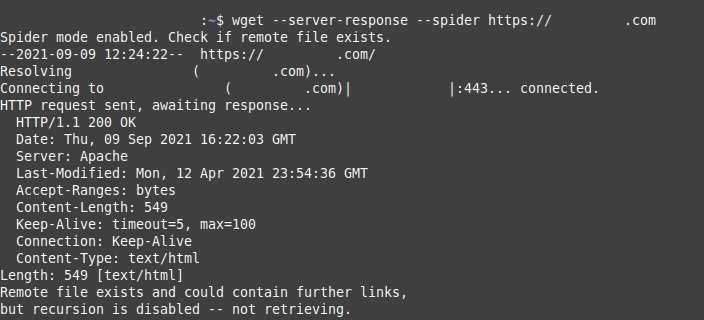
HTTP header modifications can harden your Linux server and obfuscate sensitive data to make cyber reconnaissance harder for cyber attackers. It is for this reason that many Linux system administrators decide to change Apache servername HTTP header information. HTTP responses from your Apache server will include the following by default:
HTTP/1.1 200 OKDate: Mon, 10 Sep 2021 16:01:11 GMTServer: Apache/2.4.10 (Debian)
There are multiple ways to view a server’s HTTP headers. The easiest methods: SecurityHeaders.com, Observatory.Mozilla.org, or the command-line interface (CLI).
curl --head yourdomain.com

wget --server-response --spider yourdomain.com

Read on to learn how to set a custom Apache servername.
Ensure you have root access to your Linux server and ModSecurity (mod_security) Apache module installed.
Change Apache Servername in HTTP Headers
cPanel VPS or dedicated server administrators should follow these steps:
- Log into WebHost Manager (WHM) as root.
- On the left, select “Apache Configuration.”
- Select “Global Configuration.”
- Set “Server Signature” to “Off.”
- Set “Server Tokens” to “Minimal.”

- Select “Save” at the bottom.
- Select “Rebuild Configuration and Restart Apache.”
- Select “Terminal” on the left.
- Edit your ModSecurity user configuration file:
nano /etc/apache2/conf.d/modsec/modsec2.user.conf
- It’s okay if the file is blank. Add the following lines, changing the custom server signature to your preference:
ServerTokens OS
SecServerSignature "CustomSecretiveName"
- Rebuild HTTPD:
/scripts/rebuildhttpdconf
- Restart Apache:
/scripts/restartsrv_httpd
- Check your Apache servername.
curl --head localhost

The steps below are for non-cPanel servers.
- Log into SSH as root.
- Edit your Apache configuration file.
CentOS:nano /etc/httpd/conf/httpd.conf
Debian / Ubuntu:nano /etc/apache2/conf-enabled/security.conf
- Add or change the following lines as follows. For example, if
ServerTokens OSis present, change “OS” to “Full.”SecRuleEngine on
ServerTokens Full
SecServerSignature "CustomSecretiveName"
- You can remove, or disable (#), the “ServerSignature” line if enabled.
- Save your changes.
- Restart Apache.
CentOS:systemctl restart httpd
Debian / Ubuntu:systemctl restart apache2
- Check your Apache servername.

Are you in the middle of a cybersecurity audit? Just looking for ways to better protect your digital assets? Learn more about server hardening with our Linux VPS security eBook.
If you don’t need cPanel, don't pay for it. Only pay for what you need with our scalable Cloud VPS Hosting.
CentOS, Debian, or Ubuntu
No Bloatware
SSH and Root Access


