We recently added Secure FTP (SFTP) to our Shared plans. SFTP, different than FTP access, doesn’t use the normal cPanel login to access your account. Below is our guide on using FileZilla and connecting to SFTP for shared accounts.
Generate access keys via cPanel
The first step is creating your public and private keys. If you haven’t done this, you can find the instructions in the following article SSH access for Resellers and Shared Servers. If you already created keys for SSH access, you will use the same keys for SFTP.
Create the FileZilla profile
The next step is creating your SFTP profile in your FileZilla application. There are two steps in this process. First, you need to attach your private key file to FileZilla. Next, you need to create your connection profile.
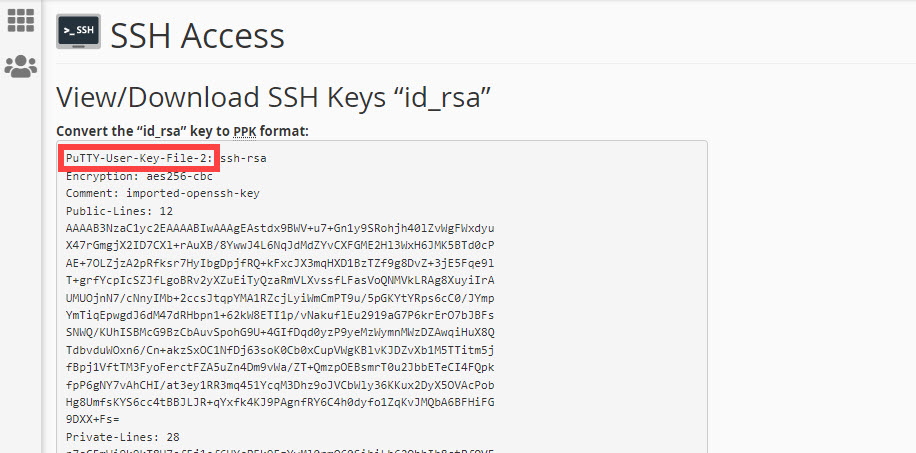
NOTE: If you have converted the key to PPK format using cPanel make sure to review the PuTTy-User-Key-File version that it has been converted to. You will see it in the first line when you convert the key (as per the screenshot below). Some FTP clients are unable to use the PuTTy_user-Key-File-3 version. The version that is converted will vary based on the cPanel version that you are using. Build 94 and older will use the older formats (version 1 and 2). FileZilla is noted for not supporting version 3 of the PPK file. You can use another FTP client to avoid this issue.
Attach your private keyfile.
- Log into your FileZilla application.
- From the upper toolbar, click on Edit and then Settings.
 A settings popup will appear. From there click on SFTP in the left-hand toolbar. In the right panel, click on the Add keyfile… button.
- Using the popup window, navigate to the ppk file you saved for your private key and click Open.
- The keyfile will appear in the list. Click the OK button to save the information.


Set up the SFTP connection profile
- Using the upper toolbar, click on File and then Site Manager.
- A popup will appear for you to create a new profile. Click on the New Site.
- The right hand form will appear brighter, indicating you can now enter data in it. Be sure to enter data into the following fields:
Field Description Host Enter your domain name (ie: example.com) or server IP Port Set this to “2222”. Protocol Set this to “SFTP – SSH File Transfer Protocol”. Logon Type Set to “Ask for Password”. User Enter your cPanel username. Password Enter your current cPanel password. - Once all of the correct settings have been added, click Connect to let FileZilla connect to your server.

Once you have completed the above, you should be able to connect to your shared account using SFTP.
Once SFTP is setup can standard FTP be disabled
Good question! The article is referring to SFTP on Shared Hosting accounts, so you will not be able to disable standard FTP on those. If you have a VPS or Dedicated Server, you can close the port or turn off the service.
Thank you for the helpful article!
Happy to help!
Once SFTP is setup can standard FTP be disabled?
Hello and thanks for contacting us. Unfortunately, you cannot disabled standard FTP on a Shared server.
Thank you for writing instructions that are easy to read, understand and follow. Unfortunately, I am getting
Error: Connection timed out after 20 seconds of inactivity
Error: Could not connect to server
Status: Disconnected from server
Any suggestions?
Hello and thanks for contacting us. Have you tried using your server IP?
Hi, Using FileZilla
I’m stuck in a loop. Keeps asking me to *Please enter a password for this server * I enter and the pop-up returns
For hostname, I recommend typing in your server IP. I’ve updated the article with this info and link as well.
I am using filezilla and getting following error. Can you please suggest what is that I am doing wrong. Status: Connecting to mydomain.com:2222…
Response: fzSftp started, protocol_version=8
Command: keyfile “C:\kdfsd\pkey.ppk”
Command: open “[email protected]” 2222
Error: ssh_init: Host does not exist
Error: Could not connect to server
Status: Waiting to retry…
Hi Jays,
I was able to step through the process again to make sure that it works with no issues. If you can provide more details we can look into. If you require privacy, then please contact our live technical support team.
There’s a step missing here!
Once you’ve generated a key, you must go back to the Manage Keys section, select Manage on the key you just generated, then AUTHORISE the key! Otherwise, it will never work.
Hello.
Thank you for your comment. You are correct that the SSH Key generated must also be authorized before you are able to use it. I have updated the linked article on SSH Access for Reseller and Shared servers, to include the process for authorizing SSH Keys accordingly.
Best Regards,
Carlos D
Can dedicated servers accoounts access via SFTP?
Yes, SFTP is allowed on dedicated servers and will use port 22. Here is a helpful link to our full guide on FTP Basics for Dedicated Servers.
Thank you,
John-Paul
Hello, I’m using FileZilla on Ubuntu 16.04 and I keep getting this:
Error: Disconnected: No supported authentication methods available (server sent: publickey)
Hello,
It sounds like the key Filezilla is trying to authenticate with is incorrect, I would recommend making sure you have the correct key in the configuration, By default, it will use the one for the account you are logged in as.
Best Regards,
Kyle M
I noticed that if I enter a wrong password when filezilla ask for it the connection will still succeed. Is that something expected once the key setup has been done?
I even modified my cpanel password, relaunch filezilla, and the connection will still succees whatever the password I enter.
is that the expected behaviour?
Keys become the authentication method for logging in once they are set up. That’s why the password no longer matters. That’s the point of keys, so you dont need passwords.
Is there a way to limit an sftp user to a certain directory in the server? Thank you.
Hello JB,
When you create the account in cPanel, then you can limit what the FTP user can access based on the folder that you indicate in their settings. If you’re trying to isolate them to a specific folder, then that folder cannot be a parent folder to numerous other folders.
If you have any further questions or comments, please let us know.
Regards,
Arnel C.
I was able to get this working in Coda 2, finally! I found that using the keys generated through cPanel was not possible in Coda, so I tried generating my own through Terminal like this:
ssh-keygen
Give it a unique name, like inmotionhosting and set your passphrase – just like you do through cPanel.
After generating the key, add it to your Keychain with:
ssh-add -K inmotionhosting (but replace ‘inmotionhosting’ with whatever you name your key)
Once that’s done, head over to Security -> SSH Shell Access in cPanel and click Manage SSH Keys. Then click Import Key.
Enter the name that you gave your key in the relevant field. Then copy and paste the contents of your private and public key files that you generated earlier in their respective boxes. Type in your passphrase where it asks for it.
If you want to quickly view the contents of these key files in Terminal, use these commands (assuming you named your key ‘inmotionhosting’):
cat ~/.ssh/inmotionhosting
cat ~/.ssh/inmotionhosting.pub
Copy and paste the results of those commands into the private field (first one) and then the public field (second one) in cPanel. Then click Import. Go back to the list of your keys and click Manage Authorization next to the key name you just imported, then click Authorize.
Go back to Terminal on your Mac and create a new ‘config’ file in the ‘.ssh’ directory if there is not already one there. You can do this with nano like this:
nano ~/.ssh/config
In it, add a new host record that looks like this:
Host YOURSERVERNAME.inmotionhosting.com
HostName YOURSERVERNAME.inmotionhosting.com
User YOURUSERNAME
IdentityFile ~/.ssh/inmotionhosting
Port 2222
Then save the file with CTRL-X and hit Y to confirm, then Enter.
Go back to edit your site within Coda, and go to the Server tab. Select SFTP under Protocol, then type in the name of your shared server in the Server field. Leave everything else blank. The config file that you just created will be pulled when attempting to connect and will use the details you entered above.
By doing all of this, I am now able to successfully connect to my account via SFTP in Coda 2!
Our Live Support can check your server logs to see where the error may be coming from.
Hey there,
I followed the steps to add the key to my mac’s keychain, then tried connecting with Coda, restarting coda after every step. It still doesn’t work: says that the login doesn’t authenticate.
Hello bennyp,
Thank you for contacting us. An authentication error is usually related to username, and password. I recommend confirming your FTP Settings are correct and without misspellings.
If your problems persist, I recommend checking the FTP logs for additional errors, or clues. If you are on a shared server, Live Support can help you with this.
Thank you,
John-Paul