In this tutorial, we will show you how to set up MS Outlook 2007 to check your email. Outlook 2007 will allow you to send and receive emails from your desktop without logging into webmail. You must have an email account already created in cPanel to do so. If you have not done so already, please refer to our tutorial on creating email accounts in cPanel. We also have a great guide on How to Setup Outlook 2013 to Check Your Email
If you are unsure what your email settings are, you can find them with our Email Configuration tool.
How to Setup MS Outlook 2007
- Open Microsoft Office Outlook 2007 on your local computer
- Go to Tools -> Account Settings
- Click New in the upper left corner
- Select the Microsoft Exchange, POP3, IMAP, or HTTP
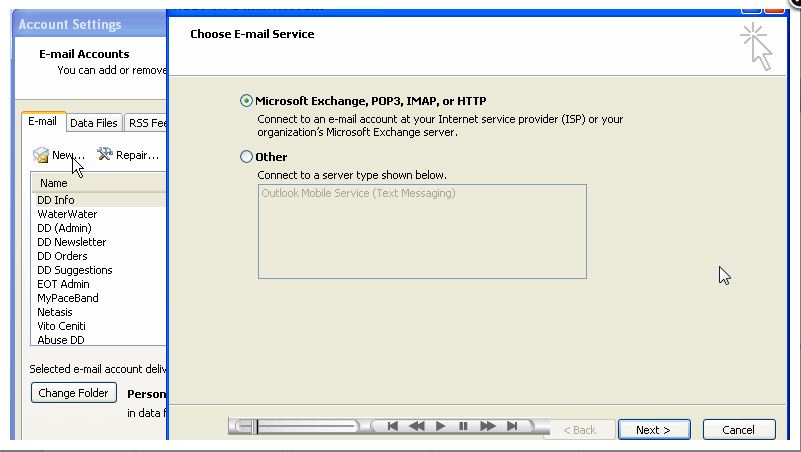
- Click Next in the bottom right corner
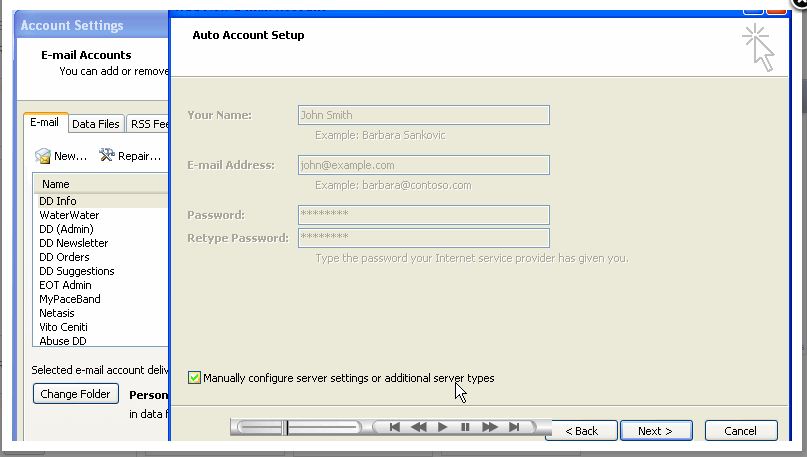
- Enter the details in each field on the screen
 Your Name: This is how you want your name to appear in emailsE-Mail Address: this is your full email addressPassword: Enter in the password for this specific email accountRe-Type Password: Enter the same password as above
 - Check the box next to the option to Manually configure server settings or additional server types and click Next in the bottom right corner

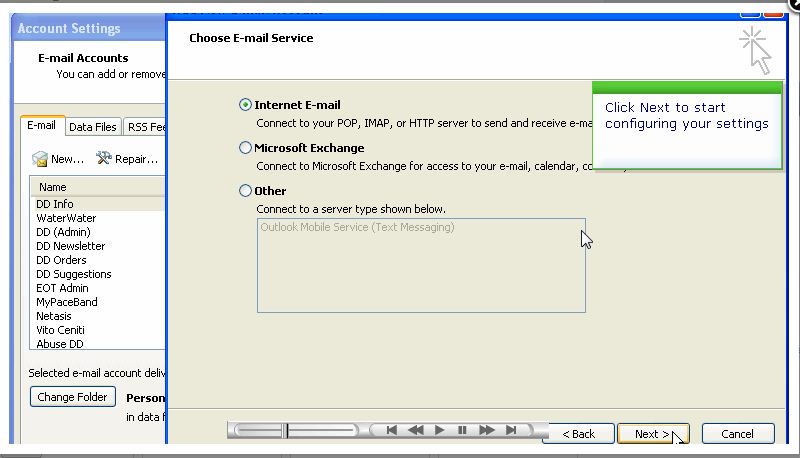
- Click Next on the next screen displayed to start configuring your server settings
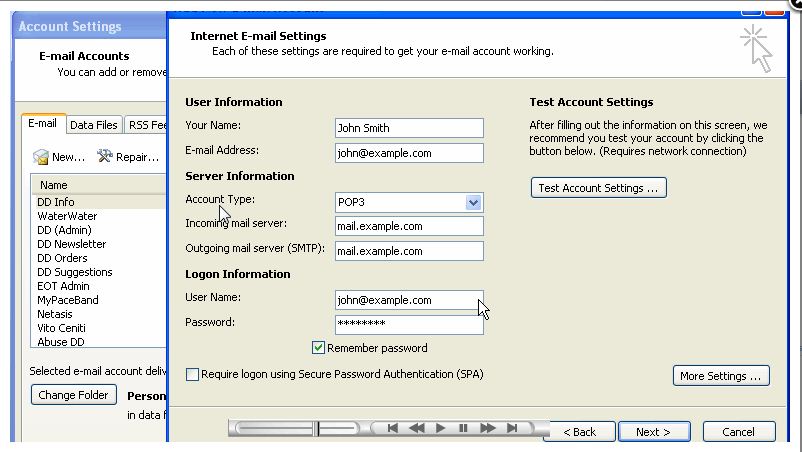
- Fill in the fields on the screen

- Account Type: Select POP3 or IMAP if you are not sure of the difference please see our article on POP3 vs. IMAP
- Incoming Mail Server: enter mail.example.com (be sure to replace example.com with your actual domain name)
- Outgoing Mail Server (SMTP): enter mail.example.com (be sure to replace example.com with your actual domain name)
- User Name: Enter in the full email address
- Password: Enter in the password for that specific email address
- Check the box next to Remember Password
- Click More Settings in the bottom right corner
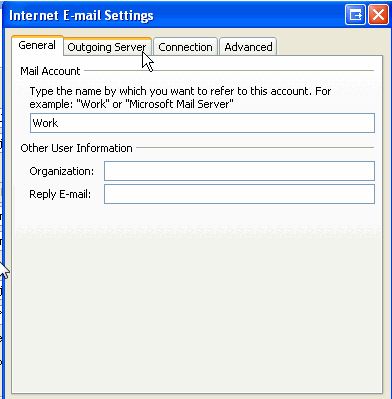
- On the General Tab give your email account a name such as work
- Fill in the fields on the screen
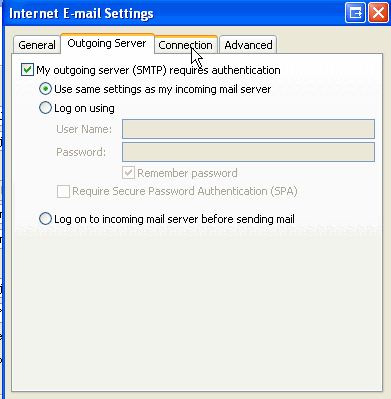
- Go to the Outgoing Server Tab and make sure to check the box next to the option My outgoing server (SMTP) requires authentication and be sure the radio button is checked next to Use same settings as my incoming mail server
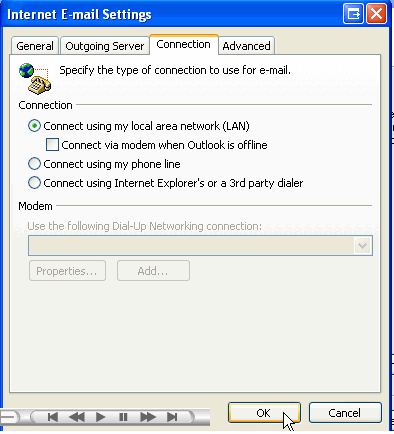
- Click on the Connection tab and select the type of internet connect you are using. Then click OK on the bottom right of the popup (most customers do not need to do this step)
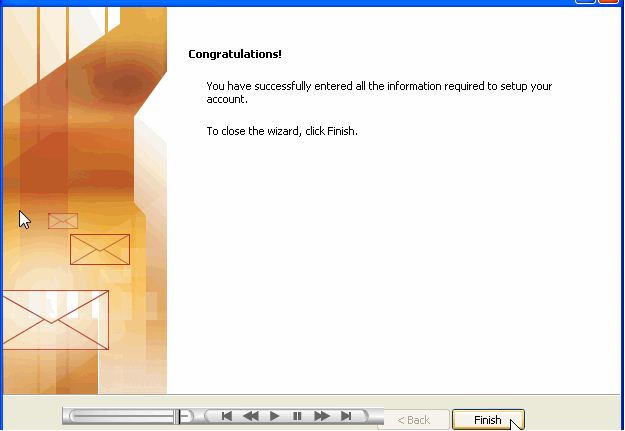
- Click Next and then click Finish to complete the email account set up
Your email account set up is complete. For more information on making changes to settings or troubleshooting email issues, please see our Support Center Email section for more information. If you find you need further assistance please feel free to ask a question on our support center website.
Hello really enjoyed your Article. Will the business Email Stop working when the host plan Expires? Thanks for your time
Thanks for contacting us. Yes, email will stop working once the hosting plan expires. However, any emails already synced to your local computer will remain. They’ll also be on the web server if you download a server backup.
Hi sir, I need your help regarding create a folder but only show client response on this option. not show autoreply, poster, and another show inbox
I recommend reviewing the documentation for Outlook 2007 to learn how to set up your folder and filters to behave as you wish.
Hi,
I m Using Outlook 2007 in my Windows 10 lap. i m unable to add Signature in that & also uanble to search any mails in any any folder
Please help me with this issues
Rgds,
Althaf
Hi Althaf, you can add a signature following these instructions. Additionally, you can setup your folders by adding them in Outlook. If you are experiencing an issue with the software you may need to reach to the developers support website for assistance with their product.
I recently had a website hosting transfer completed. Email accounts for the 3 websites which had the hosting transfer completed, all worked perfect through Outlook 2007 prior to the transfer. Since the website hosting transfer was completed, only email accounting on 1 of the domains(websites) are working. The other 2 websites that were transferred, those email accounts are no longer working. I have gone through settings in WHM and Cpanel, I have gone through all the steps to set up mail client with registry edit and manual settings. Webmail works for these 2 domains but no settings with work through outlook. I have deleted the email account through cpanel and created new accounts, I have also deleted them from outlook and set them back up.
I get this failure when trying to send test email from either of the 2 domains:
“Send test e-mail message: Your outgoing (SMTP) e-mail server has reported an internal error. If you continue to receive this message, contact your server administrator or Internet service provider (ISP). The server responded: 503 Valid RCPT command must precede DATA”
When attempting to send an email to a recipient, I get this message returned:
“Your message did not reach some or all of the intended recipients.
Subject: Tile flooring estimate
Sent: 11/20/2018 11:54 AM
The following recipient(s) cannot be reached:
‘*********@icloud.com’ on 11/20/2018 11:54 AM
503 Valid RCPT command must precede DATA”
If I send myself an email from an email account of still function emails after the hosting transfer, I receive this message:
“This message was created automatically by mail delivery software.
A message that you sent could not be delivered to one or more of its recipients. This is a permanent error. The following address(es) failed:
***@*******sing.com
LMTP error after end of data: 552 5.2.2 <***@********sing.com> Mailbox is full / Blocks limit exceeded / Inode limit exceeded”
Inboxes, trash, and spam folders are all empty on these all these accounts.
Sorry for the problem with setting up your email clients for 2 of your sites. My first comment will be that our live technical support team would be best equipped to aid you in seeing if your email issues are server related, or something related to the email client setup. Though, if webmail is working, then generally the issue is not server related. I recommend the following:
1) Check to make sure that domains that have been moved so that ALL traffic – web server and mail server- is going to the new hosting server. It is possible to move one and not the other. If the nameservers for your hosting service are all pointed to the new hosting server, then DNS will be managed in the new location. If not, then these settings are handled remotely.
2) Check to see if your email service is handled remotely or locally. If you are using an email service in the same place as the hosting web server, then the settings for mail are said to be “local.” If the hosting server is in one place and the mail server is in another, then your mail service is being handled remotely. (note: The difference between 1 and 2 is that my first answer is related to the domain settings, specifically the DNS for the domains that have been moved. #2 is specific Mail server settings and whether or not the mail has been purposefully set to be used remotely or locally.)
3) Check your email settings. I know this is very redundant, but your settings should reflect the protocol you are using (POP or IMAP), the ports being used (there 2 main types secure and insecure) and make sure that authentication criteria (typically, the user name and password) are correct.
4) Make sure there is NO email stuck in your outgoing mail. If there is, it may be trying to use your OLD settings and throwing up errors.
If your email is confirmed to be normally working at the hosting service, then you may need to contact Microsoft. Sometimes, the problem is something that needs to be cleared in Outlook itself. Sorry to say that the older versions of Outlook might be the source of the problem, but it is possible since you are using an 11-year old version of the software.
I hope that helps to resolve your problem! If you require further assistance please let us know!
Regards,
Arnel C.
The below also applies to me:
Task ‘pop.gmail.com – Receiving’ reported error (0x80042108) : ‘Outlook cannot connect to your incoming (POP3) e-mail server. If you continue to receive this message, contact your server administrator or Internet service provider (ISP).’
Please help
I’m sorry to see that you are receiving this error. It appears as though you are using a Gmail account with POP. You should ensure that you have enabled POP in your Gmail account or else setup the Gmail account as IMAP instead.
If the issue persists, you may need to reach out to Google or Outlook for further support/troubleshooting.
I can’t receive emails and there is a pop up that says “Enter Network Password”. I tried many times to reset my password but it keeps on coming. please help
I’m sorry to see this is happening. I recommend removing and adding the account to your Outlook. However, if you are using POP you may lose any emails that are not stored on the server. If you are using IMAP this will not happen and you can remove and add the account to ensure that all the settings are entered correctly. For further assistance, you should contact your email host’s support.
My reciving mail server is error.
we are sending mails in gmail.
please send outgoing and incoming mail server ID’s
Thank you
Regards
Thirumalesh
Since this is our public forum, we cannot provide account specific information. I recommend checking your server’s mail log, if you are on a shared server Live Support can assist you.
Thank you,
John-Paul
Inbox alone is not updating in outlook 2007 while configuring yahoo mil. Sent items got updating in outlook. It is also showing the error ‘failed to update folders’. Pl provide the solution for this.
This guide is intended to assist you with configuring Outlook using the Settings that work for InMotion Hosting servers. If you are having issues with Yahoo and Outlook, I recommend contacting them to further troubleshoot and/or to obtain the correct settings for their server.
I am using outlook 2007
The mail is configured and receiving the mails in inbox as well.
my outgoing messages are not being delivered at all-getting the undelivered messages like 503,However I am able to send the mails to outlook clients only like same domain name *******bhai.com
Settings are for incoming POP3 : 110
Outgoing SMTP : 25
We are happy to help you troubleshoot further, but will need a full example of the error and returned email headers.
Thank you,
John-Paul
This articule mentions nothing about setting up the folders (dictated from the pst files). I can add as many accounts as I can in outlook 2007, but the sent, trash, drafts folders are all directed to the subfolders in “Personal Folders”. I had it working fine for 2 weeks until I followed your steps to add additional accounts. Now, NONE are functioning.
From what I can tell, by default Outlook 2007 saves Drafts, Sent, and Trash messages to the Personal Folders, as you are seeing when IMAP is configured.
Navigate to Tools > Options > Mail Setup tab > Email Accounts, choose the email account you want to change the behavior for (unfortunately you need to do this for EACH IMAP connection/email account), then click on More Settings > Folders tab. Select “Choose an existing folder or create a new folder to save your sent items for this account in“. Then you will be able to use the account tree listing to map the folder you want to save the Sent items to.
Unfortunately, I was unable to locate the settings for Drafts and Trash in Outlook 2007. However, during my investigation, it seems this functionality is improved in Outlook 2010. I hope this helps!
Hi,
Since Mar 22, 2018, my Outlook in my laptop is not downloading any incoming emails. However, I am able to send emails from my laptop. Strangely, I am able to send AND RECEIVE emails on my iphone mail app. I checked the mail account settings on my Outlook in my laptop and the test was successful. Could you please help?
Thank you.
Ramesh
Please refer to the troubleshooting portion of our email guides as they may help to identify the issue. If you continue to have problems we recommend that you contact our live technical support team. Their contact information is at the bottom of the page.
Hi,
I have one perticuler persion create a folder when he was send me to one mail so I have receive three mail so pls guide me to solve this problem
I’m not quite sure I understand the issue you are experiencing. Can you explain the details of your circumstances so I can further offer some assistance?
Hi,
I am having a problem with my 0utlook email. My incoming and outgoing emails seems to have interchanged names. I am finding it difficult to tell which emails are from my clients as they are coming in with my domain name instead of the clients name. When i send an email to a someone and i leave a copy, the copy comes to my inbox as the other person name.
the configuration seems to be fine but why is it behaving this way?
Please help me.
Thanks for the question about your Outlook email. First of all, there is only ONE official email name for an email account. You can’t have an “incoming email identity” and an “outgoing email identity” for a single email account. Servers identify the sending or receiving account by the email name. We would need to know what you’re seeing and also be able to access your account in order to review why it’s not working. Note that posts are public domain on the support center. If you wish to handle this privately, then please contact our live technical support team using the contact information below.
I cannot find all my email address records which have been previously created and saved in Outlook Express when I switched to using Outlook 2007. My Outlook 2007 Address Book is empty.
Please advise.
Thank you.
Hello,
If you need help importing the email address records saved in Outlook Express check out this REPLACE2article from Microsoft. If you continue to have problems with the issue our recommendation is to contact Microsoft support in order to determine your next steps.
If you have any further questions or comments, please let us know.
Regards,
Arnel C.
I have been using M Outlook 07 for 3 years. Previously, to delete an item.I hit the delete icon and the item disappeared from the inbox. Now, when I take that action, a line is drawn through the item, it remains in the inbox and I can’t get rid of it. I should say that this began after I moved an signed with a different server. What is going on?
It is likely a certain feature that may have been enabled. It would be best to check with Microsoft support.
I am getting this error while trying to test account settings, Log onto incoming mail server (POP3): Cannot find the e-mail server. Verify the server information in your account properties. I have done all the settings correctly.
Hello Malik,
Sorry for the problems with the mail settings. If you log in to your cPanel and go to mail, there is an option for configuring the mail client for email account. Check the settings there. Additionally, check to see if webmail is working for that account. If webmail is working, then the email account is setup correctly. If you’re still having issues at that point, contact our live technical support team and they can help you with the settings live over the phone or chat.
If you have any further questions, please let us know.
Kindest regards,
Arnel C.
We recently switched to AT&T Uverse for our internet provider. I use an Acer PC with Windows i.
Since we switched, we have not been able to send or receive emails from our Outlook 2007 account. I have tried all the AT&T solutions, and none of them have worked. I would like to use my commpany’s server (www.swsloo.com) as the incoming server, but I am open to using anything that would help me get and send emails from wherever I happy to be. If you need more information, let me know. Thanks in advance for your help.
Hello Bev,
Sorry for the issues with your email. You need to properly configure your email client (regardless of ISP) in order to access email. If you are using our servers for your email, then you can find your settings by reviewing this article.
If you have any further questions, please let us know.
Kindest regards,
Arnel C.
Hello Experts,
My outloook 2007 is downloading only Inbox mails skipping all the folders. What am i doing wrong here??
Please let me know what settings do i have to make in order to download everything.
Hello Darpan Goyal,
The behavior you’re describing indicates that you are using POP3 settings. Make sure that you are set to use IMAP if you intend to use other folders than just the INBOX folder.
If you have any further questions or comments, please let us know.
Regards,
Arnel C.
Hi,
As per your guideline I ve configure the outlook. Now I am gettinf the error——
Task ‘Work – Receiving’ reported error (0x80042108) : ‘Outlook cannot connect to your incoming (POP3) e-mail server. If you continue to receive this message, contact your server administrator or Internet service provider (ISP).’
You will want to contact Live Support for account-specific assistance with your Outlook connection settings.
Thanks for your responce, but still we are facing the same problem for not for a single person, it is for multiple people. So request you to please help us in this regards.
Santoshi
Santoshi, at this point you should probably reach out to your Support Department with your email provider. They should be able to look at the logs and determine why.
Hi,
we are facing error when confiruging the email accout in Out Look.
Please find below the error details and request us to help for the same.
Log onto incoming mail server (POP3): Your e-mail server rejected your login. Verify your user name and password in your account properties. Under Tools, click E-mail accounts. The server responded: -ERR [AUTH] Web login required: https://support.google.com/mail/answer/78754
Send test e-mail message: Your e-mail server rejected your login. Verify your user name and password in your account properties. Under Tools, click E-mail accounts.
Thanks
This error says the server is rejecting your login information. You need to be sure you are using the correct hostname, username, and password. Using the correct information should correct the issue.
how do I get My office outlook 2007 to display emails over 7 days old. I can not find them and they are not in an archive folder?
Stuart, it sounds like either there is a display issue with Outlook, or the emails may be missing. I recommend contacting Microsoft, and possibly your email host.
Since two days my outlook 2007 is asking me enter the password while i am entering the pasword its asking me again enter the pasword i am sure the pasword is coryect what can i do asist me please
I would reset the password again just to be sure.
Assalamoalaikum,
I configure roundcube in outlook 2007 through POP but thers no mail left in roundcube, all mails have been moved to outlook instead of copy. tell how it will be resolved. I want that mail copy in outlook from round cube ID instead of moved.
Thanks.
POP removes the mail from the server by default. Check into the settings for Outlook and there should be a setting to check for leaving email on the server.
I have configured my email with Ms outlook i have used to log in without problem today it bring me an error that your log in has been rejected by server, I have investigated and discover that I cannot receive any email I only send. please help me to solve this problem
Hi, I set up a hotmil account as IMAP in outlook 2007. My other hot mail account is hooked to the Excahnge with no probleem. The problem I have is that the IMAP account can be seen but it is offline ll the time and I can’t do anything to turn it on and get my emails on my computer.
Here is a helpful link to the official outlook 2007 guide on Switch between working offline and online.
Thank you,
John-Paul
I am finding errors
Log onto incoming mail server (POP3): Outlook cannot connect to your incoming (POP3) e-mail server. If you continue to receive this message, contact your server administrator or Internet service provider (ISP).
Send test e-mail message: Cannot find the e-mail server. Verify the server information in your account properties.
Please any one can help me
This setting only appears when you are using the POP protocol, since IMAP leaves emails on the server by default.
Thank you,
John-Paul
Confirm your email settings are entered correctly and are free of misspellings. You can view our email settings in cPanel at any time.
Check your mx records to ensure they are pointed to the correct server.
Check your mail logs record of your connection, or additional errors.
You can also try communicating with your email server using TELNET.
Thank you,
John-Paul
Hey,
Just one qtn in my outlook 2007 there is no option of “leave a copy message on server”
Please suggest what should i do….!
Thanks for support it worked out.
Thanks for your post.
It’s really helpful.
Thanks
Here is a helpful guide that covers Problems Sending Mail – Receiving is Fine.
Thank you,
John-Paul
hi Iam finding error in sending the mail from outlook. I recive my mails but mails are not going. error is Send test e-mail message: Outlook cannot connect to your outgoing (SMTP) e-mail server. If you continue to receive this message, contact your server administrator or Internet service provider (ISP). Kindly help out.
Hi
I am trying to configure my outlook 2007 and I see that I am not able to find the “Incoming mail server” & ” Outgoing mail server” please assist where to find it??
Regards
Vinay
Your incoming and outgoing mail server is anything that points to your account, typically. Its your domain name or ip address of the server.
Hi,
In office I am using Outlook 2007 and at home i am using webmail.
I can’t see the sent item of outlook on my webmail.
How can i synchronize sent item folder?
Hello Asha,
If your Outlook email client is properly configured to send email from the same mail server that your webmail service is attached to, then the outgoing email should be tracked at the server (since it is sending the email – not Outlook). Make sure that your outgoing email is subscribed to the sent messages. Also, depending on your webmail client, you may have the same option to subscribe to folders there (this is possible in RoundCube).
If you have any further questions or comments, please let us know.
Regards,
Arnel C.
Hello currently I’m using outlook by IMAP configuration. Everything fine. Now I just want to change my IMAP seetings because I’m planning to swith to ZOHO mail.
My Question is if I chnage my mail account settings, is there anything affect on my INBOX emails ? Do I lose all preveious emails or those would be stay safe in my local system ?
How can I migrate those emails to my new ZOHO A/C ?
Please anyone will help on these !!
IMAP setups do not store the emails on your server, but sync with the server. To move emails from one server to another, you will want to use a client to do it. We have an article on how to move emails from one IMAP server to another.
hello,
I am getting error during domain configuration with Outlook in windows 10 64bit.
How can i resolve this?
Regards
Ninad
What is the error you’re seeing?
I just started using outlook 7 for a new email and have noticed that I am not getting all emails…
how can I fix this and more importantly, is there a way I can recover those lost emails?
Hello Gary,
I advise you make sure that your domain is pointing to our servers. If you use our email settings for Outlook then you must make sure the domain is pointing to us.
Also, if the email was active before trying to set up Outlook then it’s likely they arrived in the mailbox that was set up previously.
Otherwise, if the mail was sent to a non-existent mailbox most email providers would have notified the senders and they could re-send. If a message is lost, however, it cannot be recovered.
I have an email account and I created some folders. After checking an incoming email, I am moving that email to my desired folder. Like this all my checked emails will be stored in folders only. Recently I created an outlook 2007 account for this email. After completion of seting up in outlook, all the emails are imported to my Inbox folder of outlook as unread. But, I didn’t see any other folders what I created. In my email server Inbox, there are some emails I already read. Thease are aslo shown as unread in outlook. Please help how to import all folders as in my email server account.
Thanks
Hello V N Murphy
Did you subscribe to these folders?
Kindest Regards,
Scott M
Sir,
Thank for your reply.
I don’t know what is subscription and how to subscribe to these folders.
Please guide me in this.
Thank you.
Hello vnmurthy,
Thank you for contacting us. Here is a link to our guide on How to subscribe to specific IMAP folders in Outlook .
Thank you,
John-Paul
Sir,
Thank for your reply.
I am using outlook 2007, not 2010 and I configured as pop3 account.
Thank you,
Sir,
Thank for your reply.
V.N.Murthy
Hello VN Murthy,
The method in the article for 2010 will be similar. By default, a POP3 setup will pull the emails off the server so that they only appear on the device that checked it. If you have any other devices that check the email, they will not see them. IMAP allows Outlook to mirror what is on the server, for folders other than the Inbox, they need to be subscriubed to in order to see them. The emails are not pulled off the server so this is good if you check your email from multiple devices (PC, phone, tablet, work, other PCs, etc).
As you are asking about folders that are on the server, it seems that may be the setup that will work best for you. Is that what you are trying to accomplish?
Kindest Regards,
Scott M
Below error came from Outlook 2007 after configuration, what’s the problem, Though I can receive email but can’t send. Kindly assis.
(Task ‘[email protected] – Sending’ reported error (0x800CCC67) : ‘ The server responded: 421 Cannot connect to SMTP server 46.16.188.7 (46.16.188.7:25), connect error 10060’
Daniel,
Your OUTGOING server information that is in Outlook is either wrong or missing. Basically, the error message is saying that Outlook cannot connect to the outgoing server. That will happen (most frequently) when the configuration is not correctly set. However, it can also happen if there’s a broken connection or issue at the server. Since that IP address is pointing to something other than our service, you would need to check with your provider’s support in order to verify if there’s a problem at the server – they may also provide the correct settings that you need for your outgoing server settings.
I hope this helps to answer your question, please let us know if you require any further assistance.
Regards,
Arnel C.
Setting up Live.com email on Outlook 2007 – I first get that it cannot be connect to my server unless unencrytioned if I by pass that, It gives me an Internet Security Warning. The target principal is incorrect?? The server/certificate you are connected to cant be verified.
Please, any help would be appreciated – I have never faced this before- New laptop windows 8.
Thank you,
Leis
Hello Leis,
Sorry for the problem with setting up your Live.com email on Outlook 2007. That really doesn’t have anything to do with our hosting here at InMotion. However, if you were trying to setup an email account created with InMotion, then you can find your email settings here. If you are trying to use secure settings and you’re using our shared server SSL settings (e.g. secure###.inmotionhosting.com), please remember that the SSL certificate are made in the SERVER name, not your domain name. This is the reason you’ll see the “Internet Security Warning” – basically it’s saying that the names don’t match (as SSL certificates typically match the domain name). However, if you can see the server name on the certificate and it matches your setting, then it will be okay. You can approve it and there will be no problem.
I hope this helps to answer your question, please let us know if you require any further assistance.
Regards,
Arnel C.
I have a problem regarding what to put in the incoming/outcoming mail server. Where can I find the right server or domain? Thanks for the help.
Hello Mrs. Ong,
Thank you for contacting us. You can view your email settings directly in cPanel. It includes both “Incoming” and “Outgoing” settings for your email client.
If you have any further questions, feel free to post them below.
Thank you,
John-Paul
Hello H K,
Thank you for contacting us. Please see our full guide Problems Sending Mail – Receiving is Fine.
Thank you,
John-Paul
my e mail on outlook only receiving and not send ? any one can help
outlook 2007 – pop3
Hi,
I mapped my webmail server to my outlook 2007 using IMAP..now after sometime the outlook shows offline and does not automatically sync with the webmail keep getting these errors
Hello Hanu,
Thank you for contacting us. Since your error indicates it is in “Offline Mode,” try switching it online.
If your problems persist, perform a Ping/Traceroute test, to your mail server. This will provide specific clues on where your connection is stopping.
We also have a guide on How to read a Traceroute.
Thank you,
John-Paul
i just finished setting up outlook using POP3. But only emails after setting up outlook are displayed in the inbox. My old emails are not downloaded(i think) or displayed to outlook.
What’s the reason???
Thank you,
Hello Hamad,
Thank you for contacting us. If you were using POP before, then your previous emails should be saved within your Outlook program. This is because POP removes emails from the server by default, and stores them in folders inside Outlook.
If you were using IMAP on our server before, you can access the folders by setting up Outlook as IMAP, then subscribe to your IMAP folders.
Thank you,
John-Paul
Cant open this item error is showing, windows 7, google apps sync, using, and outlook 2007.
Hello Mahesh,
Thank you for contacting us. I found a similar question in Microsoft’s official Support Forums, where they link to a patch, or fix.
I hope this helps,
John-Paul
HI,
i have a customer with outlook 2007, a bigpond email address and im using POP and also using multiple devices, the problem im having is that old emails keep appearing and i keep receiving duplicates. I’ve changed the timeout to 10 minutes, and it keeps appearing on both his laptop and desktop computer. Is there a way i can stop this from happening ? Or is it simply a matter of updating from outlook 2007 to 2010 ?
Simon
Hello Simon,
Thank you for contacting us. It is possible your POP configuration is causing this problem. I would first check all the POP devices, to see if they are set to leave a copy on the server. It is possibly pushing copies of emails back onto the server that were previously deleted via IMAP accounts. Be careful however, if you do not leave a copy on the server POP will remove all emails by default.
Since you are checking with multiple devices, I recommend using IMAP settings (on all of them) instead of POP. This will store the emails on the server, and allow everyone to see the same folders.
You can still save copies of emails, by moving them to other folders.
Thank you,
John-Paul
i set up three email accounts but only one shows up on the start up page when i start up outlook 2007. how do i get all three to show there like i used to have.
redandy111
Hello redandy111
We do not have copies of Outlook to test, but if memory serves, there is an option in the left top menu that allows you to select which account you are viewing. I do have a link to an official Microsoft Outlook article that may help.
Kindest Regards,
Scott M
i am configure gmail in outlook 2007 but my password not accept ?????? Plez help me
Hello Pramod,
Thank you for contacting us. I would double-check your gmail password for misspellings, or possibly reset your password.
Also, here is a link to Google’s official guide on how to “Use email clients with IMAP or POP”
Thank you,
John-Paul
Hello Yahia,
Thank you for your question. I found a post on the official Outlook site, where they discuss the setting:
“1. In Outlook select Tools 2. Account Settings 3. Select applicable email address & dbl click 4. More settings 5. Advanced 6. Un-check leave a copy of messages on server box or adjust to as many days as required for emails to be left on the server ”
In steo 6, make sure you check leave a copy of messages on server box or adjust to as many days as required for emails to be left on the server.
Thank you,
John-Paul
I’m using outlook 2007 with IMAP; when any new E-mail came to server; outlook autmaticlly downloaded from server as cut and not leaving a copy in order to receive on my mobile. what can I do to let IMAP leave a copy of E-mails on server?
Thanks
Hello Augustin ej,
I’m sorry for the apparent replication of your email to the folders. The problem that you’re having has to do with the rules that are being used to move the email to those folders. You need to look at the rules. If there is a separate move rule for each folder, then that is the reason you’re seeing for the file duplication. We do not have control over that as that is specifically a mail client issue.
Regards,
Arnel C.
I have three folder saperatly with different names. If one email contins with this three names, the mail coming three times to all folders. If it is two emails then coming two time. How to rectify the same
Above steps is helpful for setting-up Outlook 2007 as an email client. This email client has 20 GB space for storing email items into PST format.
I have set up tmy gmail account (iMAP) in outlook 2007, get one folder inunder gmail as all mail and another as In box. I am unable to delete mail in :” all mail” folder.
Hello Akg,
The behavior you’re talking has to do with Google basically not deleting messages. Check out this article about changing a setting in Outlook for this issue.
Regards,
Arnel C.
Hi – I setup my Microsoft Outlook 2007 (POP3) to get my webmails. The setup went fine without any errors …but the issue I face is this :
1. My inbox email in webmail is now empty and all emails have moved to outlook inbox. How do I fix this to ensure inbox stays in both webmail and outlook.
2. My sent emails still reside in webmail and donot show up in Outlook. How do I make this sync.
Regards,
Ramesh
Hello Ramesh,
Thank you for your question. It sounds like you setup your Outlook as POP, which removes emails from the server by default.
Since webmail is an IMAP client, I recommend setting up your Outlook as IMAP as well. IMAP leaves the emails on the server by default, and allows all clients to see the same folders.
Be sure to Subscribe to your INBOX in Outlook. (This allows you to see the folders).
Thank you,
John-Paul
Another lady in the office has outlook 7. When she goes on to see all the e-mails that have been sent to her, the “from” has disappeared now. How does she get that back?
Thanks,
Dale
Hello Dale,
Right click on any of the headers at the top of the list of e-mail messages and select Customize Current View and then click the Fields button. Here you will see the available fields in the left hand column and the fields you are currently using.
Best Regards,
TJ Edens
Outlook cannot synchronize the suscribed folder for a particular account currently i am trying to setup. How could i solve it? please
Hello ngo wah,
Is it one particular folder on one particular account? If it is account specific you will want to contact our Live Support for assistance.
Kindest Regards,
Scott M
Dear Sir
I have 4 accounts in gescoservices.com :
[email protected]
[email protected]
[email protected]
[email protected]
the only problem i have is the all incomeing mails for [email protected] is going to the [email protected] , but i wont each email to the correct inbox .
waiting your help
amanj
Hello Amanj,
Sorry for the problems with email. If all of your emails are being re-directed, then there may be an account re-direct on the account. Since the account does not appear to be hosted with us, you will need to contact the mail admin or hosting account admin that is responsible for your email in order to properly determine the issue.
If you do have an account with InMotion, please provide more information on the email account in question and we would be happy to look further into the issue for you.
Regards,
Arnel c.
I have a work email account set up through my outlook, Is there any way to delete emails through my work email (accessing it through the internet) but KEEP them in my outlook?
As of right now, if I log into my work email through the internet and delete anything it also deletes in my outlook which I do not want.
Please help!
Thank you 🙂
Hello Sam,
If you have Outlook set up as IMAP, then it will mimic the server. This means anything added or deleted on the server will duplicate on the Outlook. If you set it up as POP3, then the Outlook will pull the email from the server and then it will exist on Outlook.
Kindest Regards,
Scott M
Hi John,
I just got problem in my Outlook 2010. Yesterday at 3 pm, suddenly i got no incoming emails, but i got it smoothly on Tab or Blackberry. before that so far was no problem. What happened with my outlook and what should I do to fix it? thanks alot..
Hi Scott.
Suddenly I got no new emails in Outlook 2010. Before so far was OK. my PST file is 17GB.
I still get new emails at Tab and Blackberry. What happened with my Outlook and what should I do to fix it?
Thanks alot…
Hello Antonio,
Due to the fickleness of Outlook 2010, it tends to be easier to remove the account from your outlook software and re-add your email address. This can happen at times with windows security patches.
Best Regards,
TJ Edens
Having a similar problem, only I am using live mail. I have to forward the mails from live mail which is on my old computer to my outlook 2010 account on my new one as outlook wont load files.
Please help..
Thanks in advance.
Hello,
Can you please provide more details on the issue at hand? Have you tried removing the account from your email client and re-adding it using the steps above?
Best Regards,
TJ Edens
Log onto incoming mail server (POP3): Outlook cannot connect to your incoming (POP3) e-mail server. If you continue to receive this message, contact your server administrator or Internet service provider (ISP).
Send test e-mail message: Outlook cannot connect to your outgoing (SMTP) e-mail server. If you continue to receive this message, contact your server administrator or Internet service provider (ISP).
i am getting this msg while testing the account settings. what to do
i followed the steps to cinfigure outlook its asking for network username and password again n again. what to do
Hello Vishal,
Are you going through a local network? There are no ‘network’ credentials needed to connect Outlook to our servers. Also, be sure your Outgoing settings are set for Authentication.
Kindest Regards,
Scott M
I can access my emails via webmail but they will not download into Outlook 2007 although I have set up Outlook a number of times. I am sure the set up is correct but when I hit Send/Rreceive in Outlook a window pops up asking to re-enter my password. The password is correct as it lets me into my webmail. The computer is a new one. Is it possible that the on-board virus checker is the problem? Any suggestions welcomed
Hello David,
Thank you for your question. Since webmail is working, you know the server is functioning correctly.
If you are being prompted for a password, normally this means Outlook is not authenticating with your server. I recommend checking all of your email settings for typos and misspellings.
Next, try the alternate email settings. For example, if you were using the non-SSL settings, try the SSL settings.
If your problems persist, contact Live Support so they can review the email logs for issues, while you are connecting.
Thank you,
John-Paul
very easy to catch the points
Hello, yesterday I tried to setup a second email account in Outlook 2007. The first email I set up is working fine. The second one isn’t even showing. It is like the emails aren’t downloading into Outlook. I have tried 3 different times in 3 different ways to delete and then redo the gmail account for Outlook. It is still not showing up. Not sure what to do.
Any help would be amazing. Thanks!
Hello Elizabeth,
Thank you for your question. I would start by restarting Outlook 2007, and possibly the computer, if it has not been restarted recently. This stops and starts all software cleanly, and can help fix simple software problems.
If it still doesn’t show up, try setting it up again from the beginning (as described above).
You can view your email settings for Google here. Just choose if you want to connect as IMAP, or POP.
Let us know what happens. If your email was hosted on our servers, we would next check the server logs for your incoming connection.
If you have any further questions, feel free to post them below.
Thank you,
John-Paul
Hey…I’m trying to set up my email account thru Outlook and when I add my info to configure the email server settings, it “hunts” for my email address/account on the Internet and then shortly thereafter says:
“You cannot add a Microsoft Exchange account to this profite whil Outlook is running. Exit Outlook and use the Mail icon in the Control Panel to add a Microsoft Exhange account.”
I have no other programs running, and Outlook isn’t “running”…I’m trying to set it up. However, I follow the instructions and the same thing happens again.
Suggestions on what to do???
Hello Susi,
Thank you for your question. I found a post via online search, where they stated:
“I have it fixed now with Dave’s suggestion. Even though I had gotten out of Outlook, the outlook.exe file was still active in task manager. When I killed that process, it allows me to continue on.” I would try this first.
If your problems persist, you may have to reinstall Outlook, or contact your Email provider at the time you are setting up the account, so they can review the server logs for errors.
If you have any further questions, feel free to post them below.
Thank you,
John-Paul
I tried to add a new account beside the exchange already set up. But when I choose to manually set up parameters of servers (checking a little box down to de left), the next pop up screen has it first option unavailable (INTERNET E-MAIL). And automatically cannot retrive parameters.
With ENTERPRISE, I mean that is a corporate outlook. It is set up with company e-mail
Hello Iony,
Sorry for the continued problem. It’s possible that your corporate version is locked down so that you can’t make the changes as per the instructions above. If that is the case, you will need to speak with your corporate IT department for further assistance. The instructions provided above will require that you have full access to make changes within your Outlook installation.
Kindest regards,
Arnel C.
Hi! very good post.
I cannot set the parameters of gmail manually. When I check the box and hit next, the “INTERNET MAIL” option cannot be choose. And automatically cannot retrive servers configurations.
It is an enterprise Outlook 2007.
Hello Iony,
Sorry for the problems with setting up Microsoft Outlook 2007 for your Gmail account. The “enterprise” version merely indicates the level of purchase of the Microsoft Suite (in terms of the other programs that come with it when you get it). It doesn’t change the setup for Outlook. Therefore, if you’re problems with the above, you need to double-check how you’re running the setup. Are you working with a new account? Is there an account already setup in Outlook? You will need to be creating a NEW account in order to create an email account. If you continue to have problems, then please provide us any error messages and the steps leading up to where you are currently stuck.
If you have any further questions or comments, please let us know.
Regards,
Arnel C.
sir?madam
i have to create microsoft outlook account nut what should i input domain name whats is domain name
pls help me
Hello Jordan,
Thank you for contacting us. I would first try restarting Outlook, this may clear out any bugs/issues with the client.
I have seen this before, where an outgoing mail gets stuck and blocks the outgoing mail. As a test, try cancelling/deleting all outgoing mail, then sending a single email.
If you are able to send, then review the emails that were in the outgoing box before.
If your problems persist, it may be easier to contact Live Support, so they can review the email logs.
Thank you,
John-Paul
Hello yogesh,
Thank you for contacting us. First, make sure you have created the email accounts in cPanel.
You can then view your specific email settings in cPanel at any time.
Then, use your settings to follow the above guide.
Thank you,
John-Paul
My husband just got a new email address for a new job. It had to be set up as a pop account. We set up all ok but it is not showing up as a new email account down the side In the outlook 2007.
When you go to tools then settings and you have a look at the account, new emails are getting delivered to another email address. We have tried to change the folder but there is no other option. He can send from the new account and receive from the new email account but he wants to show this email address separately. What do we need to do?
Hello Belinda,
Thanks for the question. It sounds like you were able to set up the account okay per the instructions above. Outlook 2007 uses profiles for managing multiple accounts. You may need to set up a different profile in order to see the other account. Check out this post from Microsoft’s Office support pages.
I hope this helps to answer your question, please let us know if you require any further assistance.
Hi Guys i have a doubt i need to configure outlook. I have configure on my lap but i want to configure on my android mobile phone my mail id is like [email protected] please help to configure on my Mobile Phone
We have a great article on setting up email on your Android phone that should resolve your issue.
Hi I have configured gmail in outlook 2007.recently i am facing issue that all emails are not downloading.I hyave reconfigured,removed rules,changed outlook profile & tested but issue still persists.Can anyone helpme out to solve this issue.
Hello Praveen,
Are you getting any errors when connecting? Have you tried deleted and recreated the account? Have you attempted using another email client such as Thunderbird to see if it is only an Outlook issue?
Kindest Regards,
Scott M
Hi Jeff, thanks for your response. I changed to port 587 and that did the trick!
When following these instructions my email will not let me send or receive anything. It only stays in the outbox instead of sent mail.
Hi,
I have successfully set up Outlook 2007 following your instructions but for some reason I am now getting this error when trying to send out emails.
Task “my email address” – Sending’ reported error (0x80042109) : ‘Outlook cannot connect to your outgoing (SMTP) e-mail server. If you continue to receive this message, contact your server administrator or Internet service provider (ISP).’
What port are you using for your outgoing mail server? If using port 25, try changing it to port 587 as your ISP may be blocking port 25.
test account settings TASK
log onto incoming mail server failed
send test e-mail message failed
ERROR shows like this…
Log onto incoming mail server (POP3): Cannot find the e-mail server. Verify the server information in your account properties.
Send test e-mail message: Cannot find the e-mail server. Verify the server information in your account properties.
what shall i do?
i used to configure my outlook 2007 and it’s done already but when i tested it shows like this.
Hello maribel,
Thank you for contacting us about email connection issues. You can confirm your specific email settings in cPanel at any time.
Also, make sure the domain’s DNS pointed to our servers.
Thank you,
John-Paul
Hello Maribel,
Thank you for contacting us. If you click the “pointed to our servers” link I provided, it will take you to the walk-through guides on pointing to our servers. There are additional guides on the bottom.
If you provide your domain name, I can tell you specifically where to make this DNS change.
Thank you,
John-Paul
recently I have been having issues with mail not clearing from the server. I am using outlook 2007 and in the last 2 weeks my mail is not clearing from the server and I have to change the quota to unlimited to receive mail. I have the accounts set up as IMAPS. It is getting frustrating that I have to change all the quotas on the accounts to unlimited to receive mail. Why are the messages not clearing from the server after being downloaded onto the outlook client…??
Hello Suzie,
Thanks for the question and sorry for the confusion with the email. When you are using the IMAP protocol, email will stay on the server. You can set Outlook to purge email marked for deletion, but email not marked for deletion will stay on the server. Also, the quota is not affected because email remains on the server. The quota is only affected when email accounts go beyond their set limits.
If you want to your email account to download the email from the server, then you would use the POP3 protocol settings for email.
I hope this helps to clear things up. If you have any further questions or comments, please let us know.
Regards,
Arnel C.
This issue about made me fall apart recently. Relized the solution to all of the weird functionlity was to set it up as a POP acct vs. IMAP
Jeff,
Thnaks, but that is set up correctly. I went over set up a few times to be sure. I had this set up before, but had to wipe out the computer and starting fresh. No luck with outgoing mail so far. Any other ideas?
If you are certain that everything is configured correctly, you may need to contact technical support for further assistance.
Switched to port 587, but still having issues sending the mail. Mail comes, bu does not go out. ERROR:
Send test e-mail message: Your outgoing (SMTP) e-mail server has reported an internal error. If you continue to receive this message, contact your server administrator or Internet service provider (ISP). The server responded: 503 Valid RCPT command must precede DATA
This is typically caused by your mail client not fully authenticating as the user. To resolve the issue, follow the steps in our article on email authentication in Outlook.
hai i am using ms outlook 2007 i cant send the mail to my fiends…..once i send my mail.it goes to out box…what i do now .how can i resolve yhis
Hello ranjith,
Thank you for your question. We are happy to help, but will need some additional information.
Is this your first time setting Outlook up, or was it working previously?
Have you confirmed your email settings are correct? If you are hosted with us you can view your email settings at any time.
Have you tried restarting Outlook?
In case an outgoing email is stuck, have you tried deleting all outgoing emails, then attempting to resend one.
If you have any further questions, feel free to post them below.
Thank you,
John-Paul
hi
i followed the instructions but when i configured two more accounts no mail recd or sent
i m worried help
Hello adhar,
Thank you for your question. First, I recommend checking your email settings, just to make sure there aren’t any typing errors.
We are happy to help, but will need some additional information.
What happens when you try to send/check your email?
Do you get any errors?
Have you tried to send a test message to an outside email address? What happens?
Feel free to post any additional questions below.
Thank you,
John-Paul
Thanks for your quick response, broken fles on Outlook.PST and Archive.PST
Spam filter was deleting emails corrupt files in windows 7 folders also broke Dreamweaver so it was a busy Weekend, but appears to be OK now
Many thanks for reply again
Regards
My outlook 2007 is set up with 4 email Pop/smtp accounts working fine for a number of years
However Friday 29/8/14 outlook indicates (xx of xx) emails coming in but nothing in the Inbox, where have they all gone to I cannot find them even having removed and reloaded Office from the system
The PST file shows 300kb of emails this has also been repaired.
Please help
Hello mk,
What do you see in the Inbox when you log into the webmail directly? Do you see the emails that are not showing?
Kindest Regards,
Scott M
Thanks alot. The instructions are very helpful.
After using live.mail for years, I set up Outlook 2007. As a result all of my old emails disappeared from live. Is ther any way to have the emails appear in both live and Outlook.
Hello Jim,
Thank you for your question. The best options may be to setup both accounts using the IMAP option. By default, IMAP leaves the emails on the server, so you will see the same INBOX in both Livemail, and Outlook 2007.
If you have any further questions, feel free to post them below.
Thank you,
-John-Paul
Just set up outlook 07. How can I just view one of the email accounts and not all email from my account and my wife’s. Currently the emails are showing up grouped as one. There are already two separate accounts. Thanks
Hello John,
If you want to manage 2 separate email accounts in Outlook 2007 you have two options.
1. Create two different profiles, one for each mail account.
2. Add both mail accounts to one profile, then setup email filters to move them to separate folders
Please let us know if you had any further questions at all.
– Jacob
I’m trying to configure an email account on outlook 2007.
All the information are entered correctly .But (IMAP) “the connection to the server failed” is the message i’m getting while testing the connection.
Outlook is also not able to connect to my outgoing email server.
At the same time my emails goes to my webmail account.But when i tried to login to my webmail account through google,it also could not connect.
Please help….
Hello Atul, and thanks for your comment.
How are you trying to login to webmail? Are you going to your domain name followed by /webmail such as https://example.com/webmail?
If you aren’t able to login to webmail, chances are a desktop email client isn’t going to work either. Because they both use IMAP in order to connect to the server and get messages.
In order to help you troubleshoot this problem, we’d need a bit more information from you. Such as the email address you are trying to connect with, and the mail server you are currently trying to use. If you’d like to go ahead and reply to this comment with that info, we can keep that info private and try to find out for you what’s wrong.
It sounds like the address you’re using to access your mail is incorrect, so please double-check your email settings to make sure they are correct.
– Jacob
TKS JACOB FOR YOUR HELP IT WORKED
Hello again John,
No problem at all, glad that fixed your problem! Thanks for letting me know that does work, I’m sure it will come up again down the road with another user.
– Jacob
Task ‘pop.gmail.com – Receiving’ reported error (0x80042108) : ‘Outlook cannot connect to your incoming (POP3) e-mail server. If you continue to receive this message, contact your server administrator or Internet service provider (ISP).’ HOW TO Salve
This
It sounds like you may just have some incorrect settings defined there. Be sure to check over all of your settings and that they match the settings provided within the Gmail POP documentation.
hi, i just got outlook 2007 used to have outlook 2003 for my job, when i view an email, and i delete it, it does not go directly to next email, how can i change setting so i can view, delete and view next email automatically.
tks.
In Outlook 2007 if you would like the behavior changed after you delete a message this can be modified by going to Tools > Options… in the menu. Beside the very first section for E-Mail, click on E-mail Options….
At the very top you should see After moving or deleting an open item:, and here you’d want to select the option Open the previous item from the drop-down. Then simply click on OK to save the setting.
Please let us know if you had any further questions at all!
– Jacob
Thanks for reply, Problem is resolved after upgrade 2007 to 2010 and now everything is working.
Thanks for quick response They are using POP and there is only single mail showing in webmail but in outlook 2007 they got multiple mails and they are using dedicated PC for mail.
It certainly seems as if the mail client is pulling the messages down, then duplicating them after they are saved on your computer. Without looking directly at your Outlook configuration, I am unsure as to what exactly is causing it, but I recommend looking over all of your settings, and possibly removing and then re-adding the account to the client. Be sure that you back up your emails before you remove it if you do this as it will cause emails to become removed.
Hi,
One of my team member getting double mails every time in inbox. I have cross check every thing which you mention above. No visus found in that pc . Please let me know how I can resolve the issue.
Are they using POP or IMAP? Do they see the emails twice within webmail as well? Are they using multiple devices to check their email?
Hello ddynamics,
Thank you for the link, I will save that for future use in future questions and possibly a new article.
Best Regards,
Scott M
I just found this Microsoft site link.
https://social.technet.microsoft.com/forums/en-US/exchangesvrclients/thread/ee7a52bc-2a42-4149-b6f8-bf212b00bf42
Turns out this behaviour is by design for all versions of Outlook using IMAP. So I guess I live with it.
Sorry. That did not help. In Outlook 2007 that path of options you gave (from Google I assume) does not exist. The only Folder option I found is Tools -> Account Settings -> Change -> More Settings -> Folders tab. But that only lets you change the Sent folder.
Hello ddynamics,
That is due to your Outlook having the default delivery location set to your local computer. You can set that location to be the server inbox, I believe you can do that in the following location:
Tools-> Account Settings-> Change Folder
(I do not have a copy of Outlook for confirmation)
This will allow your outlook to use the server Inbox instead of the local one.
Best Regards,
Scott M
When I follow these directions for Outlook 2007 using IMAP, my Outlook 2007 ends up with 2 structures. I have a Personal Folders section with an empty Inbox, but items in my sent box. And a separate section that has only my inbox, and that inbox has my email. There should only be 1 inbox, what is going on?