While many people would want to keep the default permalinks in Koken, others may want to change the particular URL that is displayed. In this article, we will go over how to change your permalinks in Koken to change the URL to anything you choose.
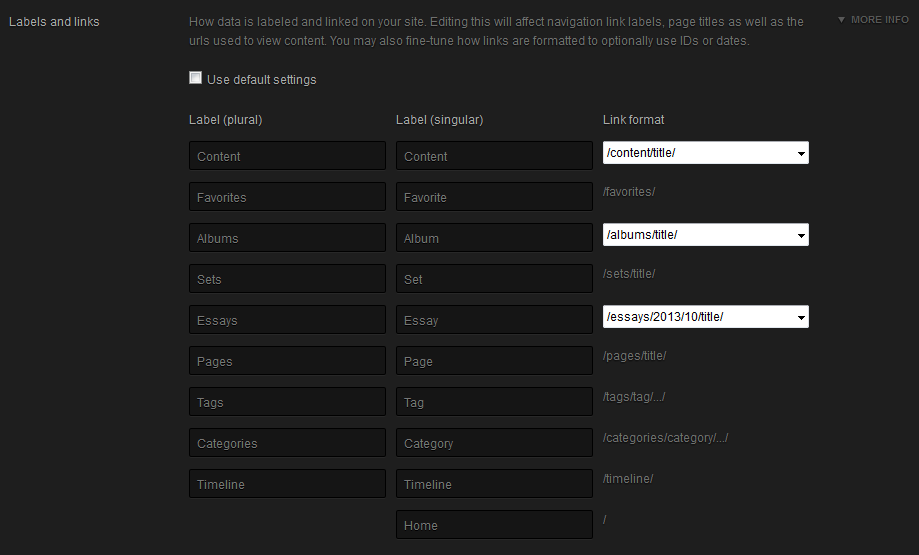
Inside the settings menu of your Koken admin panel, you will see an option for “Labels and links”. If you uncheck the box that says, “Use default settings”, you will then be able to edit any of the permalinks in Koken.
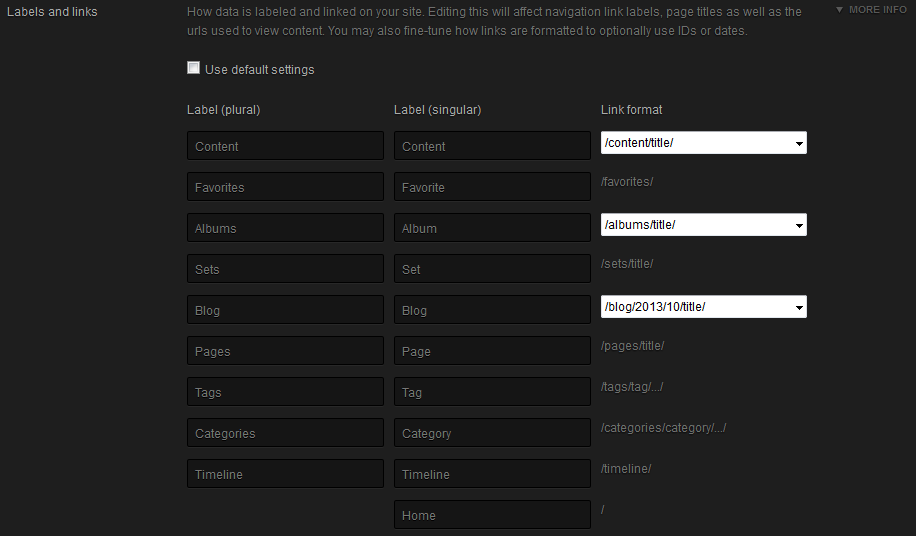
For example, if you want the Essays section to instead show “blog”, you can easily change it to Blog to allow an easily familiar URL for any users visiting your Koken site.
When editing the plural label in Koken, it will automatically try to guess what you want in the singular label, so adjust this accordingly.
The second part is the “Link format” option. This will allow you to change how the link itself looks such as showing the date or the specific ID of the content.
The “Labels and links” setting in Koken can be confusing at times. If you ever need to change it back to the default, you may do so as well by just clicking on the “Use default” checkbox.
Hi Jacob,
Thanks for your assistance!
At the moment I m facing problem to view my koken site!
When i set the domain name (www.dimages.gr) it leads to the hosting server
It needs to write the full path to visit the site.
Any idea why this happens.
Guys from hosting co. advice me to move the installation to root directory.
I did that with no success
I assume i need to do further modifications on some .php files, according to some post i read after searching on this subject on google, which far from my knowledge.
Thanks
Dimitris
It does look like you have your Koken installation currently in the /koken directory. So if you wanted to access it, you would need to enter your domain followed by that directory. Another option you would have is reinstalling Koken in the document root of your website instead of to a separate folder, if you didn’t want to type in an extra folder to get to the Koken installation.
Alternatively, if you don’t have anything in your main /httpdocs or /public_html directories, you could simply change the document root of your website to simply be the /koken directory, then you wouldn’t need to type anything extra to get to the Koken installation either.
Please let us know if you had any further questions at all.
– Jacob
In mine koken admin area under Settings there are only two options, one that shows Console URL without giving you the opportunity to edit it and the time zone.
Why i dont see the other options you mention in your article +images
Thanks
Dimitris
It looks like once you login to the Koken admin panel and click on Settings, by default you’ll be on the Console settings that you’re describing.
On the left-hand side, instead click on Site publishing, and then the second to last option should be the Labels and links option with the setting Use default settings checked. Simply un-check that check-box, and then you should see the options that this guide is going over.
Please let us know if you needed anything else at all.
– Jacob