In this tutorial, you’ll learn how to set up Outlook 2013 to check your email.
Before you get started, make sure you have done the following first:
- You must create the email address in cPanel before setting it up in Outlook 2013.
- Make sure your DNS points to our servers.
Unsure of your email settings? Find them with our Email Configuration tool.
Here are links to our other Outlook guides:
Setting up Outlook 2013
- When you first open Outlook, it will provide a “Welcome to Outlook 2013” message, click the Next button.
- The next screen will ask “Do you want to set up Outlook to connect to an email account?” choose Yes and click the Next button.
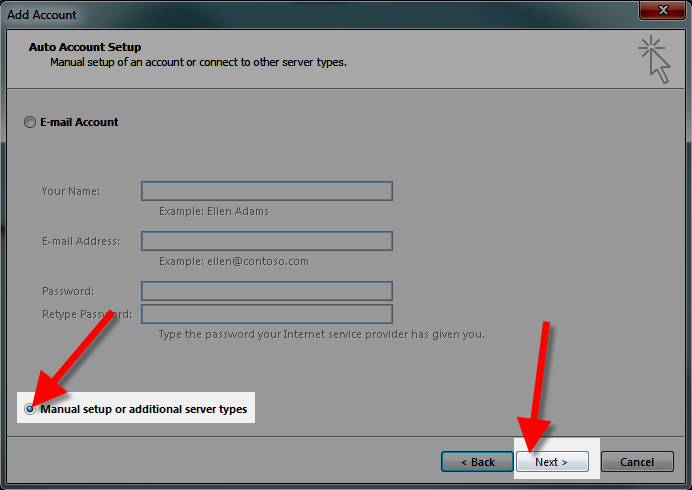
- On the Auto Account Setup menu, select Manual setup or additional server types, then click Next.

- On the Choose Service menu, click POP or IMAP then click Next.
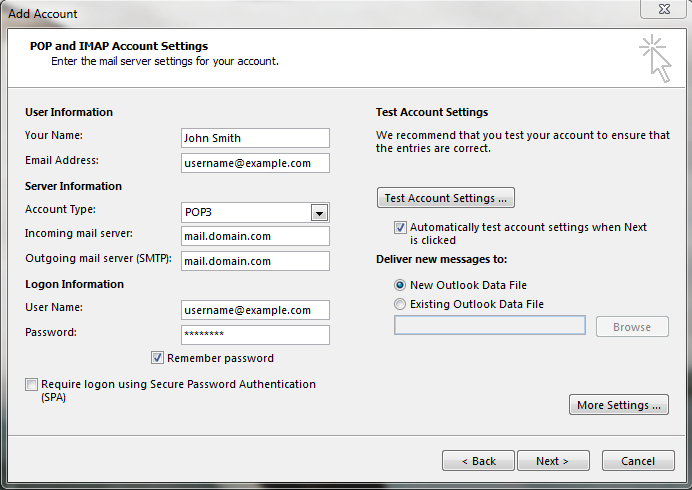
- You will then see the POP and IMAP Account Settings menu, fill in the fields.
Below is a description of the fields:
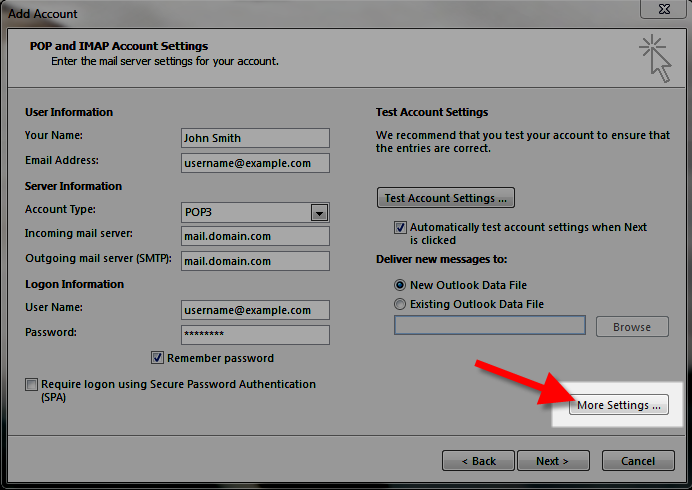
Option Description Your Name Enter the name you want people you email to see, e.g. John Smith Email Address Enter your full email address, e.g. [email protected] Account Type Choose if you want to use POP or IMAP. By default, POP downloads and removes your emails from the server, while IMAP leaves them on the server. Here is a link to an article that explains the differences in more detail. For the purpose of this tutorial, we are setting up a POP account. Incoming mail server Standard settings: mail.domain.com (Replace domain.com with your actual domain)SSL Settings: secureXX.inmotionhosting.com (Replace the XX with the numbers from your server name)Outgoing mail server (SMTP) Standard settings: mail.domain.com (Replace domain.com with your actual domain) SSL Settings: secureXX.inmotionhosting.com (Replace the XX with the numbers from your server name)User Name Enter your full email address, e.g. [email protected] Password Enter the password you set for this email address. Remember password We recommend checking this box. Require logon using Secure Password Authentication Do not check this box. - Click More Settings.
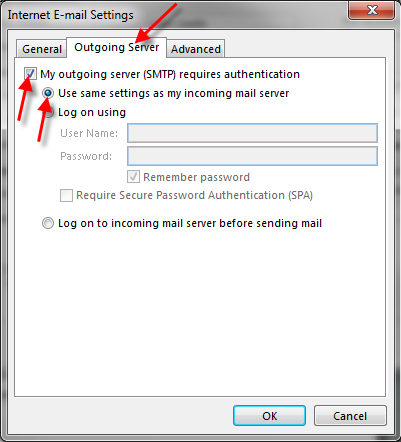
- Click the Outgoing Server tab.
Check “My outgoing server (SMTP) requires authentication“.
Check “Use same settings as my incoming mail server“.If you do not complete this step you may get a “503 valid RCPT Command Must Precede Data” error.
- Click the Advanced tab.Enter your settings, below is a description of the available options.
Option Description Incoming Server Choose your preferred settings, below are the available options.Standard (POP3): 110Standard (IMAP): 143SSL (POP3): 995SSL (IMAP): 993This server requires an encrypted connection (SSL) Click this if you are using the SSL option. Outgoing Server Standard: 25* or 587SSL: 465*Often times, ISP’s will block this port for use with their email. You may want to consider using port 587, or the secure settings.Use the following type of encrypted connection: Standard: NoneSSL: SSL - Click OK.
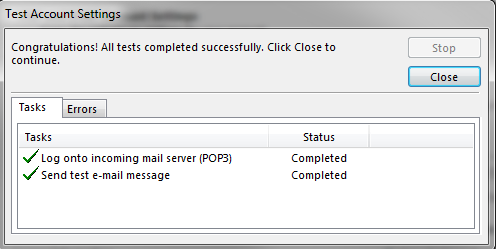
- Click Next. Now Outlook will test the the account settings.

- You will see two tasks: Log onto incoming mail server, and, Send test e-mail message. When they are complete, click Close.
- You will see a message stating “You’re all set!” click Finish.
Subscribe to IMAP Inbox
If you just setup Outlook with the IMAP option, we recommend subscribing to your Inbox in Outlook 2013. You will then be able to access and sync your email folder across devices.
Congratulations, now you know how to setup your email account in Microsoft Outlook 2013!
is it possible that i delete my existing email in outlook 2013 because it’s not working i can’t send and receive emails. what i wanna try is to do delete the existing one then make another one with the same email ID, is it possible that i can retrieve the old emails? or is it possible that i will keep the existing email ID and make another one but again with the same email ID because i wanna keep the email ID for once i don’t wanna make another new one. TIA
This depends on how your email is configured. If you’re using IMAP then your email is syncing between Outlook and the server, so deleting your email username in Outlook will mean the account is still active on the server. If you would like to save emails on your computer, make sure to transfer them to a local folder.
I followed the directions and log on to incoming completed but send test email failed
Hello,
Sorry for the problem with the Outlook email client. We need more information on your issue in order to troubleshoot. What are your settings? What version are you using? What’s the error message? Can you provide the steps you’ve taken to set it up? You can also call in to our live technical support team (or use chat or email) to get immediate assistance.
If you have any further questions or comments, please let us know.
Regards,
Arnel C.
Fantastic! thank you so much!
This solved my “I can send but not receive” issue in Outlook 2013:
Far above here, someone posted this, and I followed the link and performed the tip in my Outlook 2013;
Quote:
This article is pretty thorough, but does not discuss the issue of subscribing to your INBOX in order to receive emails, so even if the test function is successful you might end up being able to send email but not view incoming mail.
Please refer to the following additional support article:
https://www.inmotionhosting.com/support/email/outlook/inbox-subscribe
End quote.
In the linked article it states that:
Quote:
1. Open Outlook, click File, then Account Settings. Choose Account Settings…
2. Click your email account, then click the Change button.
3. Click the More Settings button, then the Advanced tab.
4. In the Root folder path field, enter INBOX (with all caps). Then click the Ok button to save your changes.
End Quote.
This did not work for me, initially, until I replaced “INBOX” with “INNBOKS”, which is Norwegian, since I am in Norway on a Norwegian Outlook version. And then, voila, the e-mails came trashing into my INNBOKS. 🙂
It took me 5 hours to figure out, solved thanks to your forum, thanks a LOT.
The weird thing is that I have a second email adress on the same server/provider with same settings as the problematic one, with identical settings, and no “INNBOKS” writing was needed for it to work.
My old computer with Outlook 2007 will allow me to have multiple e-mail addresses come in to one inbox, and I can reply to any e-mail with it going out from the e-mail address that received it.
Is it possible to have that same function in Outlook365. It tries to set up an inbox and all the others for each individual address.
Hello David,
Your question is probably better suited for Microsoft – the maker of that product. However, as far as I know the email client should be able to do everything that Outlook 2007 can , if not more.
If you have any further questions or comments, please let us know.
Regards,
Arnel C.
just set up the new outlook on an HP. ok, the system works when im in the office. but from home it states “connection to the server failed.” wireless at both locations, have tried adjusting the settings to no avail.
Please help.
You can verify if your network’s ports are open with a telnet test.
Check yourmail logs for additional clues or record of your transmission.
Thank you,
John-Paul
I am using ehost for my domain. Everything has been running well but today they suspending my account because it was up for renewal. When it was reactivated, my Outlook will not connect with the server. I have been on the phone 3 times making adjustments and still no connection. Help – help desk is now oversees.
Would be happy to help, but usually these issues are a matter of adjusting the settings. Are you getting any specific errors? Sometimes it could a username and password or something simple.
Very confusing and did not work for me.
Hello Julia,
Sorry it’s confusing for you. Can you please provide some information on where you find it confusing? We appreciate any feedback to help make the article better.
Also, if you could please let us know what version of Outlook you are using, the settings you’re using and any error messages that may have appeared when you tried to set it up.
If you have any further questions or comments, please let us know.
Regards,
Arnel C.
hi,
new computer with windows 10 and outlook 2013, however when i send email they do not get saved in sent folder,
i have ticked the save sent email box but still no luck..
any help would be great,
thanks
marco..
Hello Marco,
If you send email using Webmail, look in the sent folder and see if an email is being saved. If it’s working through webmail (which uses IMAP protocol), then the server is working. You would typically need to make sure that the SUBSCRIBE option in Outlook is properly assigned to SENT folder. If you do not see the email in the SENT folder after sending it using Webmail, then please contact our live technical support team for further assistance.
If you have any further questions or comments, please let us know.
Regards,
Arnel C.
configure my mail and configured correctly , but when I start Outlook , send mail but never frame error, and never reached the addressee . Send mail from another account and I Frame : Delivery to the following recipients failed.As a test try sending mail from webmail.
Next, review your mail logs for errors, or record of your connection.
Thank you,
John-Paul
Dear ,
God Bless you. It helped me alott.
You Made it very easy by adding Snapshots & Visuals.
Suggestion : Pls See below i suggest it will increase understanding
Incoming mail server : mail.domain.com Alongwith this give example in bracket
[[email protected]]
further you should have also mention that we can also set outgoing & incoming server to Dafaulty setting means at ” None”
Neither select TLS or SSL
anyways thnx a lot for this easy access to configuration
ADNAN HAIDER
Dear super amazing brilliant Staffers,
Thank you so far for really awesome support and service. The one last thing I cannot seem to get figured out is how to sync Outlook 365 with the web calendars I can see via horde, roundecube, squirrelmail, webcal, booked, or any of the other calendar applications. I have seemingly made Outlook work with the email accounts, now I would like to know if I can set up 8-10 calendars that can all share and interact with eachother via Outlook.
Thank you!!
Hello Abby,
Unfortunately, the web calendar option in Outlook requires that you use an Exchange Server or a third party solution that you would need to load to make it work. Apologies that we do not have a direct solution for this issue. If you have any further questions or comments, please let us know.
Regards,
Arnel C.
Hi,
am tryino to configure my outlook 2013 with my work email but keep getting these error messages
Log onto incoming mail server (IMAP): The connection to the server failed.
Send test e-mail message: Outlook cannot connect to your outgoing (SMTP) e-mail server. If you continue to receive this message, contact your server administrator or Internet service provider (ISP).
Kindly assist
Hello Liz,
Thank you for contacting us. As a test, try rotating your email settings. For example, if you are using the non-SSL settings, try the SSL settings (and vice versa).
If your problems persist, check your mail logs for additional errors, or records of your transmissions.
If you have any further questions, feel free to post them below.
Thank
Hi there,
I tried to follow your instructions, but when I did a test I got these messages:
Log onto incoming mail server (POP3): Outlook cannot connect to your incoming (POP3) e-mail server. If you continue to receive this message, contact your server administrator or Internet service provider (ISP).
And:
Send test e-mail message: None of the authentication methods supported by this client are supported by your server.
What did I do wrong?
Hello Em,
Thank you for contacting us. I first recommend verifying your settings are correct, you can view your email settings in cPanel at any time.
Next, try the alternate settings. For example, if you are using non-SSL settings, try the SSL settings (or vice versa). This changes the port and can help, if you are on a network that blocks email ports.
Thank you,
John-Paul
I am having trouble with my domain name on the incoming mail server and outgoing mail server part on Number 6. I don’t know what this is. Can you point me in the right direction? Thanks
Hello Sara,
Thank you for contacting us. You can view your own specific email settings in cPanel at any time.
Thank you,
John-Paul
Hello i manage to get my email configured on outlook 2013 but problem is it prompts for password everytime i press send & recieve, i have done almost everything sugested on google like altering the registries, changing the data folder, recreating profiles, checking credentials etc etc
I have a admin account on same laptop and outlook runs fine but when i operate my other account it frustrates me with passwrod prompt.
evry time i recreate profile with all data and press next it asks me password 2 times which is not required on other laptops and also when the profile is created and i reopen account setting my password place is blank this happens all the time
i can appreciate if you can help me settle this issue !
Hello Gaurish,
The only thing we truly can assist on is to ensure your connection settings are correct. Be sure you also have the SMTP authentication enabled with the proper username and password. This can sometimes cause issues if it is not enabled, particularly causing a popup asking for network login. If that is also correct, the next step would be to contact Microsoft’s Outlook support to see if they can assist. It is highly probable that it is some setting in the Outlook client since this is not a widespread issue.
Kindest Regards,
Scott M
Hello
I set up my outlook client but I don’t receive any email. I just can view the sent emails. I configured with other email clients and I don`t have any problems.
P.D. I followed the step by step using IMAP
Regards
Gino
Hello Gino,
Did you check the article on troubleshooting when you cannot receive email?
Kindest Regards,
Scott M
I have a problem that no-one else can solve – want to give it a try??
I recently installed Home and Office 2013, set up outlook without much trouble.
However if Outlook is open on my PC my android phone can’t conect to the email server.
If I close outlook on my PC then my phone connects to my email server with out any problem. It is 100% repeateble – Outlook running on PC, phone will not connect. Close outlook and my phone connects just fine.
Any help will be very much appreciated
Tony
Hello Tony,
If you are one of our customers you may want to contact our Live Support and have them check the logs while you connect to the server. They may be able to see something, but off the top of my head I cannot think of anything that would cause that.
Kindest regards,
Scott M
My send/receive works fine for the auto settings in Outlook 2013, but if i want to manually receive (as in when i’m on phone with client, they send me a doc and i can seee their email on the server), manual s/r seems to do nothing. It doesn’t automatically display the s/r dialogue box, and when i click on it, only shows the send bar and info…
Any suggestions?
Hello Aumigod,
Unfortunately unless it is a connection settings error, we are not able to test email client errors. That type of issue would lie within the client itself. Have you checked Microsoft/Outlook support to see if they have heard of the issue?
Kindest Regards,
Scott M
Hello,
I have had my live e-mail account going to my outlook 2013 e-mail for some time but in the last couple of days my outlook has not been receiving the e-mails. I press “send/recieve” and outlook say it is contacting the server but the e-mails are not coming through. I know I am getting e-mails as they are coming through on my phone just not to my outlook. I have gone into “account settings” and checked everything is set up ok, as per the above instructions and it is telling me everything is ok. However if I try to repair the connection it comes up with an error as per below. Cabn you offer any advice to how to solve this?
Thanks
Gavin
Hello Gavin,
Thank you for contacting us today. Since you are getting an error Establishing network connection, have you confirmed the internet is working on this computer? For example, are you able to navigate to other websites, such as Google.com, or wikipedia.org?
Also, in your screenshot, it suggests “You may need to turn off Work Offline to automatically configure this account.” This message suggests you may be set to Work Offline.
“When you’re ready to work online again, click Send / Receive > Work Offline. The button text doesn’t change, but it’s only highlighted when you’re working offline. Working Offline on the status bar also goes away when you’re working online.” I found this in the Official Microsoft website.
If this doesn’t help, perform a Ping / Traceroute to your nameservers. This will provide specific clues/evidence of the route you are taking to the Mail server.
If your problems persist you may have to contact the email host for Live.co.uk, and verify there isn’t a problem on their end.
If you have any further Outlook questions, feel free to post them below.
Thank you,
John-Paul
Hello Robert,
Thank you for contacting us about Outlook. You must sign up for an account through Outlook.com to create your email address.
Then, follow the above guide and enter the IMAP or POP settings provided by Microsoft here.
If you have any further questions, feel free to post them below.
Thank you,
John-Paul
Ok. I do have it as POP. Does this mean I need to remove the account & put it back on as an IMAP? I cannot seem to just change it from POP to IMAP?
To do so, you will indeed need to remove the POP account and set it up as IMAP.
I followed these directions, and have my inbox now syncing with Outlook 2013. But none of my folders are showing/syncing. And if I access my webmail remotely, I’m finding Outlook is not updating the server for changes I made on my laptop. Help, please.
Are you using POP or IMAP? If using POP, changes are not synced between devices and would need to be changed to IMAP.
Hey Guys, great info for the outlook setup instructions – now that outlook has been released for iOS, I was wondering if you could provide an udpate that ties the above instructions into the more limited field options for the iOS setup.
Thanks!
Colin
Hello Colin,
I will look into the possibility of writing article (as I’m the main Apple user in this group). Thanks for the request! If you have any further questions or comments, please let us know.
Regards,
Arnel C.
I’m curious as to how to get an outlook email address and fix it into the outlook program.
How can I add a password so when I start Outlook 2007 No one can see my inbox. FOR MAC
Hello Nain,
Generally it is assumed that the person opening the program on the computer is the person to which that account is assigned. To my knowledge, Outlook does not have an additional password to enter when the program is started.
Kindest Regards,
Scott M
This is the best tips that I have ever seen for outlook setting up.
litlke helpfulll
It does not give any error but keep on asking the password again and again
I have used these settings
Hello Prakhar,
You can usually generate an application specific password for Outlook to use if your mail server requires an additional level of verification.
You’d have to ask your mail host for the exact specifics of how to do this for your specific mail server. For instance if you were using Outlook.com as your mail server, you would just click on Security Info under Overview and then click on Create a new app password under the App Passwords section within the webmail interface. Then use the app password it gives you inside your Outlook desktop client.
Please let us know if you had any further questions at all.
– Jacob
To do so, you would simply set up multiple profiles in Outlook. This guide on Microsoft’s website will guide you through the process:
How to create profile and set up an e-mail account in Outlook
it requires captcha for human verification, hence it returns invalid login information although they are correct
visit link mail.iiitdmj.ac.in for more info
Hello Prakhar,
Thank you for the link. I see what you mean now. The Outlook SMTP connection should not require that since it is a client connecting to a server, I wouldn’t think. Does Outlook give any specific error message when trying to connect to the server?
Kindest Regards,
Scott M
hello my server requires additional human verification code……help me on that issue
Hello Prakhar,
I am unsure what you mean by additional human verification. Could you please explain it in specific detail so we may try to assist?
Kindest Regards,
Scott M
This article is pretty thorough, but does not discuss the issue of subscribing to your INBOX in order to receive emails, so even if the test function is successful you might end up being able to send email but not view incoming mail.
Please refer to the following additional support article:
https://www.inmotionhosting.com/support/email/outlook/inbox-subscribe
Hello Terry,
Thank you for letting us know. I have added a link to the guide on how to subscribe to the IMAP Inbox, on the bottom of this article.
If you have any further questions, feel free to post them below.
Thank you,
-John-Paul
I’m a novice and my question is if I set up forwarding in which case I have. Will configuring my email accounts
necessary? I have Gmail, Yahoo and Microsoft account. Which are not auto setup in your choices.
If you have set up forwarding, you will be checking the email accounts that the mail is forwarded to. If you have not already set up these accounts that the mail is being forwarded to, you will need to do so, but any new accounts that are forwarding to others will not need to be set up.
I have set up my email ok.. I jusrt want to secure it with a password, so no one else would have access to it. I would prefer NOT to secure windows.
There is no where to set it. only 3 options “General “Out going service and advance”
Thank you
Unfortunately, I am unaware of a way to set a secondary password within Outlook and you would need to lock the computer itself.
I am assuming that Step 8 box, 2nd column, 2nd row, should read “Click this IF you are using the SSL option.
Hello Paul,
Thank you for letting us know. I have updated the article and added the missing word.
If you have any further comments, feel free to post them below.
Thank you,
-John-Paul