Dive headfirst into the ever-evolving realm of web development with our dedicated blog category, a curated collection of articles designed to ignite your passion for crafting in the digital world. From laying the foundation with coding fundamentals to scaling the peaks of design innovation and user experience, our comprehensive content caters to beginners, enthusiasts, and seasoned professionals alike. Whether you’re aiming to build your first website or seeking advanced insights into emerging technologies, our resources are tailored to equip you with the tools and knowledge needed to excel in the dynamic field of web development. Join us as we navigate through lines of code, pixels of design, and the limitless possibilities that await at the intersection of creativity and technology.
We’ve been in the web hosting business for a long time. And we’ve found one of the most consistent benefits of web hosting is being able to control your own destiny.
Learning how to do your own coding gives you the greatest level of control over what you can do with your hosting.
So where can you learn how to code?
The web is a great place to start. Of course, there are free and premium tutorial sites. So, your best course of action will come down to two factors: your learning style and budget. We’ll cover both free and premium courses from a variety of different learning styles.
Our Very Own Support Center
Yes, it might seem a little biased, but we’re proud of our Support Center.
And we’ve got a lot of interesting articles centered around coding:
The best part about using our Support Center is you can ask questions and leave comments and we will answer you directly.
Learning With W3Schools
If you’re a hands-on learner, you could do very well rolling up your sleeves and getting started with W3Schools.
Here we have a free resource available to anyone interested in coding the web for themselves.
All of the major web development languages are covered from HTML, CSS, JavaScript, PHP, Python, and more content is being added all the time.
Get Visual With Video Courses
Many of us are visual learners. We like to see something being demonstrated by a competent instructor.
For those who prefer to learn this way, and have the budget for it, you could check out courses available Lynda.com or Udemy.
If you don’t have the budget but have a library card, you may be in luck. Lynda.com provides free premium access to some participating local libraries. Check with your local library to see if they offer a Lynda account with your membership.
Power Your Web Hosting With Your Own Code
Web development is a popular avenue for those interested in getting started with coding. The languages are fairly easy for beginners, and the web browser interface is familiar to pretty much everyone these days.
And our web hosting plans are suitable for beginners interested in launching their own applications to the world.
No matter how you choose to learn, having some knowledge of web coding is becoming a tier 1 skill, and it can take you far. So you’ve got plenty of reasons to get started today. And if you’re going to get started soon, why not blog about it on our WordPress Hosting platform?
Premium Hosting That Delivers Results
Your website is your business foundation. Our hosting platform delivers the performance, security, and reliability that growing companies require to compete effectively online.
99.99% Uptime 24/7 Expert Human Support 100% Money-Back Guarantee
If you’re looking for a simple online presence to get your business into the online game, then a single page website is a good choice. What makes this an excellent choice for a small business is that you can also package it with your hosting service.
By doing so, you can streamline the process and allow your hosting company to do all the heavy lifting to design your page, get it on the web, and maintain it for you.
Here’s exactly why this type of a package deal is a good choice for you and your business:
What goes into creating a website?
First, let’s look at exactly what creating a website means. In order to get a multi-page site up and running (as opposed to a single page website), you have to do the following:
Select your web hosting service provider and choose your hosting package
Set up your domain with your web host
Install your content management system (such as WordPress) so that you can create and edit your pages from a basic shell
Design the website and create the pages either from scratch or with pre-made templates
Upload visuals such as artwork, photos or videos, all of which have to either be created or licensed
Create content for your website in order to attract leads
Install SEO plugins and optimize your site so that it ranks high on a Google search
Get an SSL certificate and e-commerce plugins if you want to create a website where people can buy your products online.
That’s a lot to have to contend with and frankly, most people running a business don’t have the time to devote to something that large. When you factor in that this website has to be maintained and the person doing so has to have the computer savvy to make the updates, you can see why many business owners outsource the project to a hosting service.
What is offered by a hosting/design package?
With a combination package most, if not all, of this work gets sent to the company that hosts your site. You will already have to pay them for web hosting. When you do this, they will take your website’s data and place it onto their computer servers which will then keep your site online. The cost of this varies greatly depending on the type of server you are using. But many hosting providers include discount packages where they will do the heavy lifting for you.
If you choose a simple one-page website, then a company will provide you with the following:
Registration of your domain page as well as a free CMS such as WordPress
A website that includes your business name and logo along with your corporate slogan
Visuals such as clip art and photos that are relevant to your company and fully licensed from professional studios
A highlighted section to show off your product line or the services that you offer
Contact information including address, phone/fax numbers, email contacts, and social media profiles
Email forwarder that will send all questions or messages sent through the website to your predetermined address
A call to action (CTA) to help bring in people and get them on your mailing list
SEO optimization with plug-ins that will help you adjust your website as it grows
Get Started on Your Single Page Website
As you can see, a single page website built by your hosting provider is a sound choice for anyone who is looking to get started with building an online presence. Every business today needs a website to help fuel sales. But not everyone needs an elaborate site with a lot of bells and whistles. Hosting providers such as InMotion Hosting can offer you quick turnaround on single page sites and can have you up and running in a matter of two days.
With all of the options available today with a free website builder and hosting, it seems like now more than ever it’s quite simple to create your own site and get it up and running. But it does beg the question of whether you need a professional web developer to design your site or if you should just do it yourself.
Ultimately, this falls on you and what you want out of your website. But if you’re still on the fence about which way to go, here’s a breakdown of why you might want a web developer and why you might want to go with a website builder.
What’s Your Budget?
The first thing you need to look at may seem basic, but it’s one of the ultimate decision-makers for this area — your budget. A free website builder and hosting is obviously the least expensive option available to you.
But it’s also the most limited. Premium web builders can provide you with a top-notch theme for about $40 while your domain registration and web-hosting fees can run you between $70 and $100 per year.
With a web developer, you will still pay the $70-$100 fee for registration and hosting. But you will also wind up paying about $500 to $3000 for a basic website. Obviously, the more bells and whistles you want on your website, the more it will cost you. But this gives you a general figure as to what a simple website will run you.
How Computer Savvy Are You?
If you are well versed in computers and either know WordPress or feel you could learn it easily, then you may not need a web developer.
However, if you know you won’t understand the coding behind creating your own website, then it’s probably best to leave it to professionals. Which leads to a third consideration…
How Much Time Do You Have To Invest?
If you’re running a business, then you know that your first consideration should be taking care of that business and working on customer support. It shouldn’t necessarily be working on the ins-and-outs of a website to make sure that it’s running well.
If you don’t have a lot of time to invest in maintaining and updating your website, then a web developer with managed hosting is probably the best route for you. However, if you enjoy working on your website and tinkering with it, then you can go the do-it-yourself route.
What Type of Website Do You Want?
Keep in mind that web builders generally have a set number of themes and templates from which to choose. The downside of that is many other websites are already using these same templates. However, that’s not necessarily a bad thing.
Most people will not notice if the layout is the same as another because the content will be different. If you want something special, such as designer layouts, templates, graphics, or videos, then you should consider using a web developer. If not, a website builder will probably suffice.
Free website builder and hosting sites abound as do professional web developers. If you are looking at doing this yourself, you may want to consider using Website Creator, a combination of BoldGrid’s easy-to-use Website Builder and InMotion’s WordPress hosting service. This is designed specifically to help businesses get their site ramped up without having to break your bank hiring a professional web developer. Regardless of which option you choose, you should analyze the pros and cons of each before making your final decision.
Has this ever happened to you? You’ve been up all night working on a
document and suddenly the computer crashes. Was your hard work saved?
Did you have a backup?
I’m sure everyone has had this experience at some point. I used to save multiple versions of the same file over and over again every time I had made a significant change. This technique worked but I would often have tens or twenties of versions of files by the end, and it would be difficult to know what was in each version or why it was saved.
Then I discovered the concept of version control and a free program called Git. Now, I could record and backup every change made to a project without saving multiple iterations. Many applications have their own backup and recovery procedures, but they may vary across projects and types of files you’re using. This is why Git is so helpful: you can use it to manage virtually any kind of project and all kinds of files.
Using version control on a project is like recording all your work on a tape. (Does anyone remember tape?) When you have a project under version control, you can record and document the progress as you go with “commits”. And you can rewind your project to see what it looked like at various commits. You can even roll back to that previous commit.
You can also record diversions and try things out with “branches”. If you like what you did on a divergent branch, you can “merge” those changes into the “master” branch.
Basically, version control gives you complete control over change you ever made to your project. And if you have multiple participants, you can see who did what and when.
If you’re an obsessive nerd about your files then version control was made for you.
Version Control Lets You Move Files Around With Ease (Even On Your VPS)
As mentioned above, you can create a repository on your InMotion Hosting server to host your files. This feature is available at all tiers, however, we recommend a VPS (Virtual Private Server) so you or your IT person can set stricter security policies when adding users to your repositories.
And, in addition to hosting your repository on your own server, you have GitHub, a popular Git host, also available to you.
Having your files hosted in multiple locations means never being stuck without a backup.
Learn How To Use Git Today
If you’re interested in learning how you can use Git version control on your projects, be sure to follow along with our guided
tutorials. And, as always, if you have any comments or questions our hosting experts are available to talk to you 24/7.
When it comes to building trust, it takes time and numerous opportunities to prove yourself. And when you lose someone’s trust, it can be almost impossible to repair it.
People naturally get defensive when approached with a sales pitch and they think you may be putting pressure on them to buy. So how do you earn their trust?
In the business world, you may have heard of trust-building exercises. Well, let’s look now at some website trust builders:
Upgrade your visuals
People can spot a stock photo a mile away, especially the ones that seemed to get recycled over-and-over on websites. If your images come across as “fake” or “posed,” then you are going to have a hard time earning a visitor’s trust. To fix this, try to include authentic photos of your products, employees, and facilities. This will humanize you with a real image of your team, but it can also save you money from not having to buy stock photos.
Personal reviews
When you look at sales websites like Amazon, you will notice that one of the first things people look at are the reviews and if the reviewers are “Verified Purchasers.” This type of authentic testimonial is something you can use to build trust in your website.
Don’t just include glowing one-sentence reviews that are anonymous. Instead, use full paragraph testimonials (the more detailed the better) and get permission to use the reviewer’s name and, if possible, picture. This puts a human face behind your reviewers.
Design and Speed
It’s important to have a professional looking website that loads quickly. In order to achieve this, consider using platforms such as Website Creator to design a site that looks professional and is optimized for speed. If a website looks hastily thrown together, then the customer won’t trust you with their business. If the site takes too long to load, they will think that you don’t really care about your products or services as you don’t have a website that can handle standard visitors. This is where Website Creator allows you to easily get powerful hosting and all the tools to build a beautiful website.
“As Seen on” Logos
Another feature that will make your website look professional are “As Seen On” logos. If your business receives any kind of media attention on a television network or in a print magazine, then you can include a section on your website that states “As Seen On” and includes the logo of the media outlet. This can show that you are getting positive press in mainstream markets and are a trusted brand.
Awards
In addition to showing off your positive media recognition, be sure to include any awards or certifications that you have received. For businesses, this could be awards or distinctions from consumer groups. With blogs, you may want to include any writing awards that you might have received. By touting your own abilities, you will show that yours is a voice to be listened to and believed.
Trust building is an important part of getting business teams to work well together. But it is just as equally important to help build trust in your business with certain tweaks and design aspects of your website. By taking the time to make your website look as professional as possible, you will gain the trust of your audience so that they can have confidence in your goods and services.
Are you interested in becoming a web developer? With the constant advancements in technology, the development and programing market is open and there are many people who need web design and development help. The styles, layouts, and coding techniques are constantly changing and it’s important when starting to keep up with the changes. Today, we’re going to look at five ways to start learning and stay up-to-date with your web development skills.
Learn web development
If you don’t have any coding experience, we recommend you join a free program at Codecademy and complete the HTML/CSS course. This web development course will get you started with the basics. If you want to continue to learn new web languages, check out the other courses Codecademy offers.
The “learn by doing” principal is true for all of life. When it comes to web development, learning by doing is the best way to become knowledgeable in the field. Instead of just signing up for a course, work on a live website or see if you can find a client who will let you build a website. The real life experience will allow you to learn so much as it gives a variety of real-life challenges which aren’t usually covered in online classes. One thing which makes the “learn by doing” principal a bit uncomfortable is the fear of not knowing if you’ll have the knowledge to complete everything. If you find yourself in a challenge, use Google to look for answers or look for another web developer who maybe has a bit more experience.
2. Don’t miss a day without writing code or learning something new
Some people think that once they learn something, it’s time to focus on that skill. This can be good, but to succeed, learning constantly is key. In order to grow and be successful, it’s important to make a focus on writing code each day or learning something new everyday. Doing this does not only help enforce what you are learning, but also allows you to be creative. This principal is true in all of life.
Where you use your time shows what is important to you. If you don’t do something due to not having time, it’s probably not important to you. If you want to become an amazing web developer, then make it a priority and code everyday.
3. Teach what you’re learning
Teaching someone else how to code gives you the ability to learn even more. Teaching is different than learning as you need to have a solid understanding how everything works and be able to verbalize what you have learned. This will also help you learn new skills as the learner may ask questions that you never thought about.
4. Do what you enjoy
As you learn all of the different aspects of web development, find what aspects you enjoy. Work to become the best at those aspects of web development. Learning how to develop a complete website is good to do as it allows you to see the full process, but you shouldn’t have to complete this process every time. Instead of being a creative which provides everything, work to become specialized in your skill.
5. Join the open source community
Joining an open source community not only gives you the ability to work with some accomplished developers, but also gives you exposure to some incredible coding. The open source community is also very helpful whenever you feel overwhelmed on a project. You can generally reach out to any of the developers for assistance. Overtime, you will find that you have people asking you questions and you can start to teach others what you have learned.
Conclusion
Web development is constantly changing. Some coding languages become popular and some fade out. Learning by doing, not missing a day without coding, teaching what you’re learning, finding what you enjoy, and joining an open source community will help you to grow in your web development skills. Even though web development is constantly changing, if you take and apply these five tips, you will be able to stay current with the latest development trends.
Get started in web development by launching your own website. Get Shared Hosting from InMotion Hosting.
When an organization, business, or non-profit doesn’t have a website, they’re missing out on a prime opportunity for the world to hear about their products and services. Getting a website online isn’t as hard as many think. For those saying, “Help me make a website!” we’re here to walk you through the process. Let’s show you how easy it is to make your site.
1. Define Your Website Purpose
Before you start building, ask yourself: why do you need a website?
Knowing your purpose is like having a map; it ensures you don’t get lost while creating a site.
Set Your Goals
Are you trying to sell products?
Share information?
Build a community?
Clear goals help shape your website creation process, including your content and design choices. For instance, an eCommerce website will look vastly different from a blog.
Find Your Brand Voice
What’s your vibe? Friendly and approachable? Professional and authoritative? Your brand voice sets the tone for all your content. If you’re struggling, think about how you’d talk to your ideal customer in real life. Let that be your north start to finding your brand voice.
Competitor Research
Let’s be honest: checking out the competition is always smart. Look at other sites in your niche to see what works and what doesn’t. Inspiration is everywhere—borrow ideas, but make them your own.
2. Choose a Domain Name for Your Website
After selecting a domain name, it’s time to choose a hosting package. You ask, What is hosting? Hosting is what stores all of your website files and allows it to be online. Without hosting, your website can’t go live.
Your domain name is your online address. This is what your visitors will type in the URL bar to view your website. For example, our domain name is InMotionHosting.com.
Strive to make your domain name memorable and on brand.
Domain Pricing
Domains are pretty affordable. Expect to pay around $10 to $20 per year. But beware of hidden renewal fees—read the fine print before buying.
Top-level domains (TLDs) are the “.com,” “.net,” or “.org” at the end of your domain. TLDs add an extra layer of branding and creativity to your domain name.
While “.com” is the gold standard, options like “.shop” or “.blog” can be more memorable.
Remember, your domain will be the first thing people see, so make it count.
Limitless Opportunities Begin with the Right Domain Name
Your domain is the foundation of your online journey. Whether you're launching a business, blog, or personal portfolio, find the perfect domain that aligns with your goals and aspirations.
VPS Hosting: Virtual servers offer more control and resources for dynamic websites.
Dedicated Hosting: These single-tenant servers are best for high-traffic or complex websites that require performance.
Pick one that fits your needs and budget. We usually recommend shared hosting for personal websites or small businesses, and VPS plans for growing business websites.
If you’re still unsure, many hosting providers offer free consultations, including us. Chat with our sales team to learn how to start a website that meets your needs.
Once you’ve added your hosting plan and domain to your cart, it’s time to complete checkout.
4. Install a Content Management System (CMS)
So, now you have your hosting account set up. It’s time to install a Content Management System (CMS) to help you manage your new website. A CMS is the backbone of your website. It’s where you’ll create, edit, and manage all your content.
WordPress is a popular CMS that powers over 40% of websites worldwide. It’s versatile, user-friendly, and free (though some plugins and themes may cost extra).
5. Choose Your Website Builder
How do you build a website if you’re not a coding wizard? You use a site builder. Using a website builder makes starting a website easy, with easy-to-use features to edit web page layout, theme colors, fonts, and more. There are many website builders like Wix and Squarespace. Finding the right website builder completely depends on your preferences, budget, and skill level.
However, good web hosting providers will include a website builder of their own in your hosting package.
BoldGrid
This WordPress-based builder simplifies design with drag-and-drop tools to build a website from scratch. BoldGrid is a free website builder with InMotion Hosting plans and is perfect for beginners who want a professional website.
6. Build Your Website
Now, the fun begins! It’s time to make your website. After you’ve got your domain, hosting, and CMS picked out and ready, it’s time to review your online goals.
Review Your Goals
Before you start, revisit your goals. The way you design and structure your website should align with what you’re setting out to do. Is your web design serving your purpose?
Other questions to think about:
What type of website do I need to achieve my goal?
What is the most direct way to give visitors the information they need?
How can I use design to make it easy for visitors to engage with my content?
Keep your objectives in mind to help you best optimize your website.
Choose a Theme
As you review your goals and decide how to structure your website, you will want to choose a theme. A theme determines your website’s overall look. Some tips on how to choose:
Keep it simple. Clean, straightforward designs are easier to edit.
Choose responsive designs. Pick a theme that will look great on all devices.
Check reviews and ratings. Learn from others’ experiences using a particular theme.
Test customization options. Make sure your theme is flexible enough to edit for your needs.
Consider theme support. Many premium themes come with developer support.
Use Templates
While website themes determine the overall look of your website, templates are pre-designed individual pages you can customize to fit your brand. Using templates can save time and effort in laying out the structure of a webpage, like a contact page or product listing.
To make the most of templates, make sure to:
Choose templates that match your goals (e.g. a gallery template for a portfolio).
Customize your colors, fonts, and images to align with your brand.
Use templates that complement your theme so that every page of your website is consistent.
Use a pre-built layout with a strong foundation to save time tweaking your website design.
Add Your Web Pages
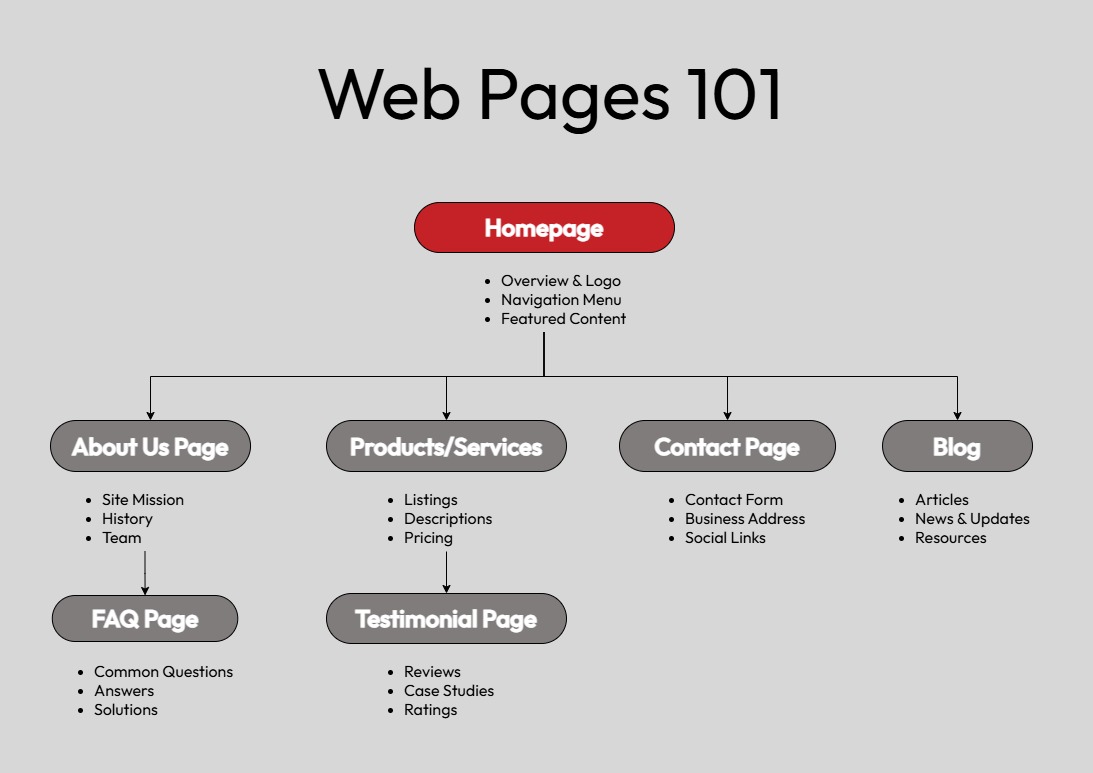
Every well-designed website needs a few basic pages:
Homepage: Your digital welcome mat to attract visitors and immediately tell them what they can expect from your website.
About Us: Where you will share your story. This page is where you can talk about your values, your mission, and what your brand stands for.
Contact Page: A dedicated page listing all the ways visitors can reach you (e.g. email, phone, social media, and so on).
Products or Services Page: If you’re a business, this page is where you can showcase your wares and offers.
Blog: Great for sharing updates and driving website traffic with SEO tactics. Blog posts can help you establish credibility as an expert in your niche.
Design for Mobile Too
63% of web traffic comes from mobile devices. Make sure your site looks great on all screen sizes. Aside from using responsive themes and templates, here are some other mobile-friendly design tips:
Avoid clutter. Remember, less is more when it comes to mobile design.
Keep your navigation bar simple and use clear, tappable menus.
Optimize your images for smaller file sizes so they load faster on mobile.
Test the look and feel of your website on phones and tablets.
Beautiful WordPress Sites Built and Maintained by Experts
Let our Professional Website Services team create a custom, modern website for your business and keep it running smoothly with our WordPress Care Plans.
Think of your site structure as a skeleton. It holds everything together and helps users navigate seamlessly.
Sitemap
A sitemap outlines your website’s pages and hierarchy.
It’s essential for both users and search engines. A sitemap can help users find information quickly while helping search engines better understand your site’s layout.
There are plenty of tools, like XML generators, that can help you create a sitemap automatically.
Optimizing Your Navigation Menu
Keep your navigation simple and intuitive. No one likes hunting for information.
A well-organized menu guides users to key areas of your site with minimal clicks. Limit menu items to 5-7 so you don’t overwhelm your website visitors.
Prioritize Key Content
A successful website places its most important content front and center. Don’t make visitors scroll endlessly to find what they need.
For instance, use your homepage to highlight your best-selling products or key services. You can also use visual cues like buttons and headings to draw attention to top-priority sections.
8. Create Engaging Content
Content is king, but engaging content? That’s royalty.
Great content grabs attention, keeps visitors on your site, and encourages them to take action.
Tips for Content Creation
Once you understand your audience, creating content becomes easier. Here’s how to add content to your website that shines:
SEO helps your audience find your website in search engines. Ensure that your website is visible on search engines by
Using keywords naturally
Making your content helpful
Crafting meta descriptions
Including alt text in your images
Remember, good SEO is about quality and relevance, not just keywords.
Check out our SEO Checklist for tips to boost your search engine rankings.
9. Test and Launch Your Website
Before you go live, make sure everything works as it should. This includes checking your links, testing your website on various devices, and testing your website performance.
Launching is just the beginning. Keep your site updated with fresh content, monitor its performance, and look for ways to improve. Regular maintenance prevents issues and keeps visitors coming back.
How to Start a Website FAQ
How much does it cost to build a website?
Costs vary but expect to spend around $50–$100 upfront for a domain and hosting. Additional expenses may include premium themes or plugins.
Can I create a website for free?
Yes, but free plans often come with limitations, like ads or lack of a custom domain. Investing a little goes a long way.
Do I need coding skills?
Not at all! Tools like WordPress and BoldGrid make it easy for anyone to build a professional-looking site.
Have you heard about web development? Not web development like spider webs, but website development!
Some of the latest statistics show that web development jobs rank in the top ten of several popular job categories. Getting into the website development industry can be very worthwhile, but can require some patience with learning and acquiring clients.
Today, we want to share some tips to help you get started and become a successful web developer.
Becoming a web developer
Getting started with web development can be challenging and you may wonder, Where do I start? Do I need to go to school? Thankfully, you don’t have to go anywhere for web development. You can learn right from your computer.
Some view web development as strictly coding from scratch. This is not a fair understanding of coding. Most of the time, a web developer will code within an content management system (CMS) such as WordPress, allowing styles and content to already be in place. This can be very helpful with getting started.
The first step is learning how to code. There are many communities of coders who share their code to help others learn and progress in their understanding of web development. Consider using a free online course. Read our guide about learning to code using an online academy.
Start practicing. Start writing html and see if you can build a website for yourself.
Learn by doing
This concept may seem a bit scary, as you may not fully know all of the different coding aspects, but you will learn the most through doing. A lot of online classes and guides do not have all of the scenarios that happen when developing a website. Working on a live website gives you the ability to understand the full picture as well as gives you the opportunity to get experience working with an actual client.
What if I get stuck? Many successful web developers spend many hours a day on Google. Googling an issue that you are experiencing is not a bad thing. This gives you the ability to connect with other developers to fix issues.
If you are still struggling with solving an issue, reach out to developers either on an open-source community or work to partner with a developer on Fiverr or Freelancer.com.
Action plan
Having an action plan allows you to be challenged and gives you a roadmap to becoming a successful web developer. What does an action plan look like? Here is an example action plan for the remaining months this year:
Month 1 (August) – Learn Bootstrap
Month 2 (September) – Build a non CMS website using HTML, CSS and Bootstrap
Month 3 (October) – Learn Javascript and advanced design
Month 4 (November) – Update original WordPress website with new design and coding.
Month 5 (December) – Build another website using HTML, CSS, Bootstrap, and Javascript.
Taking an hour and writing out a plan for the rest of the year, similar to the one included, will allow you to have a “checklist” of-sorts to follow.
Build a portfolio
If you create and follow an action plan, you will have work that you can use in a portfolio. Use social media as well as your own website to start a showcase of your work. Use your portfolio as a way to sell your skills to your potential clients.
Don’t stop learning
When a client wants to know about SEO, apps, a different CMS or language, learn by doing. Take your clients request and become challenged by it. Learn how to provide that specific service. Don’t stop learning. Even though you may not know it right now, add another skill to your tool belt.
Conclusion
The web development industry has many opportunities. Some may view the web development industry as hard as spinning their own web, like a spider, but in this article, we’ve been able to show that with patience and persistence, it can be done! Start learning how to code through an online learning academy. If you feel overwhelmed, use Google or a developer friend to help you figure it out. Creating an action plan allows you to focus each month on learning something new. Once you have built several websites, build yourself a portfolio to showcase your work. Don’t stop learning. The learning by doing principal is not just true in web development, but in all of life. When you are always learning, you are always growing. Start developing websites on a Shared Hosting plan with InMotion Hosting.
Default WordPress settings are enabled to cater to most websites; however, because they are default, it’s better to change some of these for the security of your site.
In this article we will cover the default WordPress settings you should change after installation, and why, so you can continue building the website of your dream with peace of mind.
As the top Content Management System (CMS) in the world, WordPress developers have created settings that are applicable to a large number of websites. Because of this, though, it is easier for attackers to look for certain characteristics in WordPress installations as some of these settings are now well known.
In order to protect your website and data, we recommend you change the following five settings.
Login URL
WordPress websites all share the same login URL when first created.
example.com/wp-admin
This is a major security concern, as it is a well known page and malicious users will attempt to brute force attack your website via this page in order to get access.
We recommend using a plugin to hide your login page by changing its url slug. By changing your login url to something only you know it will ensure attackers can’t access this page.
Note: Ensure you write down or bookmark the new login page as you will also not be able to access /wp-admin once changed.
Although WordPress websites allow users to set their admin username upon installation, we would like to reiterate some tips on creating your login information.
Do not set your username to Admin or Administrator: Similarly to the default login page, the username “admin” is one of the top usernames set for administrators; however this also means it is commonly used by attackers to try to access your site.
Do not use your website name as your username: Any prominent information on your website can be used as a possible username, therefore making titles, abbreviations, and such easy ways to guess your username.
Try not to use your name or email as a username: If you are planning on writing content for your website or have a contact page with your email address displayed, these can be factors attackers can use on your login page to attempt to access your dashboard.
Permalinks are the unique URL structure given to your pages, posts, and media.By default, WordPress has a “Plain” permalink structure for your posts, displayed below as per their documentation.
https://www.sample.com/?p=123
In order to make your website more user and SEO friendly, we recommend changing your permalink structure to something easier to remember, such as the “Post Name” style.
http://www.sample.com/sample-post
To change your Permalink structure follow the instructions below:
In your Dashboard, navigate to Settings, then click on Permalinks
Choose the Permalink Structure you would like to use
Click on Save Changes
Note: While this change is immediate, we recommend you clear your cache to ensure you can see your new permalinks.
Time Zone
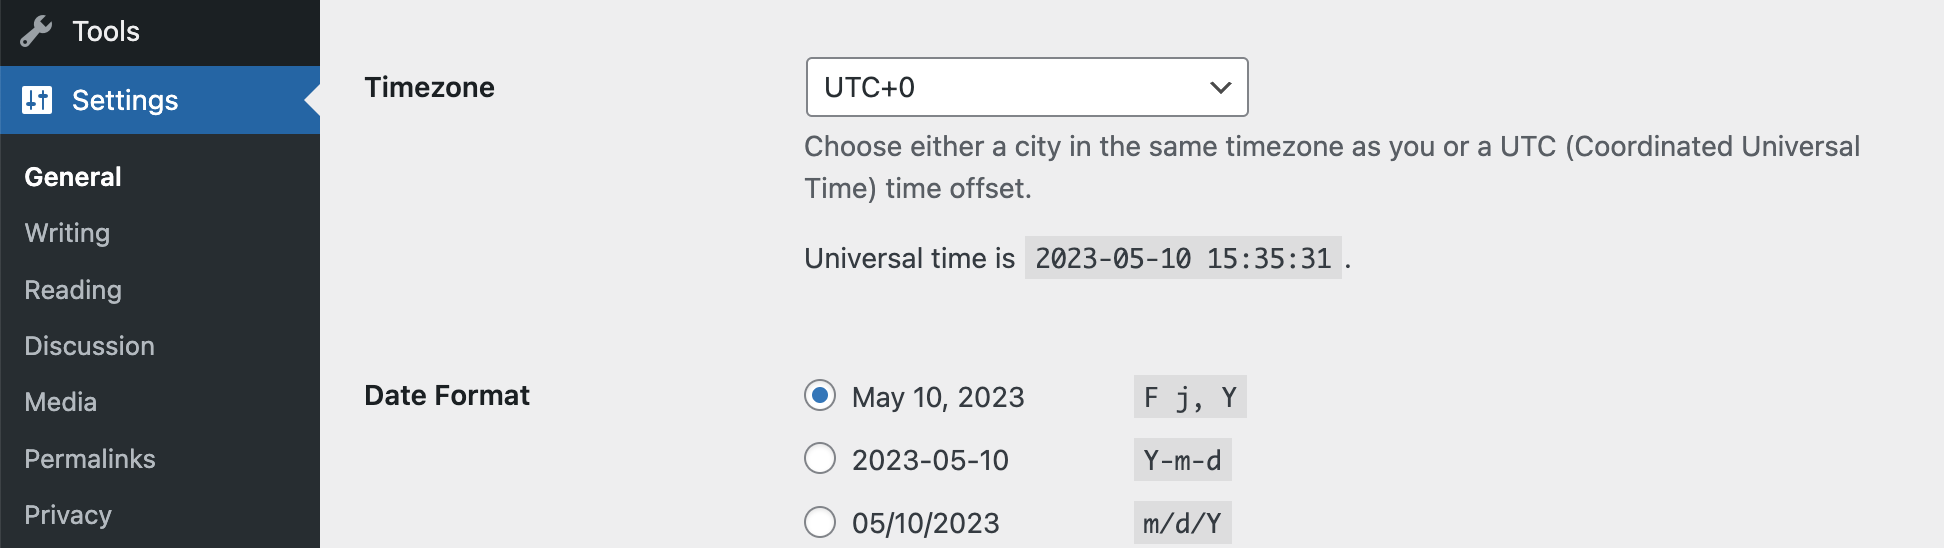
WordPress time zone is set to Coordinated Universal Time (UTC) by default. This means that any utilities or settings dependent on time will be affected by UTC. These may include:
Media Uploads
Comments
Sale Timeframes
Countdown Timers
Order Placement
While this may be okay for most site owners, if you would like for your settings to be synced to your current local time, you can update your timezone in WordPress.
In your WordPress Dashboard, navigate to Settings, then click on General
Under Timezone select the location closest to you
Click on Save Changes
Just like with the Permalinks section above, we recommend clearing your cache to ensure you are seeing the latest updates on your website.
Favicon and Tagline
While these settings may be more aesthetically centered, changing your Favicon and Tagline are still important things to change when you first create your website.
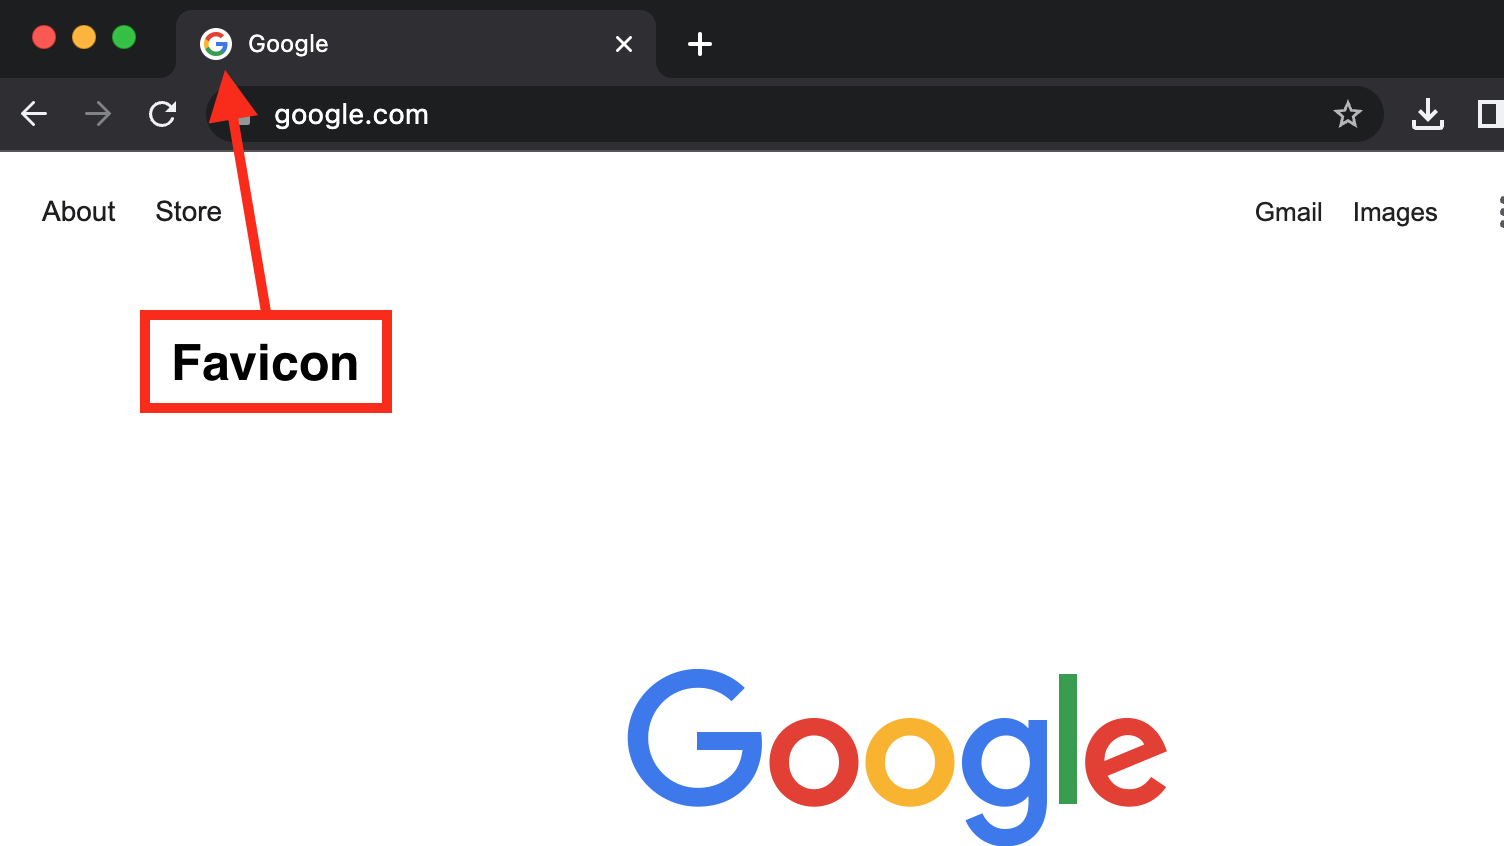
The favicon, or site icon, of a website is the small picture you see on the right side of your current tab.
By default all WordPress websites display a WordPress logo as their favicon.
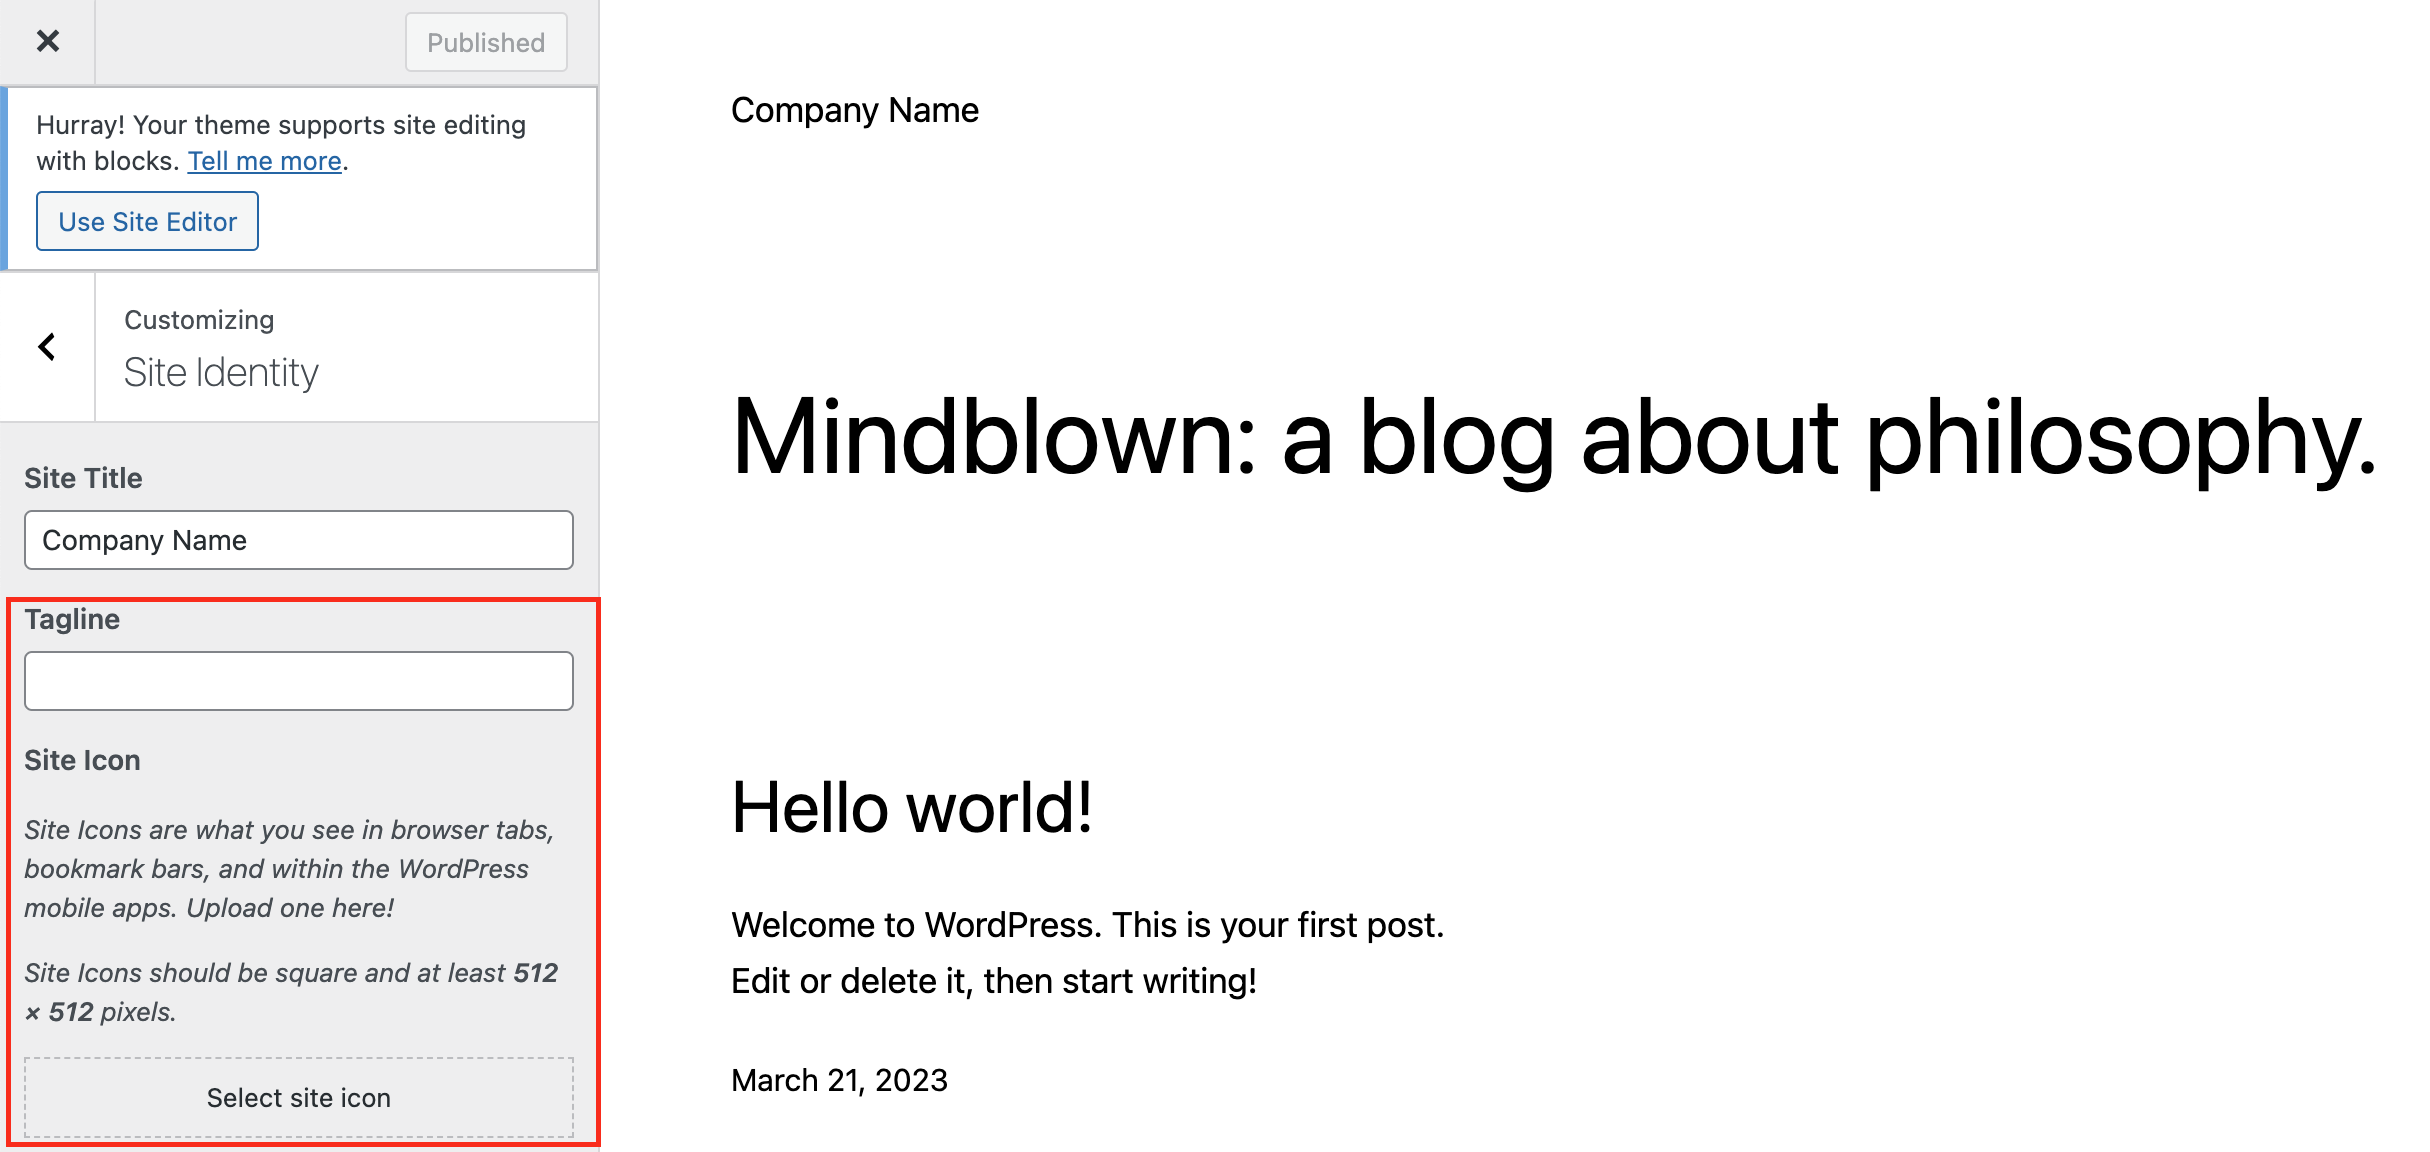
Your website tagline is a short description of your website, which appears next to your site title on Search Engine Result Pages (SERPs).
When your WordPress website is first created your tagline will be “Just Another WordPress Website”.
These two default settings not only have the potential to appear unprofessional to certain users but also expose the fact that your website is running on WordPress as a CMS, which can raise security concerns for site owners.
In your Dashboard, navigate to Appearance, then click on Customize
Click on Site Identity
You can change both, your site Tagline and Favicon under this menu
Click on Publish to save your changes
Updating a Website’s Tagline and Favicon Via the Site Editor
If you are using a Block Theme you will need to follow the next steps to change your Tagline and Favicon.
To change your Tagline:
In your WordPress Dashboard, navigate to Appearance, then click on Editor
Navigate to or add the Site Tagline Block and click on it to edit it or delete it
Click on Save on the top right corner
To change your Favicon:
In your WordPress Dashboard, navigate to Appearance, then click on Editor
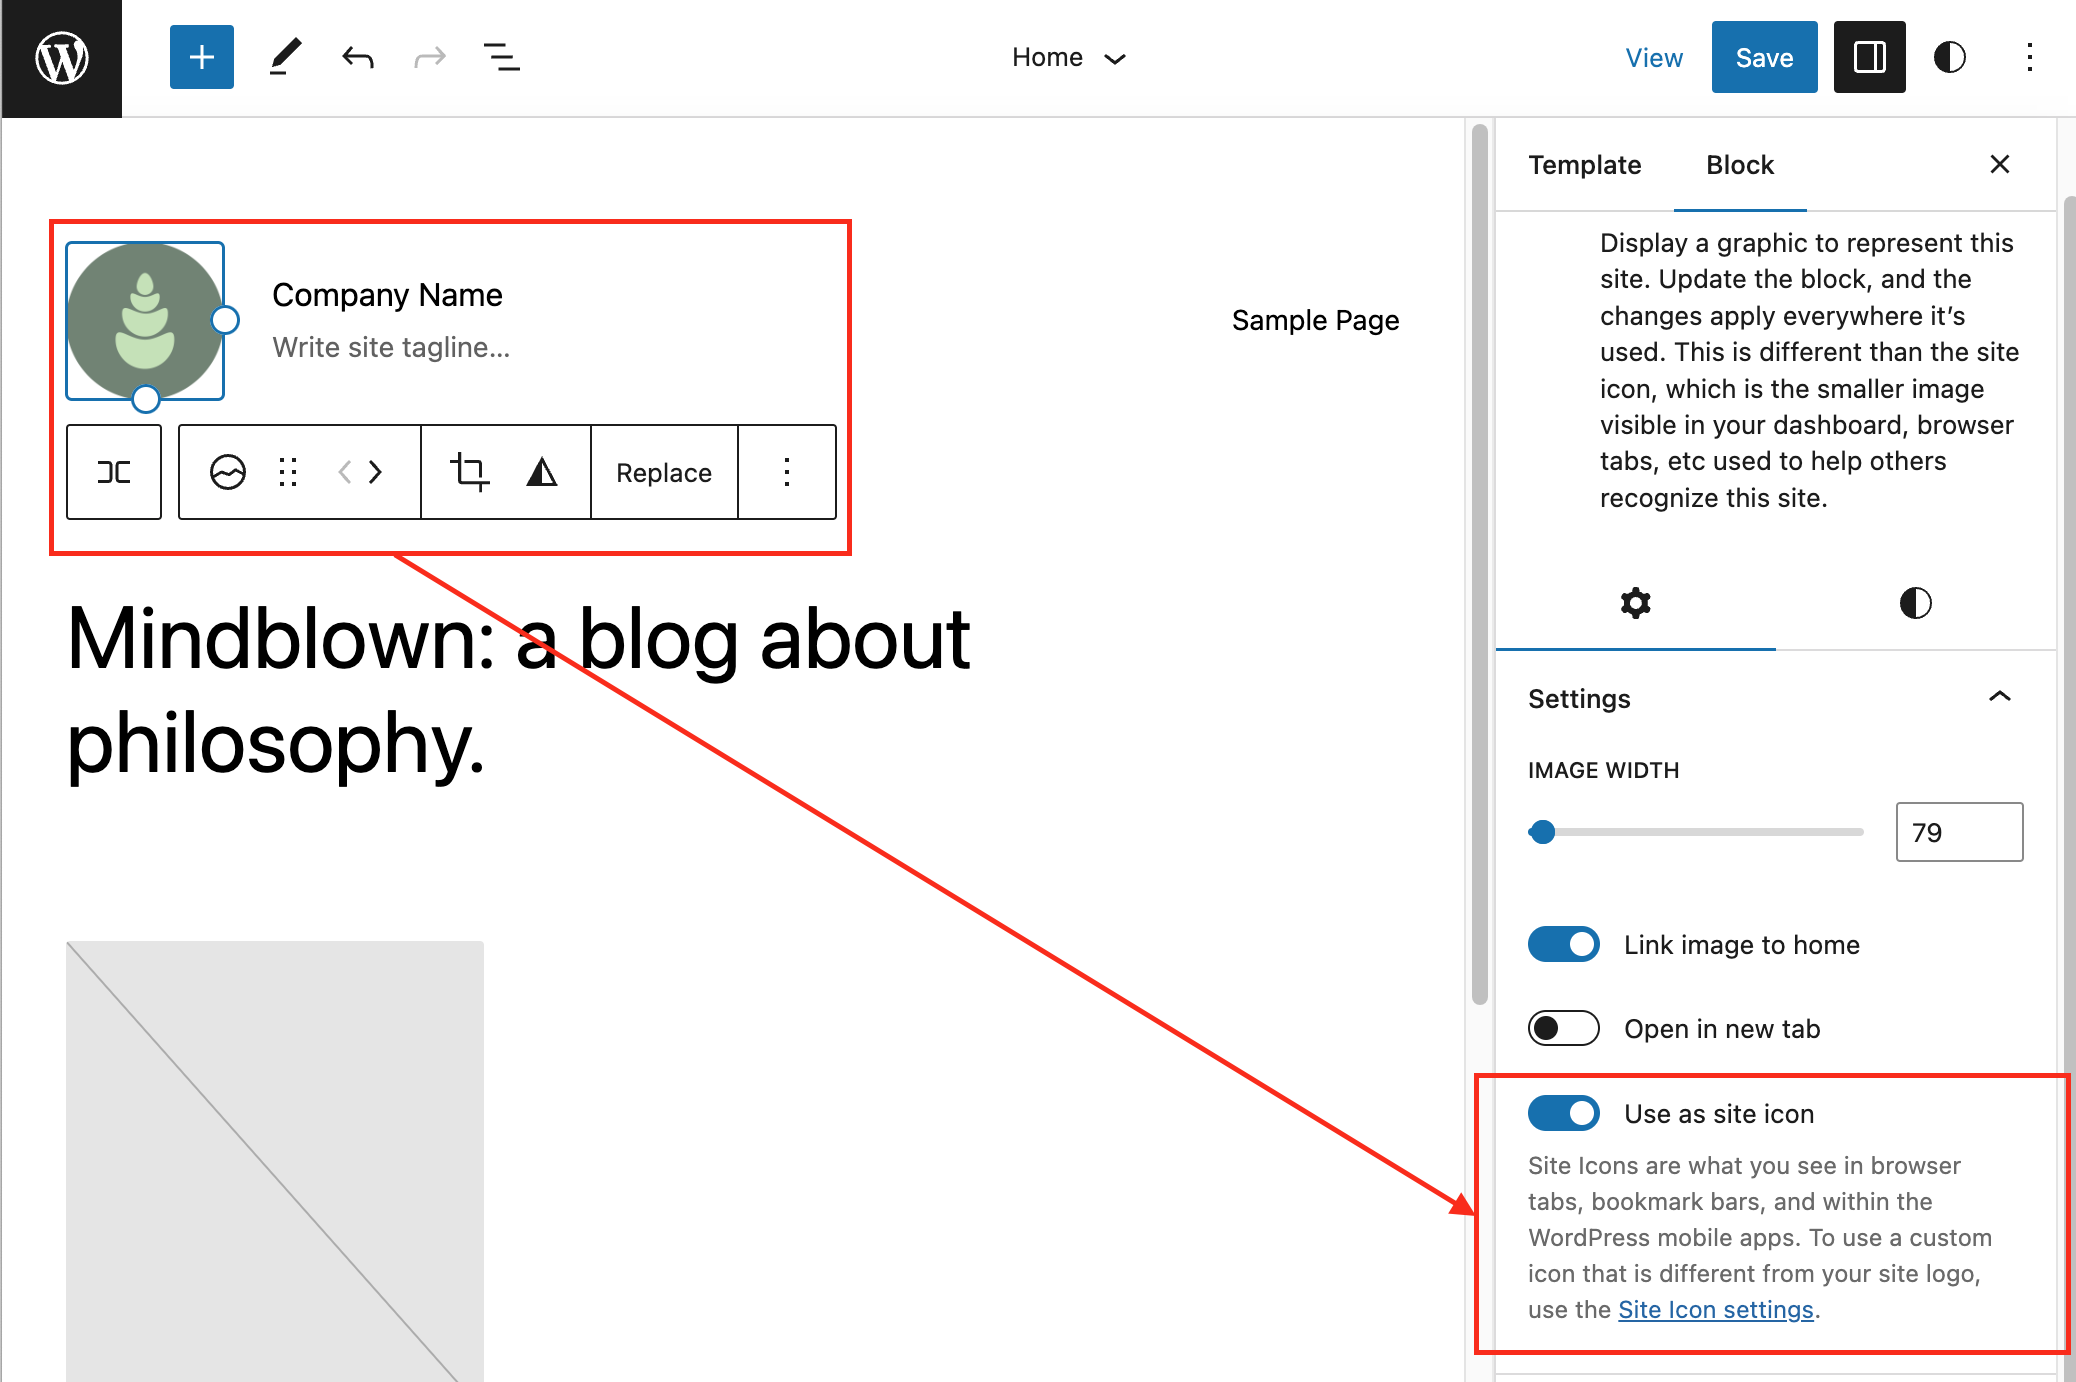
Navigate to or add the Site Logo Block and click on it
Note: With the newest version of the Site Editor you can now upload a logo for your website and it will automatically link it as your Favicon.
In the Block Settings panel, you can choose whether you want to use your logo as your site icon, or use a different image as your site icon.
If you click on the Site Icon Settings link under this panel you will be taken to the Customize Site Identity Page where you can upload an image under the Site Icon section.
Note: This section also allows you to change your Tagline.
Click on Publish to save your changes
Remember to clear out your cache once you have submitted your changes to review your website appearance.
Final Thoughts
Default WordPress settings are created with multiple users in mind, so changing the 5 settings above not only protects your website, but makes it stand out from the rest, kickstarting your journey as a site owner.
To learn more about WordPress, its themes, plugins, and other important settings, check out our WordPress education channel.
Improve the performance and security of your WordPress website with our WordPress VPS Hosting plans. Featuring blazing fast servers with advanced caching, 99.99% uptime, and a robust toolkit developed by WordPress experts.
Improve Core Web Vitals Free SSL & Dedicated IP Advanced Server Caching US & EU Data Centers
Do you think your website has been hacked? Is it not loading correctly, or is there a message saying that it was hacked? It can be overwhelming to know what to do. In this article, we want to help you take the first steps to securing and ensuring that your website is operating properly. Let’s go over several signs of a hacked website.
Browser Hacked Notification
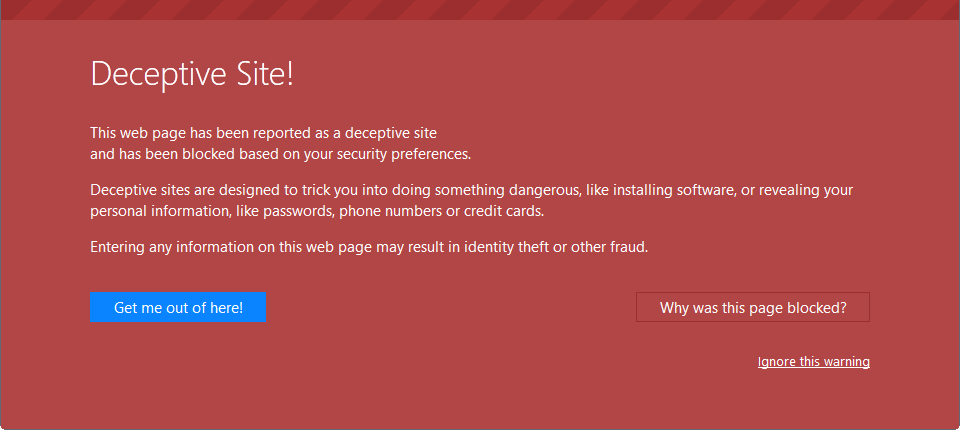
If you open your website in a private browsing window, do you get any type of warning from your browser about your website possibly being hacked or a ‘phishing attack’? Below is an example from Firefox warning of a possible hacked or deceptive website.
These types of warnings will usually happen as Google Chrome, Firefox and other browsers notice that your website has been accessed by a hacker and infected with malware with the intent to harm your visitor’s computer.
Hosting Provider Notification
Some web hosting companies run daily scans and can tell if your website has been hacked or is infected with malware. If the scan comes back positive, they will usually temporarily suspend your account and notify you via email or a phone call. Once you are notified, it is your responsibility to have the files cleaned. Most hosting providers won’t unsuspend your account until they can verify that everything is cleaned. We recommend using Sucuri to clean your hacked files. Not only do they provide excellent service, but they ensure that your website is back online fast and efficient.
Google Notification
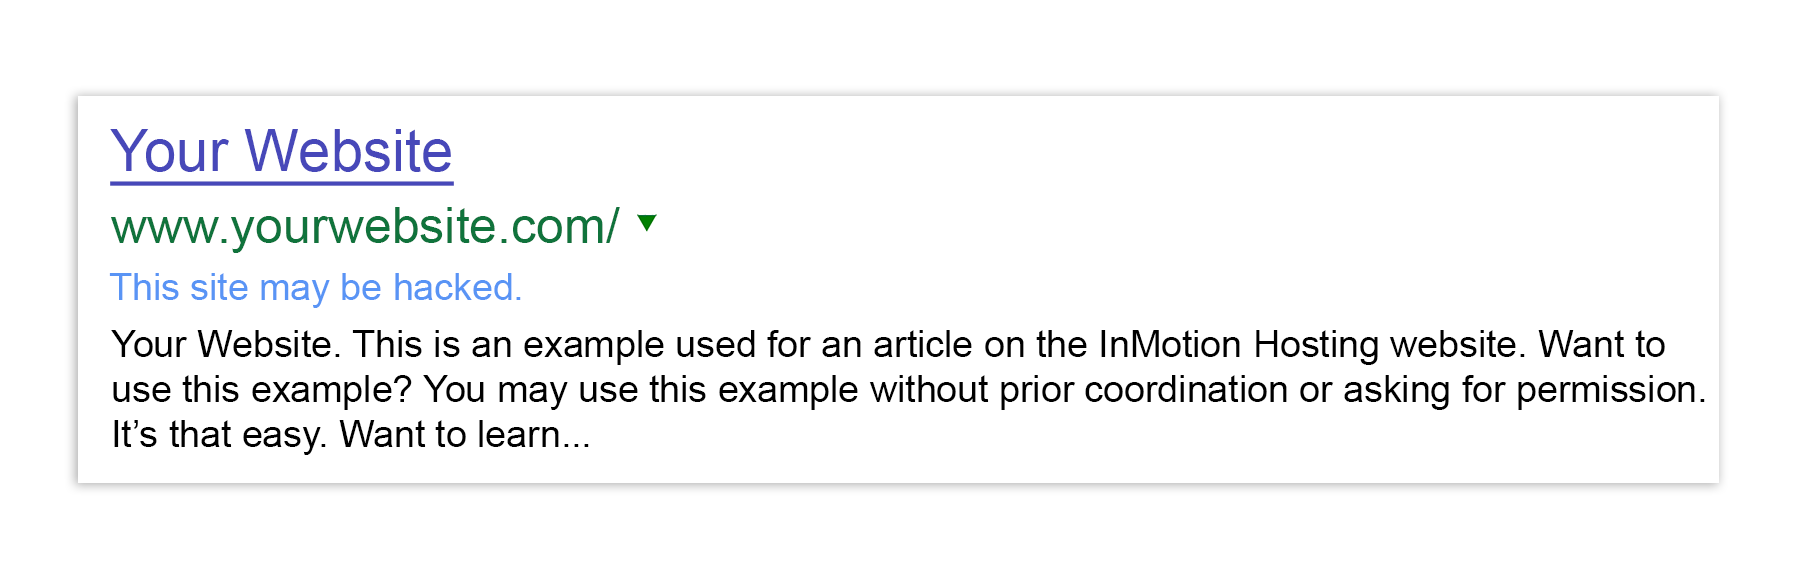
Sometimes Google will notice malware on your website and will put a notice such as, “This site may be hacked” in search results.
Depending upon the severity of the hack, Google may not list infected websites in search results. One way to check and confirm that this is not happening to your website is to check the ‘Security Issues’ tab within Google Search Engine Console. If there is malware or security concerns with your website, they will be listed within this area.
Visitor Notification
Another way to know if your website has been hacked is if you start to hear feedback from visitors about security messages or redirects to other web pages. This type of feedback is crucial to keep your online presence active and without the penalty of any search engine.
How to Move Forward
If you’ve been notified of a hack via one of these notification types, let’s look at the resolution steps that we need to take.
Change Passwords
Change all passwords for all accounts. This includes cPanel, email passwords, website login (WordPress, BoldGrid, Drupal, etc), and FTP passwords. If the passwords used for any of these services were used elsewhere, such as Facebook or another email account, we recommend changing those as they could be at risk.
Contact Support
Give us a call, open a chat, or send us an email and we’ll be happy to run a free malware scan over your account with us. This scan will tell us if your website is hacked. If it is hacked, we’ll be able to provide you a list of the files.
Scan Computer
Believe it or not, website hacks can come from your local computer. If a virus is installed on your computer, it can capture usernames and passwords. Along with capturing this information, hack code can be installed, opening a backdoor for malware and viruses to infect your website. To prevent this from happening, we recommend that you run a full security scan of your computer to ensure that nothing is infected. Learn more about running this scan by reading our support center guide. If the scan comes back with a virus, use the recommended tools in the article above to remove it. If your computer comes back clean, proceed to the next step.
Next Step
If the malware scan that we ran for you comes back with a list of hacked or infected files, reach out to a qualified developer or security company to clean your website files. We recommend Sucuri to clean website files. They quickly clean and help get your website back live. If your scan comes back clean, we recommend that you investigate where the original hack notification was displayed and reach out to that service for a rescan of your website.
The steps provided in this article will help you determine if your website is hacked and if so, what to do.
In the past, if you wanted to learn how to code, you’d have to order a specialized book from the library. After waiting two weeks for it to come in, you could start to learn. It took awhile just to get started.
Things have changed since then. There are now incredible ways to immediately begin learning how to code with online courses. These include interactive tutorials, videos, and advanced coding exams. Today, we’ll look at the top four websites that teach coding for free.
Learn to Code Online
Finding a website that’ll train you in coding is easy, but we’re looking for the most reputable websites that will provide quality training for free. Here are our favorites.
Codecademy:
Codecademy is the most popular free online coding education company.
They focus on bringing the classroom to the internet, allowing anyone to learn how to code.
Unlike a library book where you don’t know if you’ve made a mistake, Codecademy walks you through the full learning process. If you get stuck or make a mistake, they will give you a hint to get you moving.
Codecademy claims to have a million of individuals currently using their service.
If you’d like a one-on-one coach, the paid Codecademy Pro course allows you to work with a live mentor.
They teach you to code in JavaScript, HTML, CSS, PHP, jQuery, Ruby, and Python
Coursera:
Coursera teaches much more than just coding, but they do have several free classes which teach different coding languages.
Coursera partners with professionals and professors around the world to teach different coding languages.
Most courses are taught via video and do not have an auto-grading system.
FreeCodeCamp:
FreeCodeCamp is perfect for beginners.
They offer over 1397 coding challenges.
FreeCodeCamp allows you to know whether you made a mistake or not. If you get stuck, with a click of a button you can get a hint allowing you to proceed.
They offer 6 certifications.
A forum where you can ask questions and learn from others is included with the program.
Khan Academy:
Khan Academy has several different types of coding classes.
They have a convenient video player which allows you to see and edit the code while the video is playing.
They give several challenges with each class, letting you to put your learning into practice.
Being a 501(c)(3), they do not charge for any training.
Conclusion
These free online coding courses aren’t like library books when it comes to learning. Through advanced tools, you can practice what you are learning and have auto-grade helping you see if you’re headed in the right direction. Learning to code is an incredibly valuable skill to build for your future self. Try one of the mentioned academies today to get started with coding your website.
Now that have a powerful coding arsenal, you’re ready to build the website of your dreams on our shared hosting.
The Zend Optimizer is a free application that can boost the performance of your PHP sites. It works by going over your code and optimizing it for faster execution. This means your site can load faster for your users while also utilizing less of the server resources.
Zend Optimizer can be enabled on servers with PHP 5.2 or higher (this includes most of our servers). To enable this feature, first, add the two lines below to your .htaccess file in order to enable the use of custom PHP settings. Be sure to replace [username] with your actual cPanel username.
Next, you will need to enable the Zend Optimizer extension by adding the following line to your custom php.ini file. This line can be added anywhere, though we recommend having it at the bottom of the file.
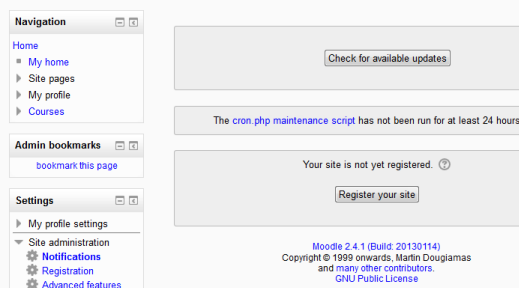
Moodle, an acronym for Modular Object-Oriented Dynamic Learning Environment, is an open source suite of software tools that is designed for those who wish to create educational courses or web pages that have a more natural and organic method of learning and teaching. Appropriate for use on Windows, Apple and Linux operating systems, Moodle software allows for complete customization and changing of base code to meet the exact needs of the programmer and educator.
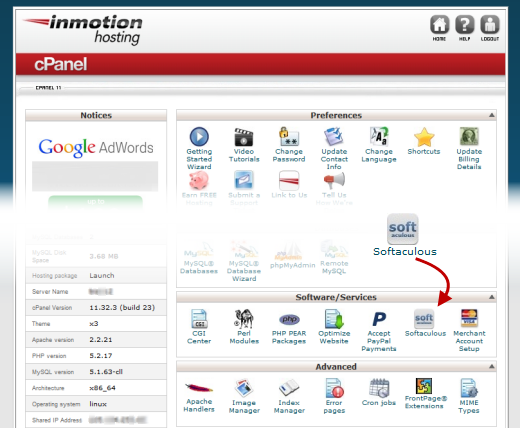
Moodle can be easily installed via the cPanel with the program Softaculous.
First, sign into your cPanel and get Softaculous up and running.
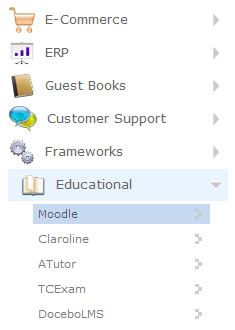
Once you have the program running, locate the Educational tab in the left-hand sidebar and select Moodle.
A window that has the option to install Moodle
should appear.
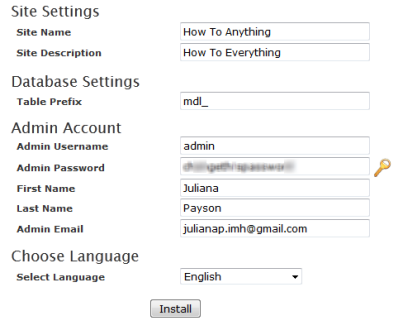
Once installation is selected a window with a series of question prompts will appear. Fill these boxes in, choosing the name you want for your main file directory.
In Directory:
The directory is relative to your domain and should not exist. e.g. To install at https://mydomain/dir/ just type dir. To install only in https://mydomain/ leave this empty.
This is also where you will set the parameters for your site. Here you choose the type of encryption and security you want. This is also where you will set up an administrative log in that provides access to all elements of the program. You will need to select a user name and a very strong password.
You can choose to have a copy of successful installation confirmation emailed to you, if you wish to have additional copies of this information, at this point in the process.
Once this information has been filled in, select Install at the bottom of the window.
Common Errors
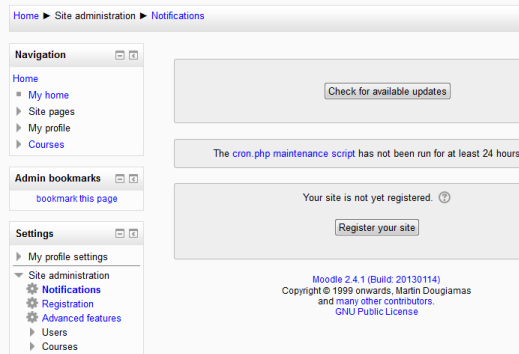
Hopefully the installation should run smoothly. But Moodle is a dynamic platform that requires some up-to-date features of the latest PHP server software. If you get a message like this:
The following errors were found :
The PHP Version is less than the required 5.3.2
Simply check with your host provider that your server is running the required version of PHP to get Moodle up and running. You can check this in cPanel yourself by looking at the left-hand sidebar. If you have a VPS or dedicated server, this is something you can upgrade quite easily for yourself to fix the problem.
When the installation is complete, you should receive a confirmation message. If you chose to have one emailed, you should also receive that shortly after the completion of your installation.
With Softaculous, installing Moodle is as easy as a few simple clicks and providing a few pieces of basic information. That is all it takes to install a powerful suite of software tools that allows programmers, developers and educators to work together to create new types of learning and educational modules that use a revolutionary way of teaching.
Moodle Back-end
Moodle provides a powerful suite of tools that allows for complete customization to meet the exact needs of the developers and educators. Free, open source software tools such as Moodle allow for easy access to powerful technologies that can be tailored to meet individual needs. Moodle works across the main operating systems and is free to use and manipulate to the needs of one’s site or educational program.
Before we dive into the cheat sheets, let’s define what HTML5 is and what it does. HTML5 is a markup language used for structuring and presenting content on the World Wide Web. It is comprised of three kinds of code: HTML provides the structure, Cascading Style Sheets (CSS) take care of the presentation, and JavaScript enables interactivity by manipulating the HTML and CSS.
HTML tags and attributes within the tag are used to create the HTML documents that you see displayed via the internet. There are many tags available to architect, design and format your page. If you’re still not quite familiar, explore our articles on understanding basic HTML tags plus our HTML tag reference list.
HTML5 Cheat Sheets
Now for the fun stuff. We have created three HTML5 cheat sheets to help beginners, designers and developers stay on top of the following:
Tags
Event Handler Attributes
Browser Supported Features
HTML5 Cheat Sheet – Tags
This cheat sheet includes new tags added to HTML5, and existing tags from HTML4.
HTML5 Cheat Sheet – Event Attributes
This cheat sheet includes new event attributes added to HTML5, existing attributes from HTML4, and unsupported attributes.
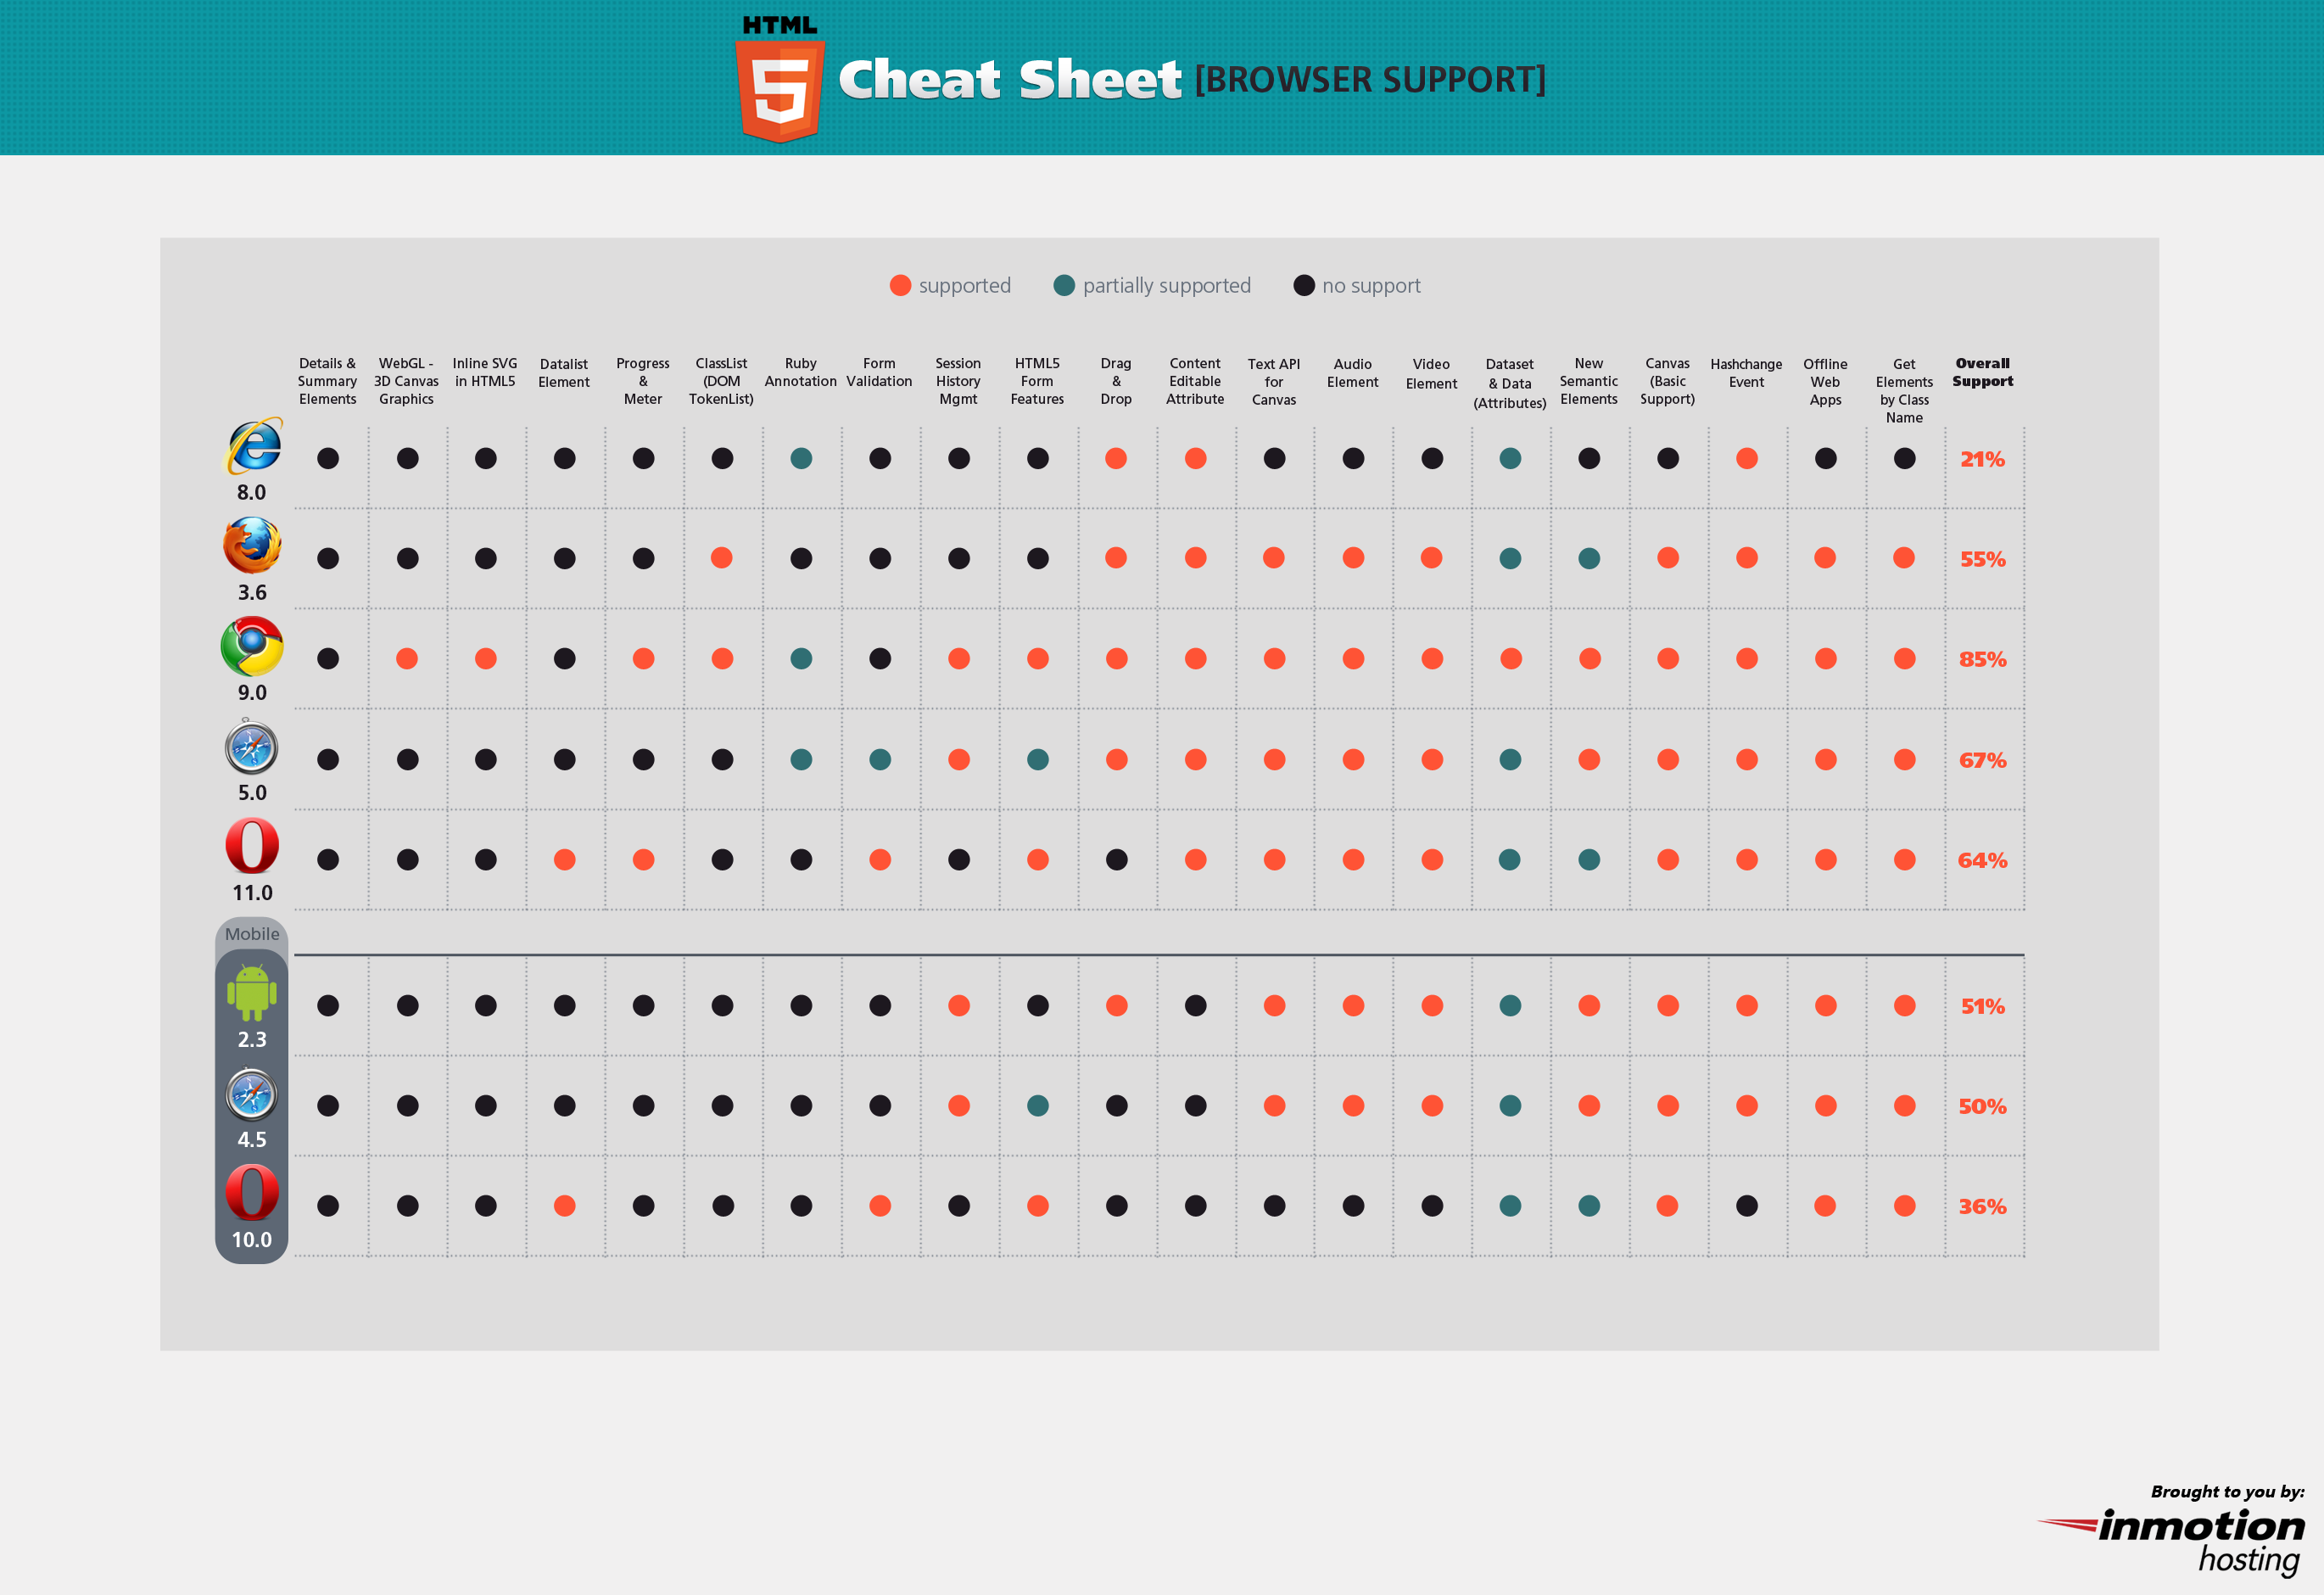
HTML5 Cheat Sheet – Browser Support
This cheat sheet reviews the most common web browsers, and evaluates which ones provide support, partial support, and no support for HTML5 markup.
Get hosting infrastructure that grows with your business. Our all-in-one hosting platform gives you everything your website needs to scale - so you can focus on the next big thing for you and your business.
 99.99% Uptime

 Improve Core Web Vitals



 Simply check with your host provider that your server is running the required version of PHP to get Moodle up and running. You can check this in cPanel yourself by looking at the left-hand sidebar. If you have a VPS or dedicated server, this is something you can upgrade quite easily for yourself to fix the problem.