In this article we’ll discuss an advanced method for taking a single cPanel account, and splitting it into multiple cPanel accounts. Multiple cPanel accounts are only available on VPS or dedicated server plans, and splitting up your domains between multiple cPanel accounts can allow you to give away cPanel access to a website owner without having to give the end user access to your other domains.
In our example below we have one cPanel account with the name userna1 that has the primary domain name PrimaryDomain.com and an addon domain name called AddonDomain.com. We want to break apart these two domains so we can give a web developer full cPanel and FTP access to AddonDomain.com without them being able to modify anything on our PrimaryDomain.com site.
We have a WordPress install on both domains, so we will also need to take special care to ensure that the MySQL database gets moved over and the database user credentials are modified to allow the database connection to still work with a new username.
cPanel creation is no longer unlimited. Learn more about cPanel Pricing Changes and related FAQs.
To follow along with these instructions you would need root access to your server. If you don’t have root access you can also follow along with our more basic article on how to split a single cPanel account into multiple ones.
- Login to your server via SSH as the root user.
- We want to find the document root for our AddonDomain.com and then change to that directory with these commands:
grep addondomain.com /etc/userdatadomainsWhich should give us back:
addondomain.com: userna1==userna1==addon==addondomain.primarydomain.com==/home/
 userna1/public_html/addondomain.com==70.39.151.52:80==
Now change to the directory in-between the ==’s with:
cd /home/userna1/public_html/addondomain.com - Now we want to look for any database configurations on this domain, an easy way is to look for the username followed by an underscore _ through all your files with the following command:
grep userna1_ ./ -RHWhich should give back something similar to:
./wp-config.php:define('DB_NAME', 'userna1_wrdp1');
 ./wp-config.php:define('DB_USER', 'userna1_wrdp1');
So we can see because of wp-config.php that these database credentials are for a WordPress site, you’ll want to open up this file and also copy down the DB_PASSWORD value as well as the DB_NAME and DB_USER ones.
- Now we want to backup that WordPress database to our home directory using the following command:
mysqldump userna1_wrdp1 > ~userna1/userna1_wrdp1.sql - We can now create our new cPanel account. The first thing you’ll want to do is Log into WHM.
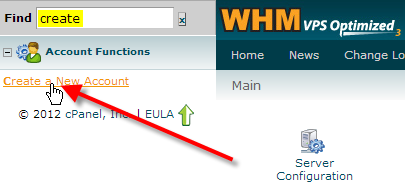
- In the top-left Find box type in Create, then click on Create a New Account.
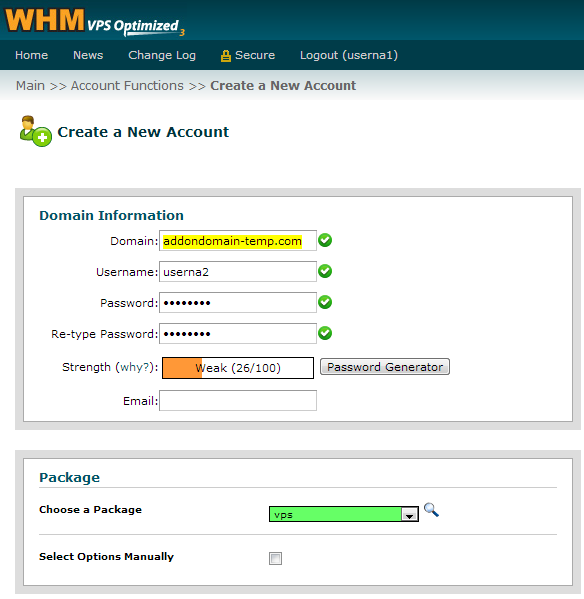
- Now for the Domain: you’ll want to enter your domain with a -temp.com suffix, that way we can test and get the account up and running prior to shutting down the real site. So in our example we’re using AddonDomain-temp.com, you can then choose a username and password you’d like this new cPanel to use, and in the Choose a Package drop-down you’ll want to select the default vpspackage or whatever custom package you might have set up.After entering in all the information scroll to the bottom of the page and click on Create
- Now that the new account is created we want to copy over all of the relevant files for the AddonDomain.com site to the new userna2 account with the following series of commands:
rm -rf ~userna2/public_htmlcp -frp ~userna1/etc/addondomain.com ~userna2/etc/cp -frp ~userna1/mail/addondomain.com ~userna2/mail/cp -frp ~userna1/mail/.*@addondomain_com ~userna2/mail/cp -frp ~userna1/public_html/addondomain.com ~userna2/public_htmlNow we want to fix the permissions of all the files we brought over, so they’re owned by the userna2 user with the following command:
fixperms userna2 - Now we want to update our wp-config.php script so it’s using our new userna2 username, this can be done with the following command:
replace userna1_ userna2_ -- ~userna2/public_html/wp-config.phpWhich should spit back:
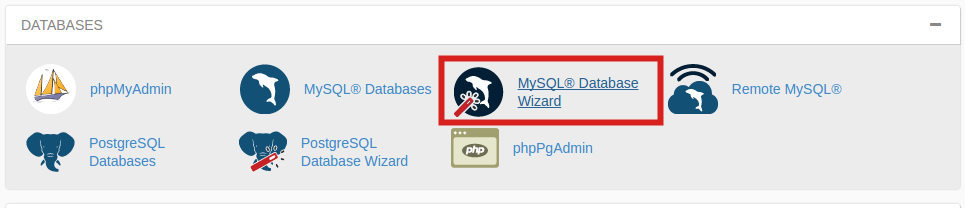
/home/userna2/public_html/wp-config.php converted - Now Login to your cPanel so you can create the MySQL database.
- Under the Databases section click on MySQL Database Wizard.
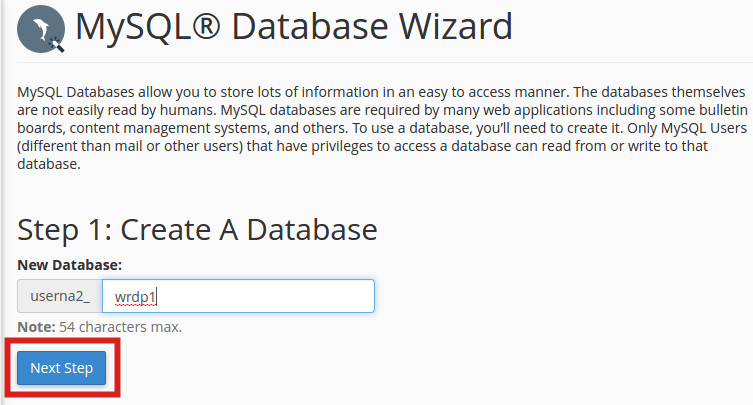
- Enter the database name from our wp-config.php script, then click on Next Step.
- Enter in a database username and password, then click Create User.

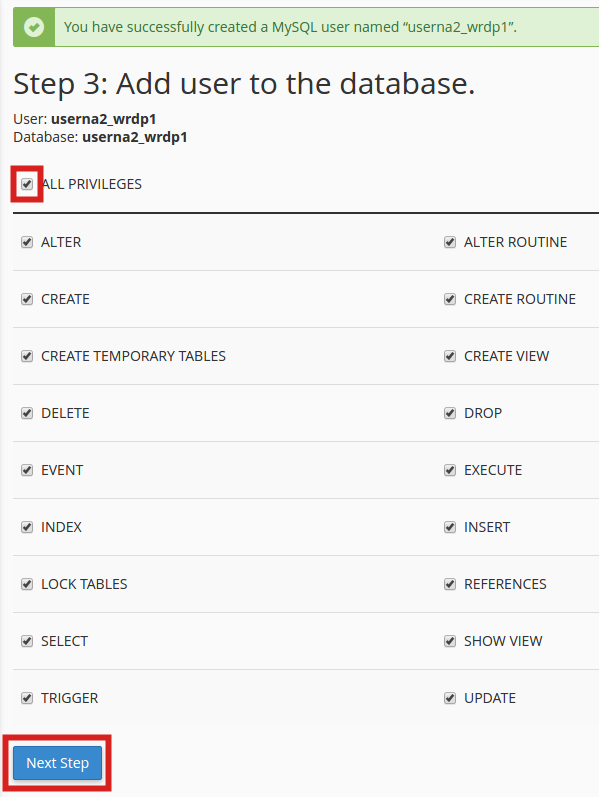
- Place a check beside All Privileges, then click Next Step.
- Now back to our SSH session we can import our MySQL backup into the newly created userna2_wrdp1 database with the following command:
mysql -u userna2_wrdp1 -p userna2_wrdp1 < ~userna1/userna1_wrdp1.sqlAt the Enter password: prompt, enter in the database user password you copied down earlier.
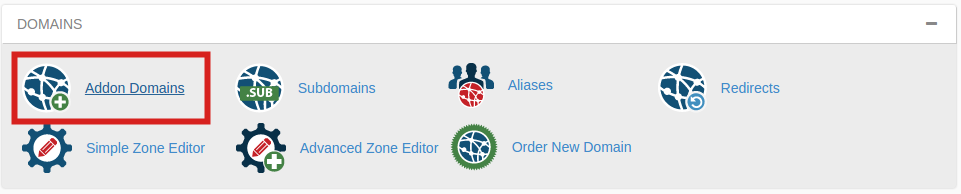
- Now you’ll want to login to your original cPanel account again to remove the AddonDomain.com from the account, so that we can modify the one we created on our new account. To start this process under the Domains section click on Addon Domains.
- Beside AddonDomain.com click on Remove.

On the confirmation screen click on Remove “AddonDomain.com”.
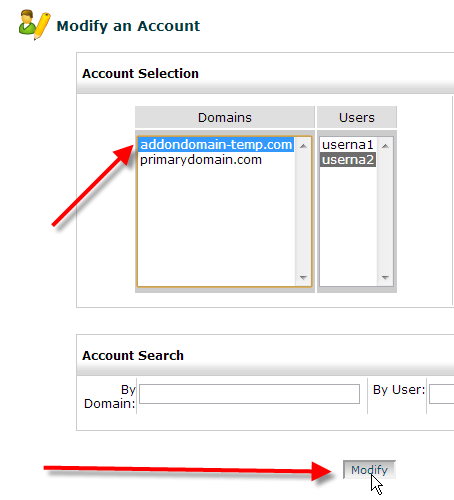
- Now that the domain is removed from our userna1 cPanel account, we’ll want to log back into WHM so we can modify our userna2 account to use that domain. In the top-left Find box type in modify, then click on Modify an Account.

- Click on our AddonDomain-temp.com domain, then click on Modify.
- Now change the domain entry in the Primary Domain: field to AddonDomain.com, then scroll to the bottom and click on Save. You should see a green Success! status display when it’s done.


This should be all that is necessary for splitting one cPanel account into multiple cPanel accounts. Once you have everythign running correctly on the new separate cPanel account, you can then go back to the original userna1 cPanel account and remove the AddonDomain.com site’s files from /etc/addondomain.com, /etc/addondomain.com, and /public_html/addondomain.com. Also you can remove the MySQL database from that user as well now that a duplicate copy has been setup under our new userna2 user.
For a simpler method on a Shared Hosting account, try to just create extra logins for appropriate tools.