
The WordPress Business Directory plugin adds a new level of interaction to your WordPress site. Create your own customized site for ratings and reviews where visitors can add their own feedback. Make a directory for a local club, or private listing of local businesses for your employees to use.
These are just some of the endless possibilities that you can accomplish with this easily modified directory sites plugin. Personalize your pages to fit your needs with drag and drop modules. You can even upgrade to a premium license to process payments with the most popular payment gateways such as Authorize.net, Paypal, and Stripe.
You must install and activate the WordPress Business Directory plugin by Business Directory Team before following this guide.
- Creating a Directory Page
- Add New Listing
- Create a New Category
- Adding New Tags
- Business Directory Settings
- Fee Plans
- Managing Form Fields
- Viewing Payment History
- How to Import/Export Listings
- How to View/Download Debug Information
- How to Change Directory Themes
- Uninstalling the Business Directory Plugin
Improve the performance and security of your WordPress website with our new WordPress VPS Hosting plans. Get 40x faster speeds with dedicated resources, server caching, and optimization tools.
![]() High-Performance VPS
High-Performance VPS ![]() 99.99% Uptime
99.99% Uptime ![]() Free SSL & Dedicated IP
Free SSL & Dedicated IP ![]() Advanced Server Caching
Advanced Server Caching
Creating a Directory Page
When you access the Directory plugin, it will first prompt you to create a page. You can allow the plugin to create these automatically or create your own directory page using a shortcode. We will now walk you through the steps.
Automatically Creating a Directory Page
- Login to your WordPress Dashboard.
- Click the Directory link in the navigation menu.
- You should see a message on the top stating “Business Directory Plugin requires a page with the [businessdirectory] shortcode to function properly. You can create this page by yourself or let Business Directory do this for you automatically.” Click the Create required pages for me button.
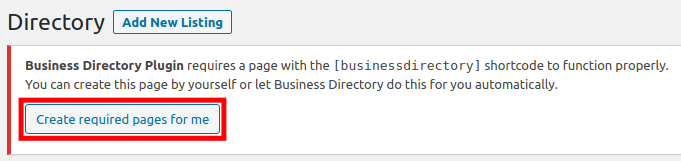
- In my tests, the plugin did not notify me when it was complete. But, click the Pages link in your navigation menu and you will see a new Business Directory page.
Using a Shortcode to Create a Directory Page
- Create a new WordPress Page.
- When editing the page with the visual editor, click the plus + sign and search for shortcode.
- Click the Shortcode button.
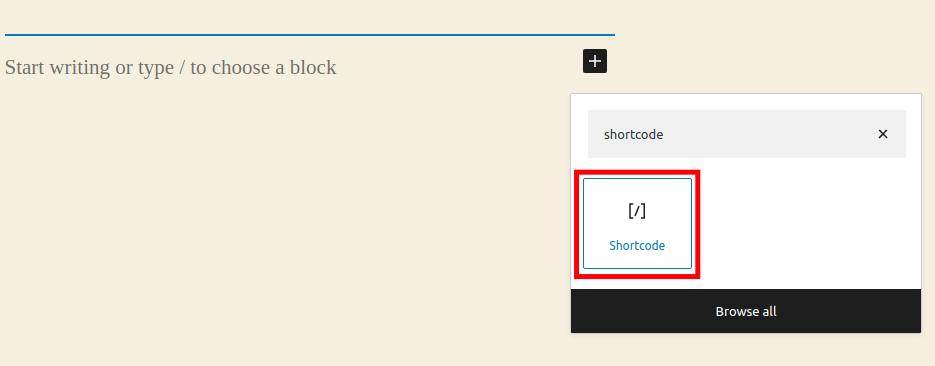
- Enter the following Shortcode:
[businessdirectory] - Click the Publish button after styling and customizing your page.
Add New Listing
Now that you have a business directory page you can create your first directory listing. Follow these steps to learn how.
- Click Directory then Add New Listing in your WordPress Dashboard.
- Fill in the available fields. The default directory listing will include the following fields: Title, Website URL, Link Text, Phone, Email Address, and Zip Code.
- In the Listing Owner drop-down menu, you can choose a specific user. Otherwise, it will be owned by the Admin WordPress user by default. Messages can be sent to the listing owner from the listing page.
- In the Custom Fields section, you can create additional fields as needed. This information will be included when you view the listing page.
- In the Discussion section, check the box to allow comments or trackbacks and pingbacks.
- Click the Add Comments button at the bottom to add more details or comments about this listing.
- Select a category for this listing in the Directory Categories section. You can also add new categories here as needed.
- In the Directory Tags section, you can group listings together by choosing a tag or adding a new one.
- In the Listing Information section, it is required that you choose a Fee Plan. The default one is Free Listing. Select it from the drop-down menu and click OK.
- Click the Publish button once you have filled in your listing details. You will then see a Post published message.
Create a New Category
Categories help you identify what listings are contained in that directory. By default, there is a “General” category but we recommend creating more specific ones. Follow these steps to learn how.
- In your WordPress Dashboard, click Directory then Directory Categories.
- You will see any existing categories on the right. Under the “Add New Category” section, fill in the following fields. Name, Slug (this will be included in the URL for this category), Parent Category (leave as None if you don’t want this to be a subcategory), Description.
- Click the Add New Category button.
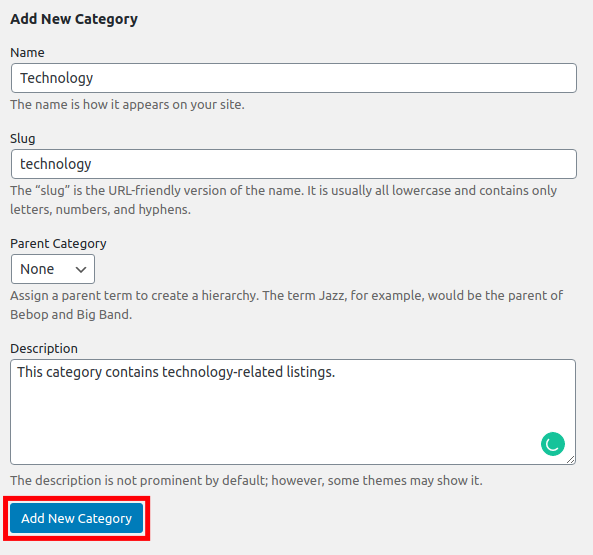
You will then see the new category listed on the right side of the page.
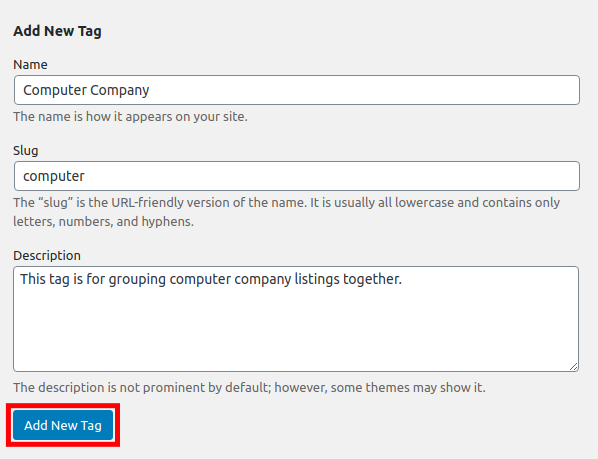
Adding New Tags
Listings can have multiple directory tags, and they are a great way to group similar listings together. You can create new tags by following the steps below.
- Click Directory then Directory Tags in your WordPress Dashboard menu.
- You will see the tags you already created listed on the right side of the page. Under “Add New Tag” fill in the Name, Slug, and Description for the tag.
- Click the Add New Tag button.
You will then see your new tag listed on the right.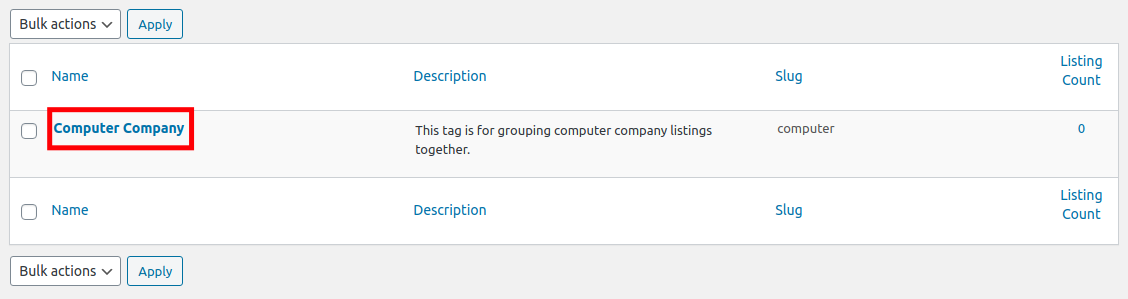
Business Directory Settings
Since this plugin is highly customizable there are many available options. In this section we’ll cover the different settings that are available. The business directory settings can be accessed by clicking Directory then Settings in the WordPress navigation menu.
General
The General tab is the first tab you will see when accessing the Business Directory settings. It also has some sub-tabs you can click on for additional tools. Here is an overview of what you can adjust here. Be sure to click the Save Changes button to keep any changes you make here.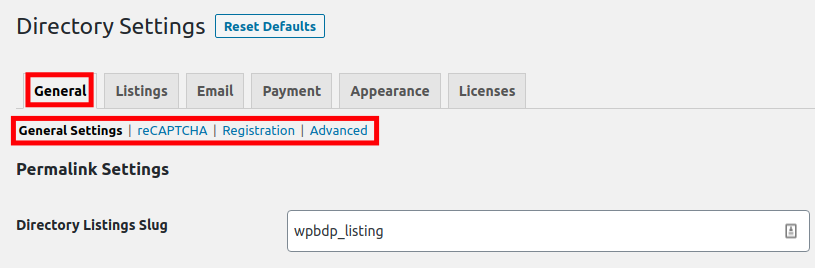
General Settings
- Permalink Settings – Set specific identification slugs to include in URLs for listings, categories, and tags. You can also check the box to disable ID slugs.
- Terms and Conditions – Check the box here to require users to agree to your terms and conditions. After the box is checked, a field will appear to allow you to fill in the terms and conditions.
- Data Collection – Check the box here if you want to allow the Business Directory plugin to collect anonymous information about your WordPress site, such as plugins, themes, and version you are using.
- Directory Search – Set the nature of your directory search in this section. Set the fields that you want to include in the quick search and where you want the search field to show. You can also turn high performance searching on here which can reduce database and server usage.
reCAPTCHA
This section is where you can set up reCAPTCHA, which is a way to prevent bots from posting on your website. For more information, see our full article What is Captcha.
Registration
This is where you can require users to login to your site before creating listings. Select if you want to allow users to create accounts when they submit a listing to save them time. You can also set up a different login URL if you are using a 3rd party plugin or a non-standard page.
Advanced
This section has options such as the ability to disable custom post types, turn AJAX compatibility mode on, disable frontend submissions, and a FontAwesome troubleshooting tool.
Listings
On this tab, you can manage some of the finer details of your listing pages. For example, you can set how many listings appear on a page, how they are sorted, and if you want to include a contact form on the page. We will now provide an overview of what you can set on this section of the Directory Settings page.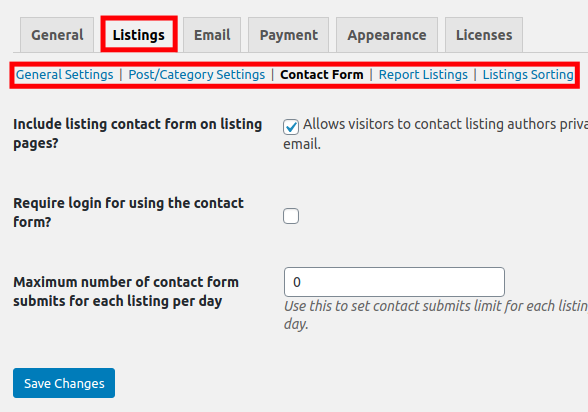
General Settings
This is where you can set how many listings will show per page. The default is 10 listings, but you can increase this number as needed or set it to 0 to show all the available listings. You can also specify how many days a listing should display. The default setting is 365 days, but you can change this to 0 to allow them to display forever. Here you can also set if you want listings to open in a new tab, assign a default owner for anonymous submissions, and decide how to treat listings if they are deleted or the plugin is uninstalled. There’s a field you can fill in to provide instructions for users that are creating a new listing as well.
Post/Category Settings
This page is where you can choose how WordPress should handle new listings. For example, you can set them to “pending” so they can be reviewed before going live. Set how listings should be displayed such as the order for categories to be displayed, and whether you want to hide empty categories and sub-categories.
Contact Form
Check the boxes here if you want to allow visitors to submit direct messages to listing creators and to require login before submission. You can also set a maximum amount of form submission to allow each day.
Report Listings
Check the available box here to display a button on listings where visitors can report them to the administrator.
Listings Sorting
Here you can choose the order that listings display in, such as by Author, Title, Date Posted, or Last Date modified. You can also set if you want them listed in ascending or descending order. Check the available box to enable a sort bar. You can then choose what sort options you want to be available to visitors.
This tab is where you can control the frequency and messages that are sent via email to the Admin account and users.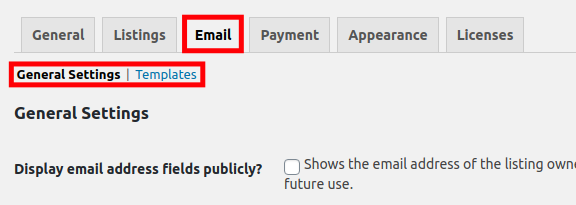
General Settings
This section is where you can set how email addresses are displayed on listings and when to be notified via email. For example, you can choose for an email to be sent to the Admin user when a new listing is submitted. You can also add a CC address here for notifications and choose when users will be sent emails.
Templates
This page is where you can customize the subject and content of all the automated emails.
Payment
This is where you can enable and setup payment options and gateways. We will now go over the free options.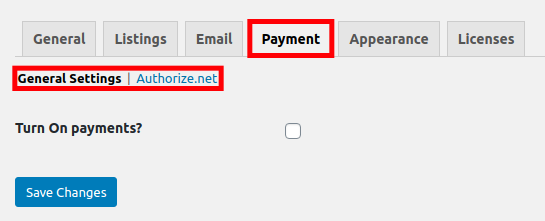
General Settings
Check the available box here to enable payments. Once enabled, you will see additional settings that can be adjusted such as currency, payment message, and test mode. This will not be officially enabled until you set up a payment gateway such as Authorize.net.
Authorize.net
If you have turned payments on, it is required that you set up a payment gateway before it works. Authorize.net is the only payment gateway included in the free version of the Business Listing plugin. The premium version of the plugin allows you to use other options such as Paypal and Stripe. Here are the steps for setting up Authorize.net.You will need an Authorize.net account before following these steps.
- Click Directory then Settings in the WordPress Dashboard.
- Click the Payment tab to open the settings.
- Check the box next to Turn On payments.
- Choose your settings then click the Save Changes button.
- Click the Authorize.net link.
- Check the box to enable Authorize.net.
- Enter your Login ID and Transaction Key for Authorize.net.
- Click the Save Changes button.
Appearance
This tab is where you can set up how you want your directory listing to look. We will now go over the available options.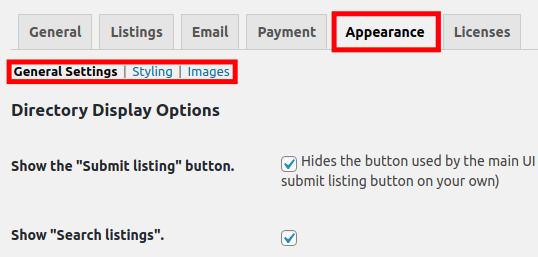
General Settings
Here you can choose if you want to show the Submit listing, View listings, Manage Listings, and Directory buttons. You can also set if you want the Search listings section to display.
Styling
Choose if you want to use a customized button color and override the default WordPress theme color here. Click the button to choose a new color from a slider or by entering a hex value.
Images
This tab is where you can set the image options for listings. Set size limitations for images or thumbnails and choose if you want to automatically crop thumbnail images to a specific size (set in pixels). Choose if you want to display thumbnails by default and set up custom badges here as well.
Licenses
If you purchased a premium Business Directory license, it can be set up on this tab.
Fee Plans
Listing are free by default in the Business Listings plugin. But, if you have set up a payment gateway you have the ability to create listing fees. Here are the steps.
- In your WordPress Dashboard, click Directory then Fee Plans.
- Click the Add New Listing Fee button.
- Fill in or choose from the following settings.
•Fee Label – Enter a name for the fee.
•Fee Description – Provide details regarding the fee.
•How long should the listing run – Set a specific amount of days or choose to run the listing forever.
•Number of images allowed – Set a number for how many images users can upload. Default setting is 0.
•Private Fee Plan – Check this box to enable this option. It will only be visible to Admins.
•Is recurring – Check this box to make the listing auto-renew at the end of the run time.
•Is featured listing/sticky – If this is enabled, listings will display on the top of pages while visitors browse or search.
•Listing background color – Click the button to choose a background color from a slider or set with a hex value.
•Plan Category Policy – Click this drop-down menu list to choose of you want these listings for all categories, or if you want to choose specific categories.
•Pricing Model – Here you can select if you want to set a Flat price, Different price for different categories, or Base price plus an extra amount per category.
•Fee Price – Enter the price here. - Click the Add Listing Fee to enable this fee.
Managing Form Fields
When someone submits a listing they can fill in information as needed. This section is where you can set the fields and options available. You can click the listing Label to edit the existing fields, or the arrows up/down to change the order they display in. Clicking the Add New Form Field button will allow you to make new field options. If you make changes to an existing field, you can click the Manage Theme Tags button to modify the associated title tag.
Viewing Payment History
If you have enabled the Fee Plans option, this is where you can view any payments that have occurred. Filter the payments by clicking All, Pending, Failed, Completed, Canceled, On Hold, or Refunded. Click a payment to view and make changes as needed.
How to Import/Export Listings
You have the ability to export and import listings in this section. This can be helpful when backing up listings or migrating your site. Below are the steps for exporting and importing listings.
Export Listings
- Click Directory then Import & Export in your WordPress Dashboard menu.
- Click the Export tab to access the settings.
Export-settings.png - Choose from the following settings.
•Which listings to export – Select if you want to export All, Active only, or Active + Pending Renewal.
•Export images – Check the box to include images in the export.
•Additional metadata to export – Check from a list of values that you want to include in the export.
•What operating system will you use to edit the CSV file? (required) – Select if you will be editing the CSV file on a Windows or macOS computer.
•Image Separator (required) – A semicolon will be filled in by default.
•Category Separator (required) – A semicolon will be filled in by default. - Click the Export Listings button once you have made your selections. The export will then be prepared.
- Click the Download button.
- Once it has been downloaded, click the Cleanup button to remove any temporary files that were generated.
Import Listings
- Click Directory then Import & Export in your WordPress Dashboard menu.
- You should be on the Import tab by default. Click the Choose File button next to CSV File and open your exported file.
- If you downloaded images in the export, click the Choose File button next to the ZIP file containing images option and open your .zip file.
- Choose from the available import options as needed.
- To verify the import will work, you can click the Test Import then Start Import button. Any warnings will be listed on the bottom.
- To perform the import, click the Import Listings then Start Import button to import the listings. You will see a summary of the import once it completes.
How to View/Download Debug Information
If you are troubleshooting issues with the Directory Listing plugin, Debug information can help you gather more information regarding the plugin and environment. Here are the steps for viewing and downloading the debugging information. We also have a helpful article on WordPress Troubleshooting Techniques.
- Click Directory then Debug in your WordPress Dashboard menu.
- You will then see information regarding the plugin. Click the Plugin Settings or Environment tab to see more details.
- Click the Download Debug Information button to download the debug details as a .txt file.
How to Change Directory Themes
Directory themes have the ability to change the look of your listings. The plugin will include a default theme, but you can purchase and install additional premium themes directly from the Business Directory plugin developers. Here are the steps to upload and change Directory themes.
- In your WordPress menu click Directory then Directory Themes.You will see your active theme listed.
- If the theme is already installed, you can roll your mouse over it and click the Activate button.
- To use a new theme, click the Upload Directory Theme button.
- Choose and open your new theme file. It should be in a .zip format.
- Click the Upload button.
Uninstalling the WordPress Business Directory Plugin
If you no longer want to use the Business Directory plugin, it includes an uninstall tool. Below are the steps to remove this plugin from your WordPress site.
- In the WordPress Dashboard, click Directory then Uninstall.
- To remove all listing data and deactivate the plugin click the Yes, I want to uninstall button.
- A survey will ask why you are deleting the plugin, choose an option (required).
- Click the Uninstall Plugin button. You will then see an “Uninstall completed” message. When you reload the dashboard, the Directory option will be gone.
Now that you know how to use the WordPress Business Directory Plugin, you can start building a custom listing site. Find more helpful articles in our WordPress Education channel.
If you would like to explore alternatives to the WordPress Business Directory Plugin, check out the 5 Best Business Directory Plugins for WordPress.
Become a master of WordPress plugins! Protect, optimize, secure, and expand the functionality of your website easily with the help of WordPress plugins!
