In this article:
The personal touch is often a concern when creating content for our WordPress users. Since a lot of the content on a WordPress blog is written by an author, it is a good practice to let people know who is writing. The Jetpack Authors widget lets you create that personal connection by letting your viewers know who your authors are. The widget allows you to provide list authors, even those who have not yet contributed. You can also set the widget to display a picture of the author. The user roles that are displayed include Contributors, Authors, Editors, and Administrators. Follow the steps below to learn how to add the widget and then see it in action.
Note: This article requires that you have Jetpack installed on your WordPress site.
Adding the Author Widget to your WordPress Site
In order to follow these directions, please make sure that you are logged into your WordPress Administrator Dashboard.

In the menu to the left of the screen, click on Appearance. Next, click on Widgets.

When you’re on the Widgets page, scroll down the list until you find Authors (Jetpack). Note: If you don’t see the Authors widget, see the directions below.
-

Click on the widget to open it up and place it. You can also drag it to the columns to the left of the page in order to position it.

Once the widget is in place, click on the drop-down arrow in order to configure it.
- Click on the Title field to name it. Typically, this field is something like, “Authors” or “Bloggers.” Label it as you wish.
- You can display the articles written by each author. The default number is set to 5. If you just want to list the authors, then set it to zero. Authors who have contributed will have a hyperlink leading to their posts.
- The Avatar Size has to do with the image that you use to represent each author. You can click on the drop-down arrow to select a size or remove them entirely.
- Once you’re done with the widget settings, click on Save.


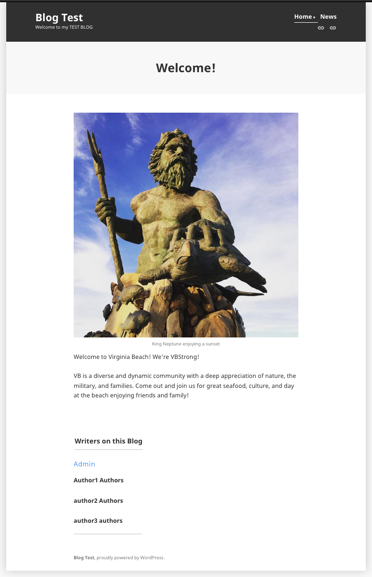
That completes the placement and configuration of the Authors(Jetpack) widget. Check out the screenshot below to see how it would appear when the widget is in use.
Missing Widgets
If you’re not seeing the author’s widget, chances are that you simply need to go into the Jetpack settings and enable them. Follow the steps below to enable the extra Jetpack widgets.
- In the WordPress Administrator Dashboard, click on Jetpack in the menu to the left of the screen, then click on Settings.
- When you get to the settings page click on Writing in the menu at the top of the page.
- In the Writing page, scroll down until you find Widgets.
- To enable the widgets, click on the slider labeled “Make extra widgets available for use on your site including subscription forms and Twitter streams“
That completes the steps needed to enable the extra Jetpack widgets. If you’re looking to learn more about using more of the Jetpack functionality for your WordPress site, please check out Using Backups and Security in Jetpack Professional.
