In this guide we’ll show you how to install the Really Simple SSL WordPress plugin. It’s often easier to use such a plugin to force a large, existing WordPress site to use a free or paid SSL certificate (HTTPS) than attempting an .htaccess redirect and manually fixing mixed content errors (not to be confused with Self-Signed SSL Certificate Warning). This is why we recommend this plugin which forces all images to display over a secure connection to negate mixed content errors. This can easily be tested using a security test site like WhyNoPadLock.com.
Warning: Before you force any website to HTTPS, ensure you’ve installed a properly signed paid SSL or FreeSSL. If your SSL is self-signed your browser will display a security error.
Below we cover:
Optimize WordPress speed immediately with our Nginx-powered WordPress Hosting.
Installing Really Simple SSL
You can install Really Simple SSL with the WordPress dashboard, WP-CLI or manual installation.
Install from the Dashboard
- Log in to your WordPress dashboard.
- Install the Really Simple SSL plugin and activate it.
- On the left, hover over Settings and select SSL.
Installing via WP-CLI
Starting with version 3.1.6, the plugin developers improved ease of use for advanced users with dedicated WP-CLI commands to handle important tasks via SSH.
- Log into SSH.
- Install and activate Really Simple SSL using the following command:
wp plugin install really-simple-ssl --activate
Note: Activating the plugin will not automatically force HTTPS for the website.
- If you’ve already installed an SSL for your website, execute the following command to change your WordPress settings to force SSL usage:
wp rsssl activate_ssl
Once complete, you should see “Success: SSL activated.” - Clear your browser cache or start a private browsing session and visit your website without HTTPS. It should redirect to HTTPS with no errors.
- Configure your website to ensure AutoSSL updates with Really Simple SSL enabled (if applicable for cPanel server environments).

If you have an issue after activating the plugin, you can undo the changes in with wprsssl deactivate_ssl. Check for more WP-CLI commands with wp help rsssl.
Installing Manually
- To install the plugin manually, download the plugin zip file from WordPress.org.
- Upload the zip file and extract the folder to the website’s
wp-content/pluginsfolder. - Log into your WordPress site or use the WP-CLI command to activate the plugin:
wp plugin activate really-simple-ssl
Configuring Really Simple SSL
- Ensure you have installed a free or paid SSL. You can test this by visiting “https://youdomain.com” in your web browser. It shouldn’t be a self-signed SSL. Otherwise, your website will display a security error.
- Create a cPanel backup or WordPress backup and download it to your local workstation per WordPress security best practices.
- Once you’re ready to force your website to only use a secure connection, you can activate the SSL function. Log into your WordPress dashboard.
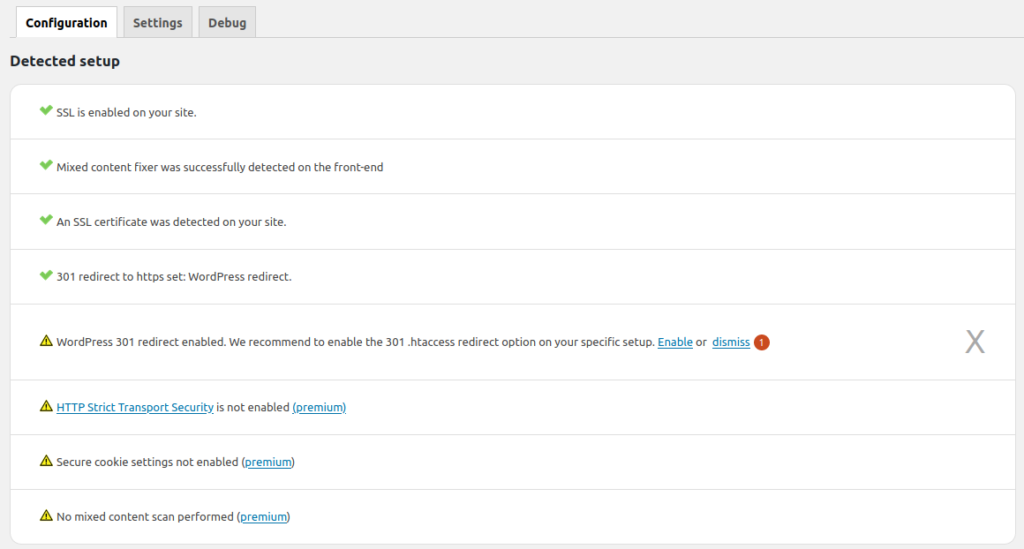
- You can enable it from the Installed Plugins page or the plugin notification at the top of your WordPress dashboard by selecting Go ahead, activate SSL! You’ll be redirected to the Really Simple SSL Configuration page to check the status of related settings.
- (Optional) For better performance, you can enable the 301 .htaccess redirect option by selecting Enable in the Settings tab at the top. Then, select the Enable 301 .htaccess redirect slider.
- Save any changes made at the bottom of the page.
- Test your website’s new 301 redirect by opening a private browser session and navigating to your website without HTTPS – e.g. domain.com. It should automatically redirect to HTTPS.
If you get locked out of your website after enabling the .htaccess redirect, follow official documentation to prevent Really Simple SSL from editing .htaccess.
Afterwards, you’ll want to ensure you update any URL’s for your website shared elsewhere. You can recheck your redirect results at WhyNoPadLock.com. For more information on improving your WordPress site, please see or Recommended WordPress Plugins.
Note that the premium items on the Configuration page require a paid subscription to the plugin provider. They do NOT indicate an issue with the plugin. If you want to further strengthen your HTTPS redirect, you can enable HTTP Strict Transport Security (HSTS) to force the redirect from the browser application.
Disable .htaccess Redirects
AutoSSL is the free SSL that’s auto-enabled forever, but sometimes AutoSSL will encounter an error and nott update for WordPress sites using HTTPS redirect methods. These methods include the Really Simple SSL plugin or .htaccess 301 redirects. Instead of disabling the plugin and HTTPS redirect to update your AutoSSL every time, editing your .htaccess file once should resolve the issue.
- Log into WordPress.
- On the left, select Settings and SSL to edit Really Simple SSL plugin settings.
- Select the Settings tab.
- Select the Stop editing the .htaccess file slider. It should transform from grey to blue.
- Save changes.
- Now the .htaccess file needs to be modified manually. Open your .htaccess file for the WordPress website.
Note: If using cPanel File Manager, ensure your settings show hidden files.
- Add the following code under your current redirect lines:
RewriteCond %{REQUEST_URI} !^/\d+\.BIN_AUTOSSL_CHECK_PL__\.\w+\.tmp$ [NC]
RewriteCond %{REQUEST_URI} !^/\.well-known/acme-challenge/ [NC] - Save your changes.
Afterwards, you shouldn’t need to worry about AutoSSL renewals. If you have any questions or issues following these steps to resolve your FreeSSL issue, please contact our live support directly.
Learn about more ways to further secure your WordPress site:
- Follow security and performance recommendations from the WordPress Site Health feature in your dashboard
- Install other security plugins such as Cerber Security or WordFence Security for in-depth protection and customization in your dashboard along with Block Bad Queries (BBQ) to fight code injection
- Consider using the Sucuri web application firewall (WAF) for additional protection against Denial-of-Service (DoS) and related cyber attacks
- WordPress backup configuration to automatically schedule and verify backups in the case of disaster recovery
- Read our article “I think my website has been hacked” for hack recovery assistance
- Check out our latest guides on how to learn more about cybersecurity and free website security tools to harden your server
What measures do you take to harden WordPress websites? Let us know in the comments below.
