The terms scheduled tasks, also called cron jobs, are used to identify a category of code scripts that do not run constantly on the server. Often these tasks are used to perform housekeeping duties such as cleanup or checking on specific activities and are usually set to run at regular intervals, whether it be hourly, daily, weekly, or monthly. For example, one of the tasks that is included in your SMF program is an auto approval task. This task takes posts that are awaiting approval and automatically approves them. This task is set to run at two hour intervals. Below are descriptions on getting to the area, as well as enabling, disabling and editing tasks as well as managing the task log.
Getting to the scheduled task area
- Log into your SMF admin dashboard.
- From the entry page, click Admin from the upper menu. This will reveal a second menu just underneath the first. Hover over Maintenance and click on Scheduled Tasks from the popup submenu.
- This brings you to the Scheduled task screen where you will see a list of all available scheduled tasks.
Enabling or disabling your scheduled tasks
Once you are on the Scheduled Task screen, you will see there are two columns on the far right for each task row that have checkboxes. The first column is the Enable column. Checking the box will enable the task, meaning it will run at its scheduled interval, while unchecking the box will disable it. Once you have enabled or disabled any tasks, simply click on the Save Changes buton at the bottom to save the configuration.
The second column is the Run Now column. Check this column for any and all tasks you wish to run immediately and click on the Run Now button at the bottom to perform those tasks.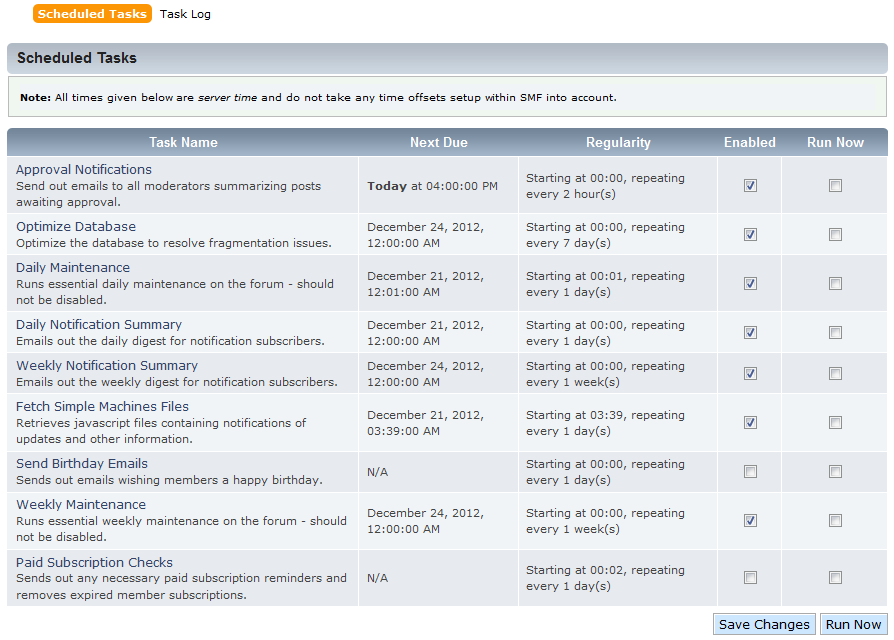
Editing your scheduled task
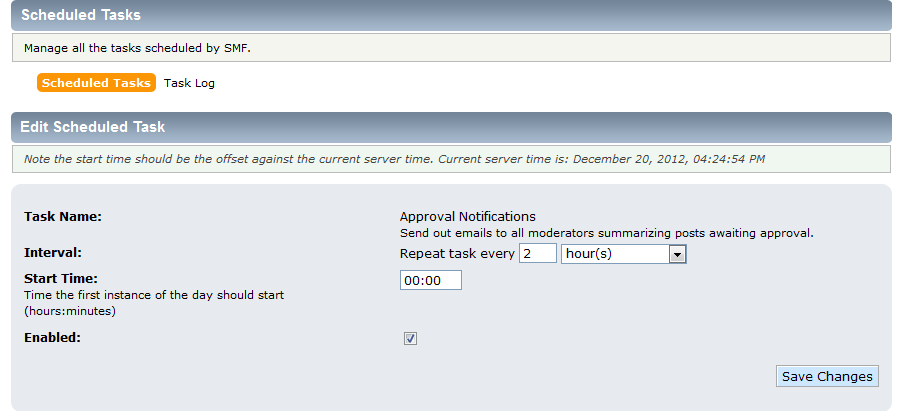
You have the ability to edit certain features of your scheduled task, such as its run frequency. To do so, simply follow the instructions above for navigating to the Scheduled Task list. Once there, find the task you want to work with and click on its name. In our example, we will edit the Approval Notifications task. There are three settings to modify for each task.
| Interval | This is where you can change the frequency your script is activated. You can choose from minutes, hours, days, and weeks. |
|---|---|
| Start Time | Enter the time you wish for the script to initially run. It will then run again according to the Interval above. |
| Enabled | Checkbox to enable or disable the scheduled task. |
Viewing and clearing the Task Log
Once you navigate to the Scheduled Task list, you can select the Task Log from the page menu. This will bring you to the Task Log viewing list where you can see the chronological list of the tasks that have run beginning with the most recent. If there are too many tasks listed for one page, you will see page navigation links as well so you can view a more tasks.
If you wish to clear the log and begin again, you can simply click on the Empty Log button located at the bottom of the page.