
Strong passwords protect your ownCloud server against unauthorized users. An aggressive ownCloud antivirus solution prevents authorized users from uploading malicious files. The free Anti-Virus app integrates ownCloud with ClamAV, a popular Linux antivirus application, on the same server or an external system.
Install the ownCloud Antivirus App
The following steps cover how to install the ownCloud app from within the dashboard as an administrator.
- Log into ownCloud and install the Anti-Virus app.
- From the settings page, under Admin, select Security.
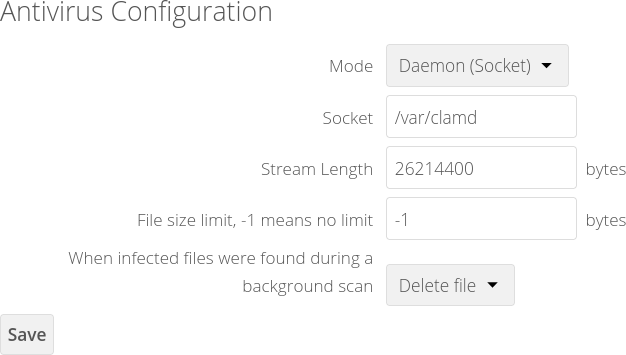
- Scroll down to the Antivirus Configuration section to make necessary changes. Read the following sections for configuration information.
If the app is misconfigured, it will reject all uploads.
- We recommend changing the drop-down option for When infected files are found during a background scan to Delete file.
- Select Save at the bottom.
- Attempt to upload a file to test your setup. If there is an issue, a notification at the top of the page will state “[signature] is detected in the file. Upload cannot be completed.”
We recommend using the EICAR Standard Antivirus Test File for reassurance. It is a benign text string specifically created to trigger a false positive response (falsely states a virus is present) for testing purposes. It is not malicious. To do this, visit https://www.eicar.org/?page_id=3950 and read the entire page. - After you’ve read everything, add the alphanumeric text string from the EICAR page to a new text (.txt) file.
- Attempt to upload the text file to ownCloud. A pop-up at the top of the page should state “Virus Eicar-Signature is detected in the file. Upload cannot be completed.” If so, you now know your AV solution works. If not, recheck your configuration using the information below.
You can select Advanced to create rules for scanner results.
Prepare ClamAV
As stated in the beginning, you’ll need the ClamAV malware scanner installed on the server or an external system and able to receive scan requests from ownCloud. ClamAV can be installed on Linux (CentOS, Ubuntu, Gentoo, etc.), Windows, macOS, and BSD. There’s also a ClamAV plugin for cPanel.
You should ensure the server running ClamAV has the resources available to handle scan requests before continuing. If you have doubts about this, or your hosting account has exceeded resource limits recently, you should implement website speed optimization methods first including a content delivery network (CDN) and firewall.
Configure ownCloud Anti-Virus
ownCloud Antivirus lists three scanning modes: Daemon (Socket), Executable, and Daemon. The best option for you depends on whether your ClamAV installation resides on the same server as ownCloud or a separate server.
ClamAV on the Same Server – Daemon (Socket) or Executable
Daemon (socket) is the recommended method for using ClamAV on the same server. It is less resource-intensive compared to the executable mode. The Socket path should match the file path to clamd. One way to find this information is to SSH into your server and run the netstat terminal command:
netstat -a | grep clamd
The file path is at the end:
unix 2 [ ACC ] STREAM LISTENING 1754490 /var/clamdYou must have ran freshclam (for updates) at some point for ClamAV to generate the socket.
Executable for the same server uses clamscan, is slower, and demands more resources compared to the daemon (socket) mode. But it does allow you to combine additional commands to the security scan. This option allows you to quarantine files and easily develop scripts to notify key personnel for further action.
With this option, your Path to clamscan must match the clamscan file path. There are a few ways to find this via SSH:
locate clamscan
find / -name clamscan
The default file path for clamscan on a cPanel-managed server with the ClamAV plugin:
/usr/local/cpanel/3rdparty/bin/clamscan
The default file path for clamscan on a Linux cloud server:
/usr/bin/clamscan
If the Path to clamscan in ownCloud is wrong, you must change it in the ownCloud config/config.php file using SSH, cPanel, or another method. The line to change will state 'files_antivirus.av_path' => '/usr/bin/clamscan'.
ClamAV on a Remote Server – Daemon or Daemon (ICAP)
Daemon sends ownCloud scan requests to ClamAV on a remote server. You’ll need the Host (server hostname or IPv4 address) of that server and the Port number ClamAV is configured to listen on. The clamd.conf file on the remote server must also be configured for external requests as this isn’t enabled by default.
- Find your ClamAV configuration file in the terminal:
locate clamd.conf
- Edit the file with Nano, Vim, or another text editor as user root.
- Remove the “#” before
TCPSocket 3310to enable listening for requests. - Change the port number to an unused port if desired or another application is already using port 3310.
- Exit and save changes.
- Permanently open the port in your firewall – Advanced Policy Firewall (APF), ConfigServer Security & Firewall (CSF), Firewalld, etc.
- Restart Apache web server. CentOS:
service httpd restart
Debian:systemctl restart apache2
Daemon (ICAP) allows you to integrate other AV scanners including Kaspersky and McAfee using the Internet Content Adaptation Protocol (ICAP). Read ownCloud Antivirus documentation for more information.
Looking for other improvements after an ownCloud security audit? Add a strict password policy.
Learn more from our ownCloud Education Channel.