As a photographer, there are many choices that one can make in order to create a website. One of most popular choices to create a website on the internet is the freeware known as WordPress. This tutorial will show you how to easily create a website to display photographic images using a WordPress installation with the default Twenty-fourteen theme using only a few plugins.
1 – Installing and Modifying WordPress
The first step in the process will be to install WordPress. If you are an InMotion Hosting customer, then this can be quickly and easily done using Softaculous. If you intend to make extensive changes to the theme layout, then we also suggest that you create a child theme.
2 – Plan and Modify the Images to Be Used for Your Website
Today’s modern digital cameras can produce images that are quite large in size. In most cases, cameras are producing images that are even beyond HD resolution (1920×1080 pixels). These large image sizes are not suitable for display on a website due to two main factors: 1)The monitor screen is not that large, and 2)Loading an image that size would take too long. You want your website visitors to be able to see the entire image easily and not have to wait for the image to load. The experience of viewing your website should be one where they’re concentrating on the images you have created. If it takes too long, you’ll lose your viewers.
If you are a photographer and you want to use WordPress to display your images, plan on having a work flow that involves optimizing your images for use on the web. This will mean using your camera or a photo editing software to modify the images so that they are appropriate for the web before you upload them to your website. Your image sizes may vary depending on the type of photos that you are taking. For example, panoramic views are typically very large shots and may require additional editing for use on the web. You will need to work with your images in order to determine what works best for your work. A good rule of thumb for website image resolution is to use 72 dpi (dots per inch). Check out Working with Images for your WordPress PortFolio Website for further details.
Protecting your Images with a Watermark
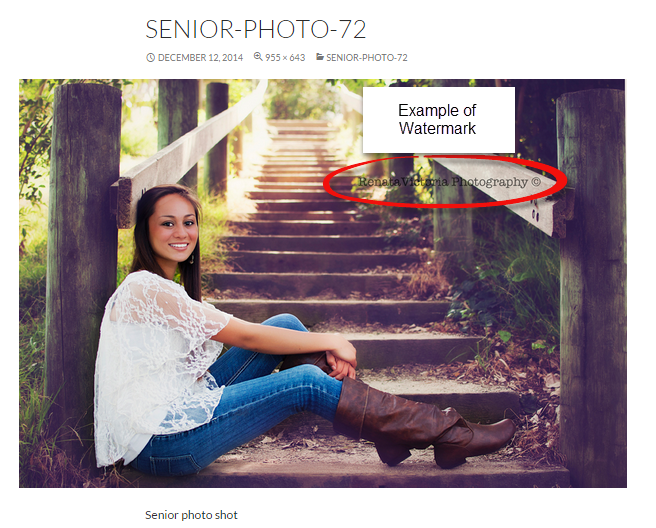
One of the concerns photographers have with putting their images on the web is being able to get credit for their work and proving that the image was a result of their work. This is often done through the use of a watermark. The watermark is simply a mark or symbol that is placed in the image to identify the image as the photographer’s intellectual property. There are several ways to add watermarks, but you may want to review the tutorial for Smart Watermark plug-in. You can also do this with a photo editing software such as Adobe Photoshop. If you are not adding the watermark through a WordPress plug-in, then you should make sure to add this to your work flow in processing your image before it is uploaded to the website server.
3 – Uploading your Images
Once your images have been modified for use on your website, you will want to upload your images. WordPress makes this easy with the Media library:
- Login to your WordPress Administrator dashboard.
- In the menu on the left, hover over Media. You can click on either the Library or Add New option. If you click on Library, you simply have to click on Add New at the top of the page to add your image files.
- The Add New option will open a portion of the screen with a message that says Drop files anywhere to upload, or you can click on the button labeled “Select files”. Note the Maximum upload file size. Anything larger than that size can not be uploaded.
- After you have finished selecting the files to upload, click on the button labeled Open. This will upload the files into the media library.
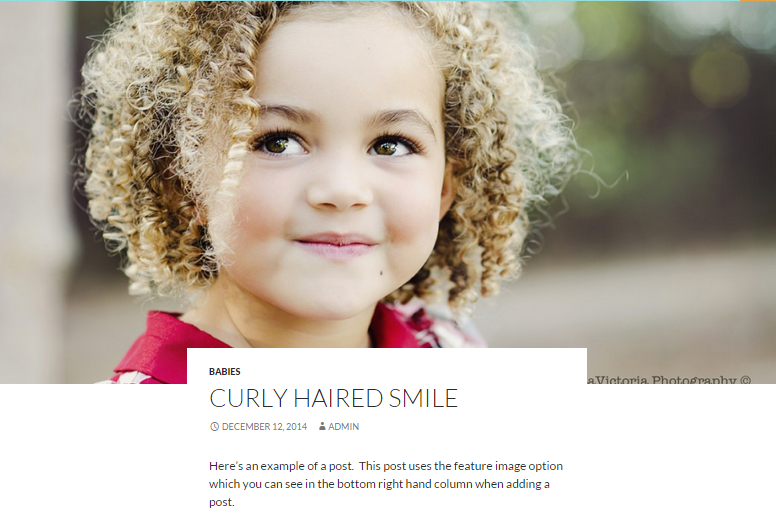
After you have completed uploading your pictures, make sure to take the time to label or describe your pictures with a title, caption, alt text and description. This is can be done by simply going to your media library and clicking on each image.
4 – Create Galleries
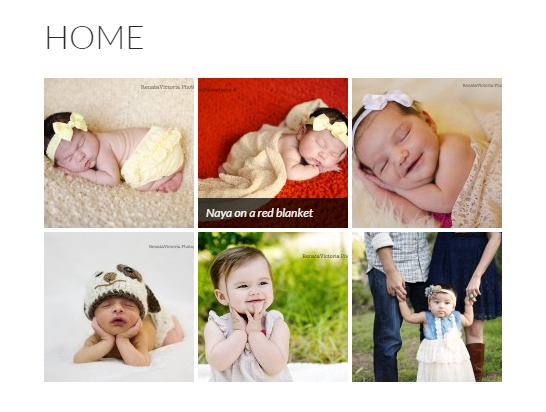
After you have completed uploading your images, your next step will be to start creating your galleries. This tutorial concentrates on simply creating galleries through pages and posts, but if you wish to add a narrative, it is also easily done through the pages and posts. WordPress provides the functionality of adding a gallery without requiring a plug-in. For more information, see Create a Simple Gallery in WordPress without a Plug-in.
Removing the Comments/Leave a Reply Option
A very common request from photographers and other users of WordPress is how to remove the comments and reply options in each post. WordPress was originally developed as a blog software, so its focus was on user interaction. However, it is very common where a photographer trying to use WordPress simply wants a clean page showing only their images. This can be done, but it requires that you edit a few files within the WordPress theme. The following steps will guide you through the process of removing the comment and leave a reply link within each post. These edits can be done using any text editor, but the tutorial shows you how to do it within the WordPress Administrator.
- Login to your WordPress Administrator dashboard.
- In the menu on the left hand side of the screen, use your mouse and hover over Appearance.
- You will see a text editor with a list of templates on the right hand side. Click on Comments (comments.php) to the right. This will open the comments.php file for editing.
- The easiest way to remove all of the comment options is to simply comment all of the code in the file. This way, you can easily re-establish the comment options if you require it in the future. A comment starts with “/*” and ends with “*/”. Type in the “/*” at the very top of the file, then close the comment with the “*/” at the very end of the file.
- Click on Update file at the bottom of the editor screen to save your changes.
- Next, we will remove the “leave a reply link” from each post. This is done by editing the Styles.css file. Scroll down the list of the files on the right hand side until you reach the bottom. You will see the file under Styles labeled Stylesheet (style.css). Click on this file to edit it.
Scroll to the very bottom of the style.css file. Look for the “}” (bracket) symbol. You will need to add the following code immediately above the last bracket:
} .comments-link {display:none} }- Click on Update file at the bottom of the editor screen to save your changes.
If at any time you want to return the comment or leave a reply link options, then simply go back into these files and remove the changes detailed above. You should also go into the Settings menu and remove comment options from the Discussion menu options.
5 – Building your other WordPress Pages
The other pages and sections of your WordPress site will depend on how you want to build your website. You can add a menus, pages, and footers. For example, you can add contact information in the side bar, or in the footer. You could also easily add updates using posts that include pictures. WordPress makes it very quick and easy to add or modify elements within your website. For a lot more information on using WordPress, check out our WordPress Education channel.
Summary
This completes the tutorial on creating a simple image portfolio for photographers using WordPress. The methods described above attempt to keep changes to the WordPress interface to a minimum. Only the default theme and a base installation are required to quickly create a WordPress site for displaying images. WordPress functionality can also be extended using various plug-ins and themes. Find the ones that work best for you and let WordPress take care of your portfolio needs.
Special thanks to Renata Victoria Photography for graciously providing her beautiful images for this tutorial.

I am using Prophoto on my WordPress website https://www.*******.com… and blog https://www.*******.com …. The combination of the three works a charm!