Customizing your community site can set you apart from other sites that use the default setup. You may want to replace your title with your own custom or company logo. This article explains how to replace the ehader title with your own logo using the SMF administrative dashboard.
How to edit your logo in SMF
- Log into your SMF admin dashboard.
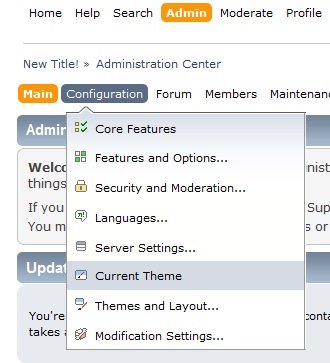
- From the entry page, click Admin from the upper menu. When the second menu appears just below the first, hover over Configuration and click on Current Theme from the popup submenu.

- This brings you to the Theme Settings page for your current theme. Look for the section named Theme Options and Preferences and then the Logo Image URL field. Enter the full URL for the logo image based on where you uploaded it. For example, we uploaded the test logo into the root directory for our smf.inmotiontesting.com site, so the full URL is https://smf.inmotiontesting.com/newlogo.png

- After entering the full URL for the image, scroll to the bottom of the page and click on the Save button. The before and after shows that our previous title, InMotion Testing has been replaced with our new logo image.
Before After 


you didn’t mentioned the smf standard logo size. please guide with a standard logo size that fits on desktop and mobile.
There’s no standard logo size since SMF does not really limit this, but I found a helpful post on the official adobe site that mentions the following for “horizontal layouts”:
250px by 150px
350px by 75px
400px by 100px
And the following for “header images”:
160px by 160px